Complete series source code can be downloaded from GitHub.
Introduction
In the last chapter of section 4, we will take our journey to Station 8.
In this lab, we will add authentication to the project created in the previous lab.
After completing this lab, only authenticated users will be allowed to access the CustomerComponent.
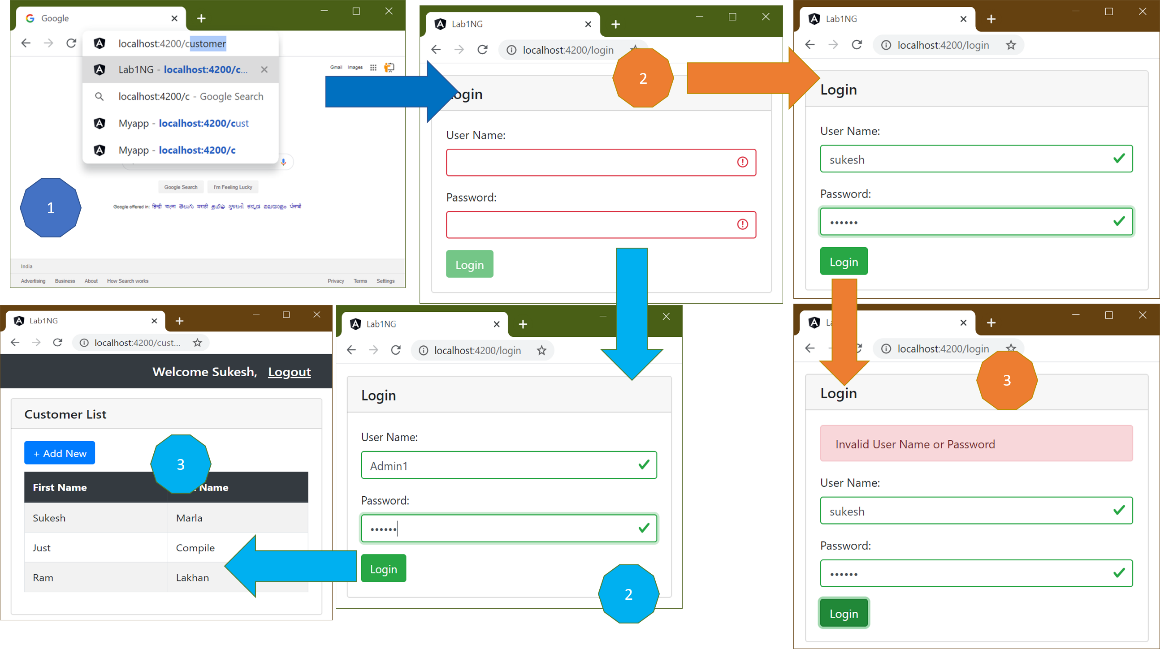
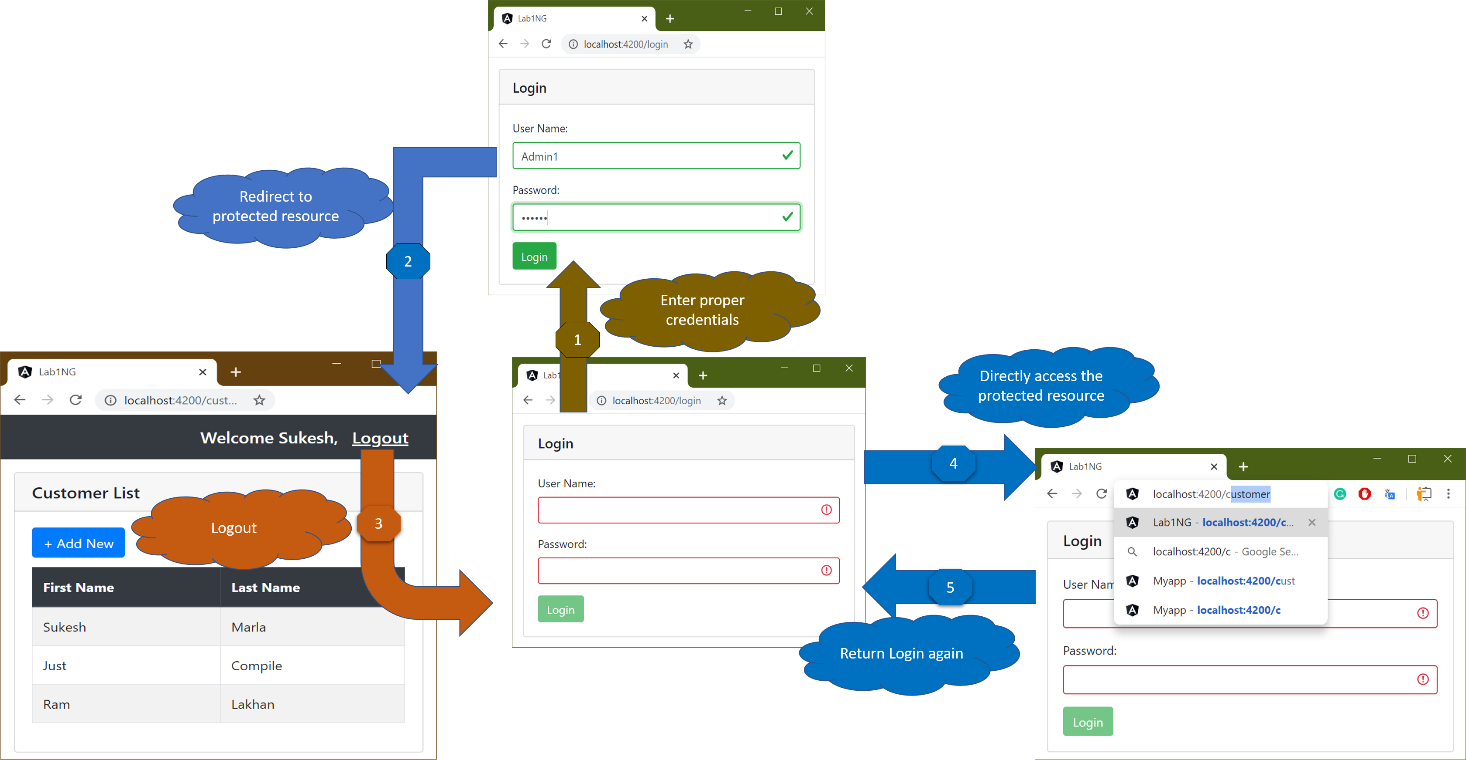
Here is the preview of what we will get by the end of this lab.
Complete series (Index)
— — — — — — — — — — — — — — — — — — — — — — — — — —— — —

— — — — — — — — — — — — — — — — — — — — — — — — —
Lab 3 – Angular Authentication
Step 1 – Create a copy of the project
Create a backup of your last project and rename it to lab3-ng.
Step 2 – Create a Login Component
Create a new folder Login inside the app folder and create a new Angular Component Login as follows.
//login.component.ts
import { Component } from '@angular/core';

@Component({
  selector: 'login',
  templateUrl: './login.component.html'
})

export class LoginComponent {

}


<!-- login.component.html -->

<div class="container-fluid pt-3">
  <div class="card">
    <h5 class="card-header">Login</h5>
    <div class="card-body">
      <div class="form-group">
        <label for="UserName">User Name: </label>
        <input class="form-control" type="text" name="UserName">
      </div>

      <div class="form-group">
        <label for="Password">Password:</label>
        <input class="form-control" type="text" name="Password">
      </div>
      <input type="button" class="btn btn-success" value="Login">
    </div>
  </div>
</div>
Step 3 – Add Component to Module
I don’t think I need to repeat, “Every Angular Component belongs to an Angular Module.”
Let’s add our LoginComponent to the AppModule.
......

import { CustomerComponent } from './Customer/customer.component';
import { LoginComponent } from './Login/login.component';

@NgModule({
declarations: [AppComponent, CustomerComponent,LoginComponent],
imports: [BrowserModule, FormsModule],

......
Step 4 – Display Login Component
Now open app.component.html and replace CustomeComponent with LoginComponent.
<!-- <customer></customer> -->
<login></login>

Step 5 – Check the output
Execute the application if not done already using the ng serve –open command.
Discussion
The last time when we had input controls, we followed a template-driven approach. This time we will follow the model-driven approach, also known as the reactive approach.
Lab – Continued
Step 6 – Prepare the LoginComponent class for validation
Validation in the reactive approach involves two steps.
- Creating a FormGroup
- Creating FormControls inside FormGroup
Change the code in the LoginComponent class to the following.
import { Component } from '@angular/core';
import { FormGroup, FormControl, Validators } from '@angular/forms';

@Component({
selector: 'login',
templateUrl: './login.component.html'
})

export class LoginComponent {

loginForm = new FormGroup({
UserName: new FormControl('',[Validators.required,Validators.minLength(6)]),
Password: new FormControl('',[Validators.required,Validators.minLength(6)]),
});

}
Please note: Every FormControl property in the above code represents one control in our UI (template), and you can notice that validations are mentioned in component class instead of template.
Discussion – Continued
In the model-driven approach, we will use the directives such as formGroup and formControlName to deal with form controls. Both of these directives are declared as part of an Angular module ReactiveFormsModule.
Hence to make these directives accessible in CustomerComponent, we have to import ReactiveFormsModule in AppModule.
Step 7 – Import ReactiveFormsModule
Get access to ReactiveFormsModule inside app.module.ts by importing from @angular/Forms.
import { NgModule } from '@angular/core';
import { FormsModule, ReactiveFormsModule } from '@angular/forms';
import { BrowserModule } from '@angular/platform-browser';

......
Next, specify it in the imports section of the @NgModule decorator attached to AppModule.
......

import { CustomerComponent } from './Customer/customer.component';
import { LoginComponent } from './Login/login.component';

@NgModule({
declarations: [AppComponent, CustomerComponent,LoginComponent],
imports: [BrowserModule, FormsModule,ReactiveFormsModule],
providers: [],

......
Step 8 – Binding FormGroup in Template
Now that our component class is ready with the FormGroup instance let’s connect our template to the same using formGroup and formControlName directive.
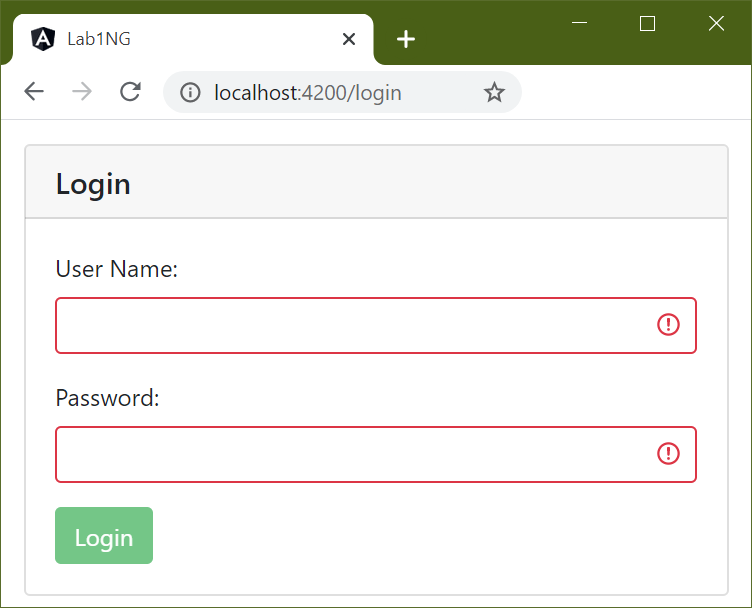
<!-- login.component.html -->

<div class="container-fluid pt-3">
  <div class="card">
    <h5 class="card-header">Login</h5>
    <div class="card-body" [formGroup]="loginForm">
      <div class="form-group">
        <label for="UserName">User Name: </label>
        <input class="form-control" formControlName="UserName" type="text" name="UserName">
      </div>

      <div class="form-group">
        <label for="Password">Password:</label>
        <input class="form-control" formControlName="Password" type="text" type="password"
name="Password">
      </div>
      <input type="button" class="btn btn-success" value="Login" >
    </div>
  </div>
</div>
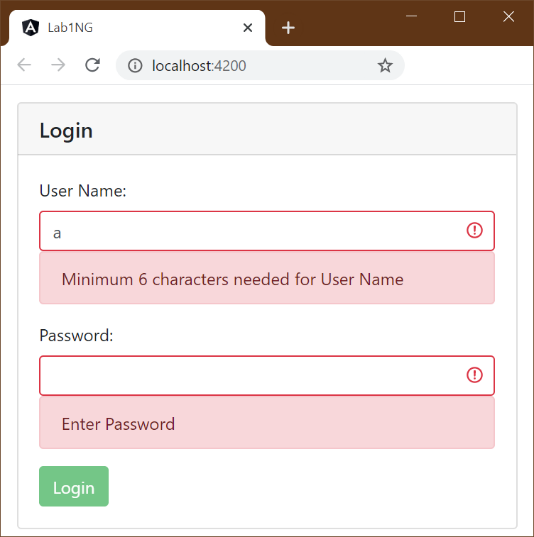
Step 9 – Set up the validation
Now, just like the last lab, let’s set up validation messages using the following code.
<!-- login.component.html -->

<div class="container-fluid pt-3">
  <div class="card">
    <h5 class="card-header">Login</h5>
    <div class="card-body" [formGroup]="loginForm">
      <div class="form-group">
        <label for="UserName">User Name: </label>
        <input class="form-control"
        [ngClass]="{'is-valid':loginForm.controls.UserName.valid,'is-invalid':loginForm.controls.UserName.invalid}"
        formControlName="UserName" type="text" name="UserName">
        <div class="alert alert-danger"
        [hidden]="!(loginForm.controls.UserName.dirty && loginForm.controls.UserName.errors?.required)">
          Enter User Name
        </div>

        <div class="alert alert-danger" [hidden]="!(loginForm.controls.UserName.dirty && loginForm.controls.UserName.errors?.minlength)">
          Minimum 6 characters needed for User Name
        </div>
      </div>

      <div class="form-group">
        <label for="Password">Password:</label>
        <input class="form-control" formControlName="Password" type="password"
name="Password">
        <div class="alert alert-danger"
        [hidden]="!(loginForm.controls.Password.dirty && loginForm.controls.Password.errors?.required)">
          Enter Password
        </div>
        <div class="alert alert-danger" [hidden]="!(loginForm.controls.Password.dirty && loginForm.controls.Password.errors?.minlength)">
          Minimum 6 characters needed for Password
        </div>
      </div>
      <input type="button" class="btn btn-success" value="Login" [disabled]="loginForm.invalid" >
    </div>
  </div>
</div>
It looks like a template-driven approach, but note that validation decision is taken care of by component class.
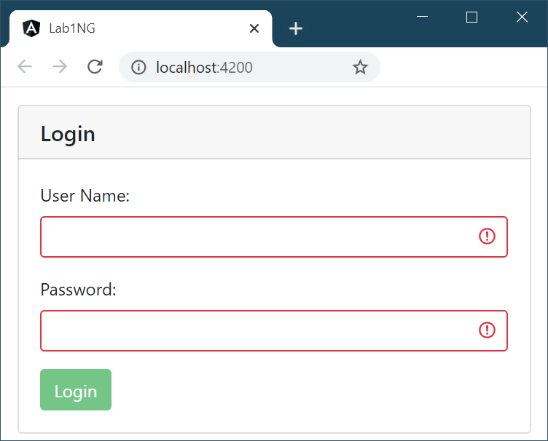
Step 10 – Check the output
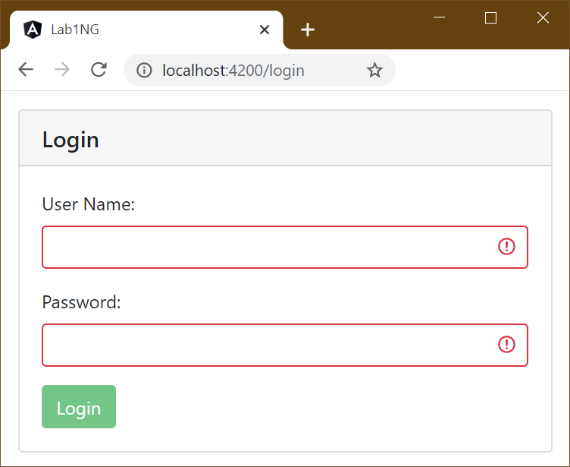
Execute the application and put invalid values.
Now, put the valid values.

Step 11 – Configure Invalid Login
Before connecting to a real REST API and doing authentication, let’s configure our “Invalid User Name or Password” message properly.
First, define the IsAuthenticatiionFailed variable in the component class and set it to false in the constructor.
......

IsAuthenticatiionFailed: boolean;
constructor() {
this.IsAuthenticatiionFailed = false;
}

......
Handle the login event as follows.
......

          Minimum 6 characters needed for Password
        </div>
      </div>
      <input type="button" class="btn btn-success" value="Login" (click)="login()"  [disabled]="loginForm.invalid" >
    </div>
  </div>
</div>
Define the login method and set IsAuthenticatiionFailed to true.
......

  login() {
    this.IsAuthenticatiionFailed = true;
  }
}
Add error message on the top in the Login template as follows.
......

  <div class="card">
    <h5 class="card-header">Login</h5>
    <div class="card-body" [formGroup]="loginForm">
      <div class="form-group">
        <div class="alert alert-danger" *ngIf="IsAuthenticatiionFailed" >
          Invalid User Name or Password
        </div>
        <label for="UserName">User Name: </label>

......
Discussion – Continued
Did you notice *ngIf in the above code? Like *ngFor, it’s a structural attribute.
Unlike hidden, it will not hide or show elements. Instead, it will create and remove items from the DOM.
Step 12 – Check the output
As you can see, initially, it’s visible. Open developer tools and check the HTML in the elements section.
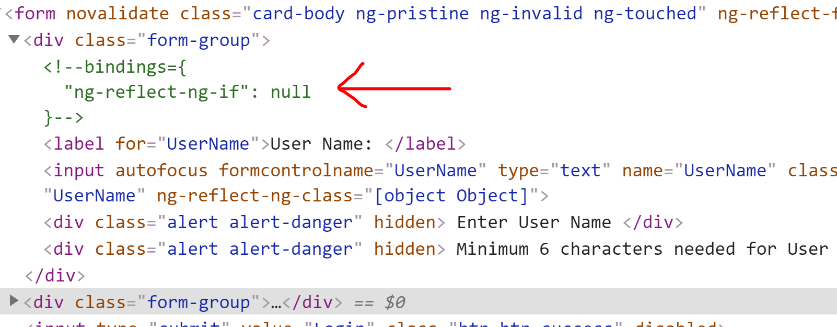
As you can see, the div element is not even rendered as IsAuthenticatiionFailed is false in the beginning.
Put some dummy values and click login.
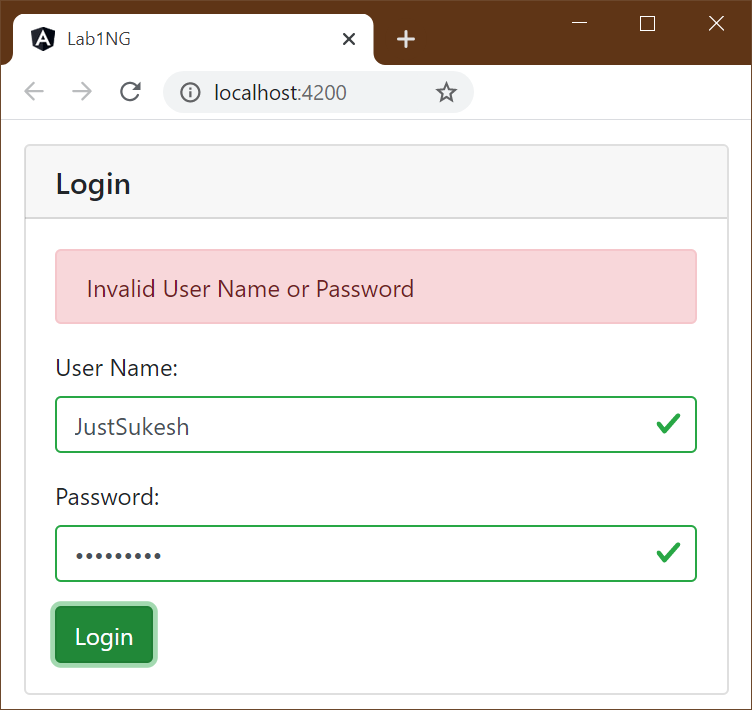
You can see the error message now. Let’s open the developer tools and see the changes.

As you can see, as the value is true, div gets created dynamically. If IsAuthenticatiionFailed is changed to false, it will again get removed.
Discussion – Continued
Now that we are ready with Initial UI stuff, including what should happen if credentials are invalid, the next question is, what should happen in case of valid credentials?
The definite answer should be – After successful login, we should redirect to CustomerComponent and maintain some state indicating that the user has authenticated.
It’s time to introduce a new Angular concept called Angular Routing.
Routing is a common terminology used in many technologies. The core idea behind it is displaying different things in UI based on different URLs. We provide some data to the routing engine; Using that data routing engine shows different things for diffent URLs.
Lab – Continued
Step 13 – Define Routes
First, create a folder in the app folder and call it Routes. Then create a file inside it app.routes.ts with the following code.
import { Routes } from '@angular/router';
import { LoginComponent } from '../Login/login.component';
import { CustomerComponent } from '../Customer/customer.component';

export const AppRoutes:Routes=[
{ path:'login',component:LoginComponent},
{path:'customer',component:CustomerComponent}
];
Isn’t the code is intuitive enough. We have two simple routes for now: when the URL is login, LoginComponent will be displayed, and when it is customer CustomerComponent will be displayed.
Step 14 – Import RouterModule
Now to configure routing in Angular, we need to import RouterModule in our AppModule
......

import { RouterModule } from '@angular/router';
import { AppRoutes } from './Routes/app.routes';

@NgModule({
declarations: [AppComponent, CustomerComponent,LoginComponent],
imports: [BrowserModule, FormsModule,ReactiveFormsModule
,RouterModule.forRoot(AppRoutes)],
providers: [],
bootstrap: [AppComponent],
})

export class AppModule {}
As you can see while importing RouterModule we have passed the our Routes to it.
Discussion – Continued
As you see, this time, the import is a little different. This time we have not mentioned the class names in the import section of the NgModule decorator. Instead, we invoked the forRoot method of the RouterModule class, passing our Routes object as a parameter. It will configure the routing in the application.
Where will these different components be displayed?
We configured the routes in the application specifying what component will be displayed for what URL, but the question is, at what location in the UI those Components will be shown.
That’s where an Angular component RouterOutlet comes into the picture.
RouterOutlet will act as a placeholder for other components.
Is it too much text, and Is it confusing you? Let’s jump to the lab and discuss it over there.
Lab – Continued
Step 15 – Add placeholder in AppComponent
In one of the previous steps, we replaced CustomerComponent with LoginComponent in AppComponent.
Now let’s remove everything with “router-outlet,” which is the selector of “RouterOutlet.”
<!-- <customer></customer> -->
<!-- <login></login> -->
<router-outlet></router-outlet>
Step 16 – Check the output
Switch back to the browser and append “/login” to the URL. You will get to see the Login Component.
Now replace “/login” with “/customer,” and you will see Customer Component.
Discussion – Continued
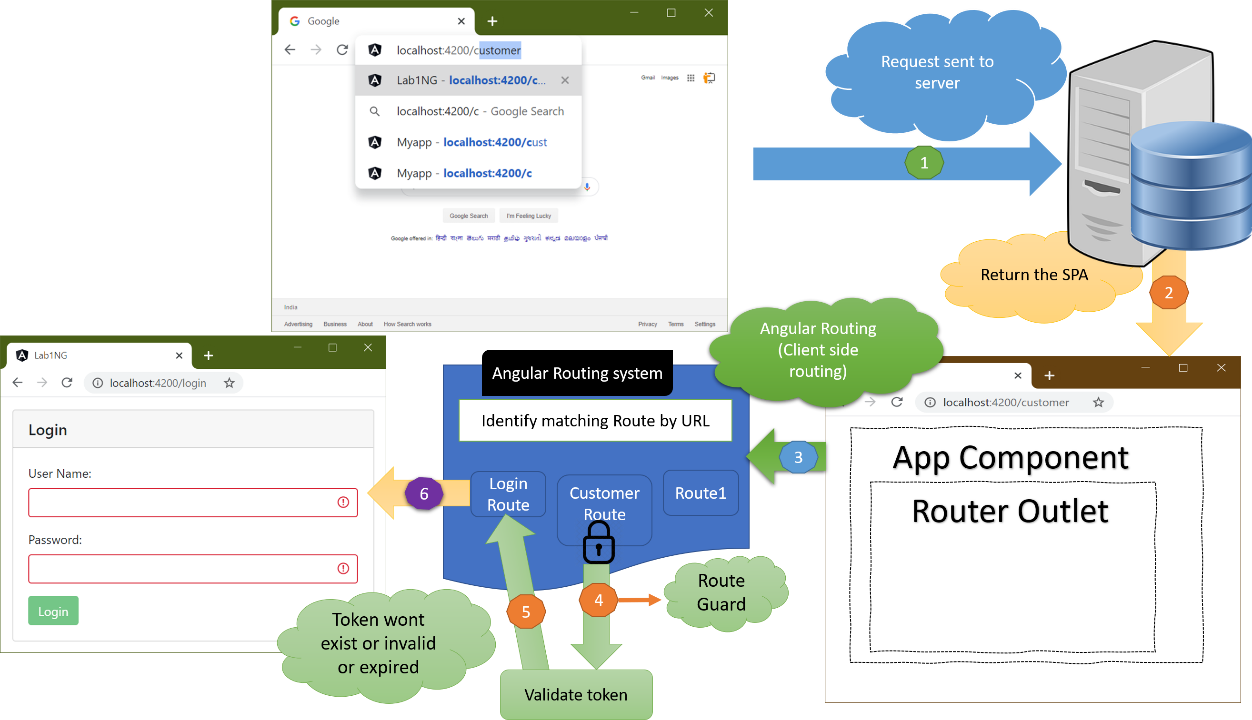
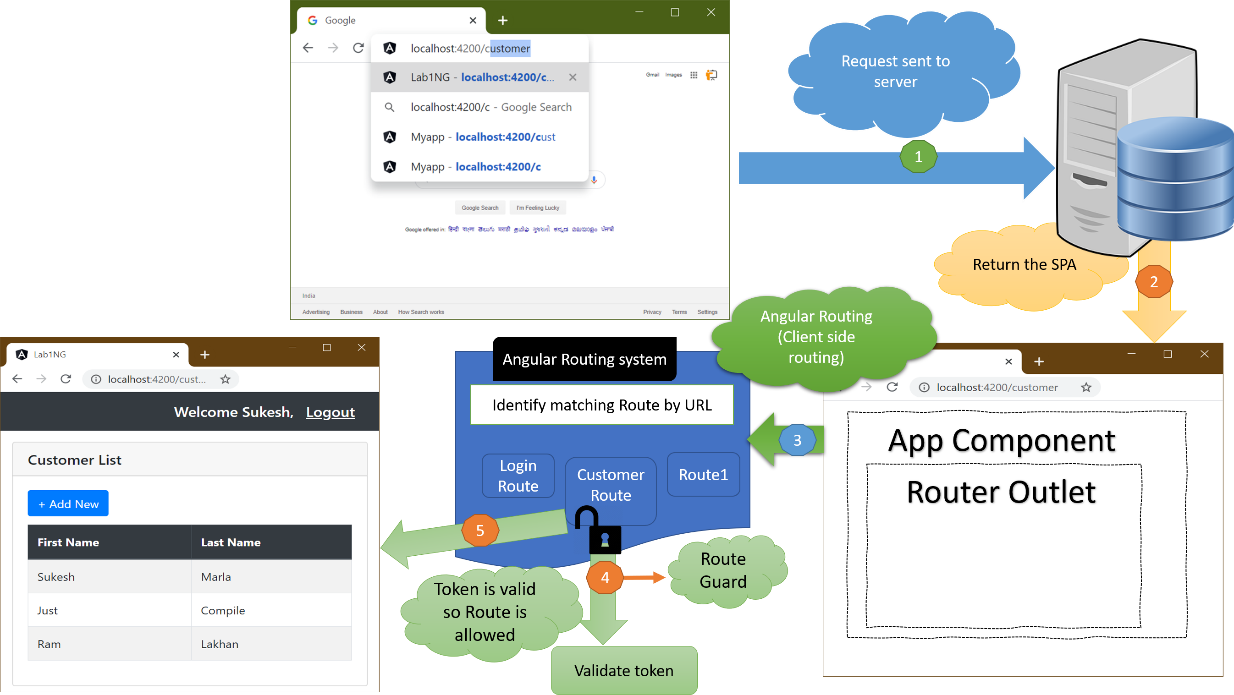
Let’s understand the entire flow.
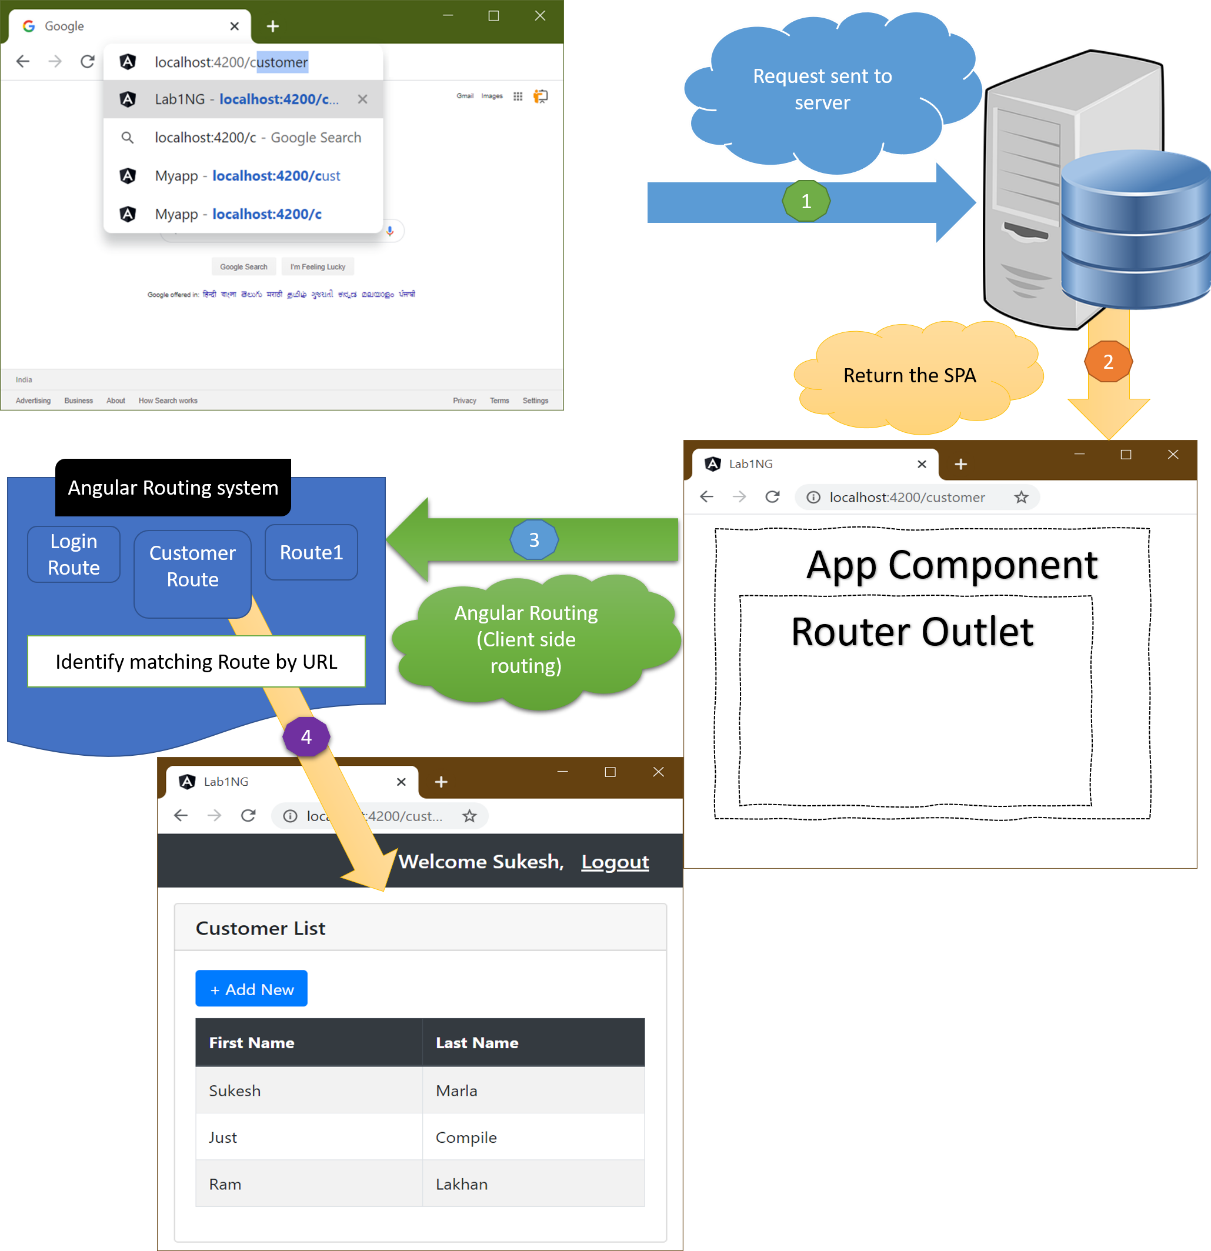
- In the case of Single Page Application, the first request will be sent to the Server. It will send the entire Single Page Application (some times partial) to the client.
- As routing is configured at the client-side, the Angular Routing system identifies the marching Route based on the URL.
- Based on the Route information, the appropriate Compone will be loaded into the UI.
Step 17 – Default Route
Did you notice output in the beginning? I mean, when URL was only http://localhost:[portnumber].
It was a pure white screen.
Let’s configure our Route to return Login Component in case of an empty path. For that, add more Route to our Route collection as follows.
......

export const AppRoutes:Routes=[
{ path:'login',component:LoginComponent},
{path:'customer',component:CustomerComponent},
{path:'',redirectTo:'login',pathMatch:'full'}
];
Discussion – Continued
You can skip this explanation. Not crucial for now. You can try it later.
When “pathMatch” is “full,” it means that the whole URL path needs to match and is consumed by the route matching algorithm.
When “pathMatch” is “prefix,” it means, the first Route where the path matches the start of the URL is chosen, but then the route matching algorithm is continually searching for matching child routes where the rest of the URL matches.
 Lab – Continued
Step 18 – Check the output
Switch back to browser and change URL to simple “http://localhost:[port number],” and you should see Login Component.
Step 19 – Check with some random string
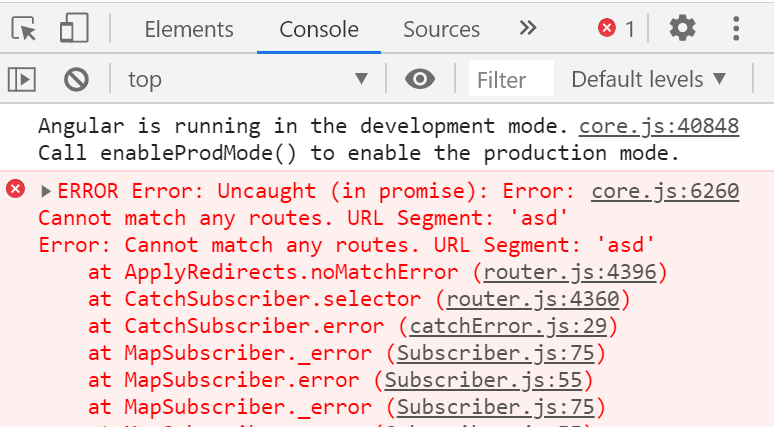
Now check the application with random string in URL. For instance, try http://localhost:[port number]/asd and check the output.
We will get a white screen.
Are you wondering what happened? Let’s check developer tools.
There is no Component matching with specified current URL patterns.
Step 20 – Define Invalid Route
Add one more Route to our Route collection as follows support invalid paths.
......

export const AppRoutes:Routes=[
  {path:'login',component:LoginComponent},
  {path:'customer',component:CustomerComponent},
  {path:'',redirectTo:'login',pathMatch:'full'},
  {path:'**',redirectTo:'customer',pathMatch:'full'},
];
Step 21 – Check the output
You will find that If anything other than “/login” or “customer,” it will redirect to Customer Component.
Discussion – Continued
We have finished our setup process, but we haven’t learned yet how to navigate. That can be done
Using the “Router” service.
We have seen Components, Directives, and Angular Modules. Now it’s time for Services.
Soon in this book, we will be creating our custom services, and at that time, we will discuss in more detail about services. For now, try to get as much you can and jump to the next step in the lab.
So let’s start with understanding what exactly a Service is?
Service is an Angular feature which represents the Injectable Application logic.
Let’s separate both words.
Application logic
It can be any application logic.
Example – It can be a logic, which will log messages somewhere, or it can be one that will help us communicate with external APIs, or it can be one that will help us create files in the Server, etc.
As a best practice in Angular Application, logics should not be written as a part of components. It should be moved into Services. We will create a custom Service for our Login Component very soon in this book and move all logic there.

Injectable
Look at the image on the right side.
A patient needs medicine.
That medicine is injected into his body by Doctor.
According to you, who is more knowledgeable with medicine, Doctor, or patient?
The answer is Doctor (unless the patient is also a doctor 😉)
Imagine if patients are supposed to be injecting themselves. Can you think of a problem? They may not realize the amount of medicine to be used with injection. They may forget to change the needle.
By letting doctors decided it, patience life becomes easy.
When a similar approach is followed in the programming world, its called “Dependency Injection.”
The dependency will be injected into various parts of the application externally.
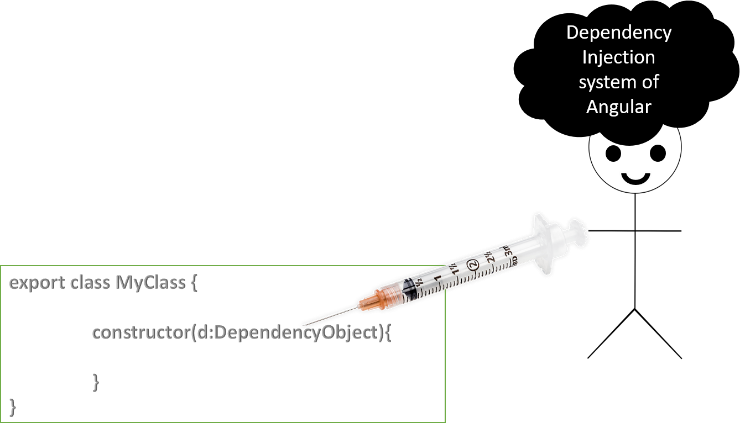
The one who needs the object will not initialize the object; instead, it will only declare it, and the framework will initialize and inject the object at runtime.
In this case, the framework which will do this injection work is our Doctor. The needy part in the application is patient, and medicine is the object which the patient needs.
Angular has inbuilt support for Dependency injection, aka DI and Angular services are injectable.
In short, we won’t create the instance of Angular Service explicitly. Instead, Angular will take care of the instantiation of the Service. Those service instances are injected wherever it is needed.
Still not very clear, Let’s get back to the lab. We will talk more about it once we start with our custom Service.
Lab – Continued
Step 22 – Get the reference of Router service
Modify the Login Component constructor as follows.
......

import { Router } from '@angular/router';

@Component({
selector: 'login',
templateUrl: './login.component.html',
})

......

constructor(private router:Router) {
this.IsAuthenticatiionFailed = false;

......
As you can see in the above code, we have not created the instance of Router Service explicitly. Instead, we only declared it as a constructor parameter.
Note: by putting private keyword to constructor parameter, we simply made it a Shorthand property.
Step 23 – Handle Login event
In the Login Component class, modify the Login method to the following.
......

  login() {
    if (
      this.loginForm.controls.UserName.value == 'Admin' &&
      this.loginForm.controls.Password.value == 'Admin'
    ) {
      this.router.navigate(['customer']);
    } else {
      this.IsAuthenticatiionFailed = true;
    }
  }

......
It’s a simple code. We are testing our credentials against some static values. If they are valid, we are redirecting to Customer Component or else simply show the “Invalid User Name or Password” error message.
Step 24 – Check the output
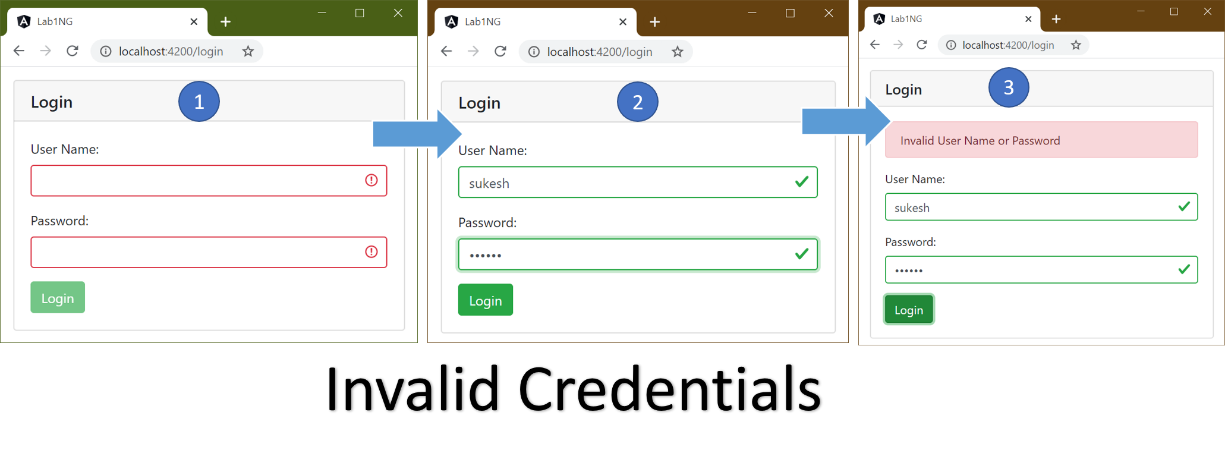
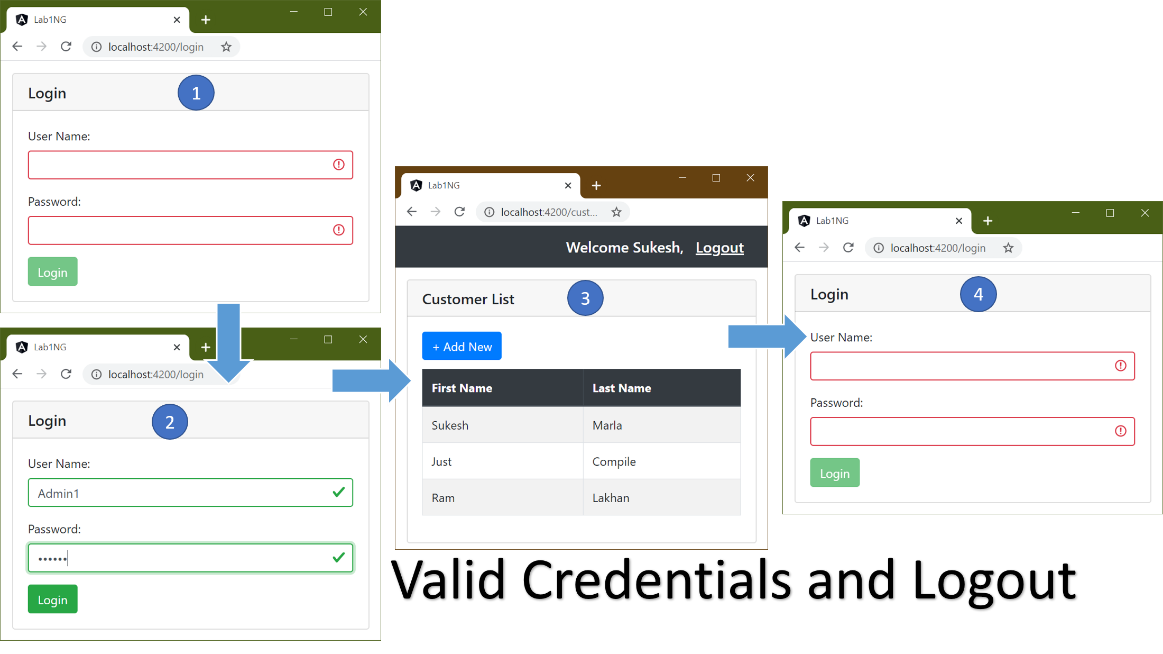
Go back to the browser and send a request to the “login” route. Put any credentials other than “Admin1”, “Admin1”, then click “login.” You should see the “Invalid User Name or Password” error message.
Next, put “Admin1”, ”Admin1” and try. You should be redirected to the Customer Component.
Step 25 – Implement Logout and greeting message for user
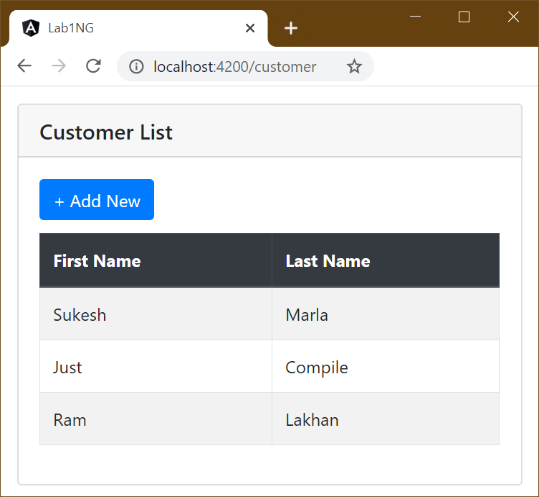
Add a log out link in the Customer Component template along with a greeting message as follows.
<nav class="navbar navbar-dark bg-dark justify-content-end">
  <span class="navbar-brand mb-0 h1">Welcome Sukesh,</span><a class="navbar-brand mb-0 h1 underline " href='/login' ><u>Logout</u></a>
</nav>

<div class="container-fluid pt-3">
  <div class="card" [hidden]="IsAddNew">
    <h5 class="card-header">Customer List</h5>
    <div class="card-body">

......

......
Step 26 – Check the output
Discussion – Continued
We have completed almost all the UI and navigation steps. Now, let’s get our Server (REST API) into action and do real-time authentication.
First of all, let’s understand how exactly authentication works in Single Page Application.
1 – Get the Authentication token from Server
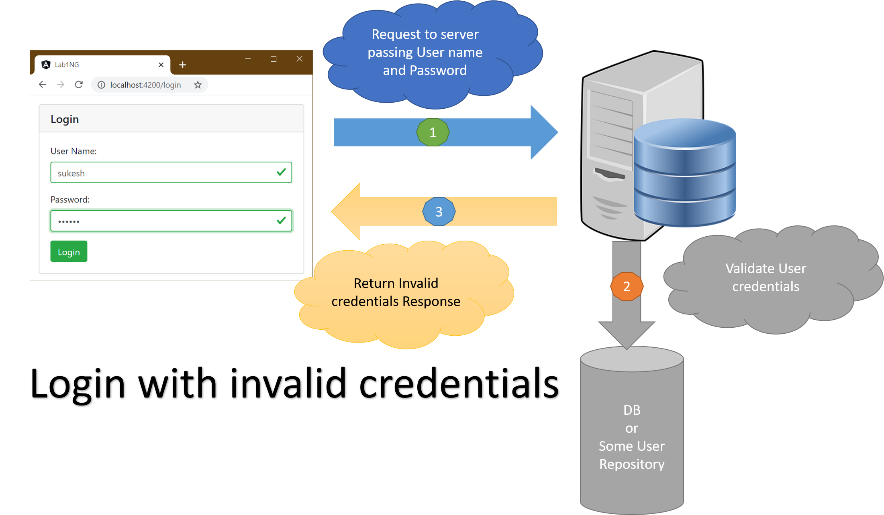
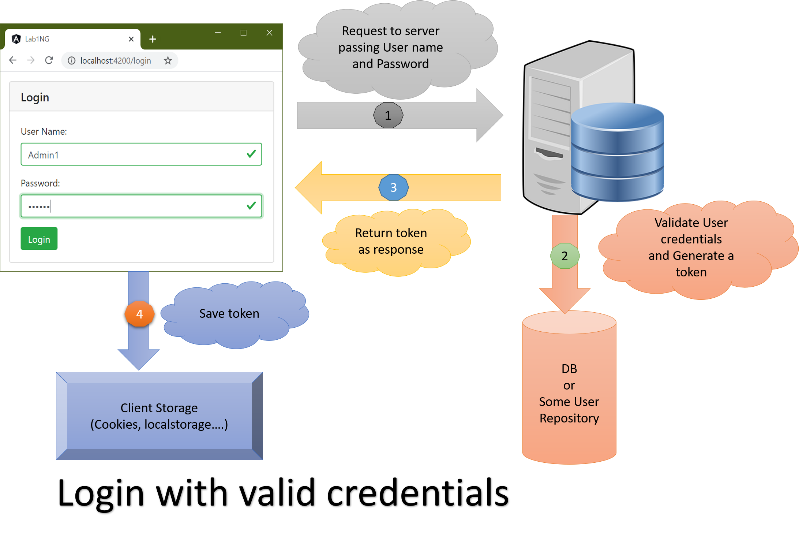
It starts with a getting token from a server. The Server will validate the credentials received from the client. If they are valid, then it will generate some token using some algorithm and return it as a response. That token will be persisted in some client storage for further usage.
In case of invalid credentials, some “invalid response” will be sent.
2 – Securing Routes at client side
The user will not be allowed to access secured Routes unless they have a proper token.
3 – Securing Server resources
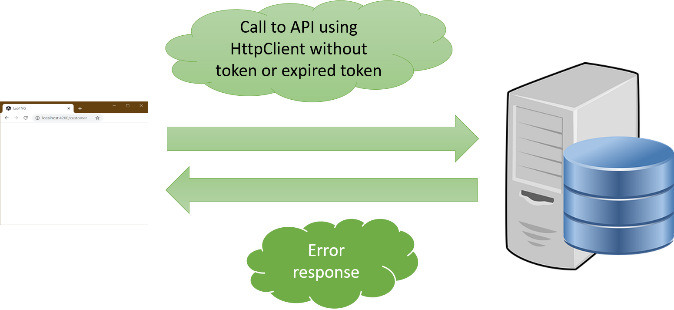
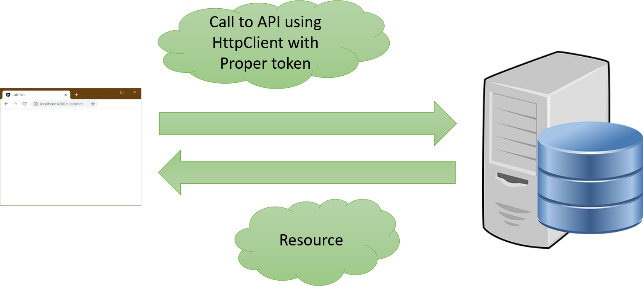
So far, using a REST API call, we got the Authentication token. That’s the only server call we had till now. A real-time application will have more API calls, such as very soon we will make REST call in Customer Component to bind the Customer list with dynamic data.
Soon you will see that too. The difference between these APIs and Authentication API will be security.
Authentication API will be accessible to everyone, whereas other APIs will be accessible to only authenticated users. Hence it is necessary that while doing REST calls, we pass token in headers to the Server. The Server will send back the response only if the token is valid or else return the error.
Don’t worry about it now. We will implement it very soon.
What is token in the above step?
It is a string value created by the Server Application and returned to the client. Token acts as the “ID card” for the client. The client sends that token with every subsequent request to the Server.
The Server validates the token and returns response only if the token is valid and not expired.
Please note – Generation and validation of token is the role of server technology. We will provide you a sample server code for testing purposes, but the detail of the Server will not be discussed in this book.
How to assure that the token is secured?
The first thing you need is the SSL, which makes sure that whatever is exchanged across the wire is encrypted. You have to configure SSL while hosting the Server and client application.
Secondly, it depends on the standard we follow for the token. The most used one is JWT, aka JSON web tokens.
The official definition of JWT is as follows.
“JSON Web Token (JWT) is an open standard (RFC 7519) that defines a compact and self-contained way for securely transmitting information between parties as a JSON object. This information can be verified and trusted because it is digitally signed. JWTs can be signed using a secret (with the HMAC algorithm) or a public/private key pair using RSA or ECDSA.”
As it is signed, it cannot be modified in between transfer by anyone.
Token also has an expiry period. The Server will consider token as an invalid token after the expiry period.
Are we going to create REST API?
We won’t build a REST API from scratch. We will provide you a development purpose only REST API, which will validate Username and password against some static values and then return the JWT token in response in case of a valid user.
Lab – Continued
Step 27 – Prepare the Server
Please follow the following step to get your demo server.
- Download the server code from my Github repository. It’s in chapter 11 folder.
- Launch the command prompt, navigate to the folder.
- Execute “npm install.”
- Now execute “node server.js.”
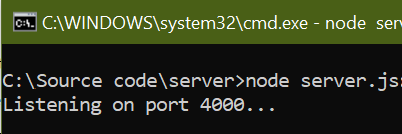
It will start the Server. Keep it running in the background.
Step 28 – Get Access to HttpClient service in Login Component
Get the reference of the “HttpClient” service in the Login Component with the help of the following code.
......

import { HttpClient } from '@angular/common/http';

@Component({
  selector: 'login',
  templateUrl: './login.component.html',
})

export class LoginComponent {

......

  constructor(private router: Router,private httpClient:HttpClient) {
    this.IsAuthenticatiionFailed = false;
  }

......
Remember, “HttpClient” is a service. It will be injected by Angular Framework automatically at runtime.
Step 29 – Check the output
You will notice that the application will stop working. Check the chrome developer tools for a reason.
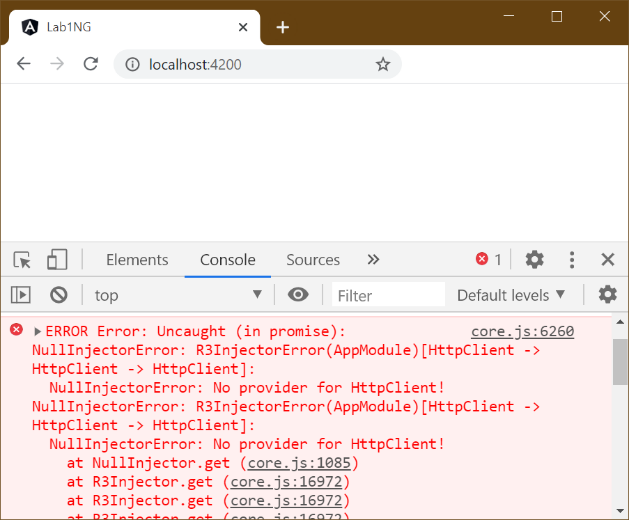
Let’s discuss this error.
Discussion – Continued
Every Component and Directive in Angular belongs to some Angular Module.
But what about the Services?
Services only work if Injectors are configured with providers.
What are Injector and Provider?
The Injector is the one who will create and inject an instance of Service wherever needed based on the provider configured.
We will talk about the Injector more in the next chapter.
A provider is an instruction to the Dependency Injection system of Angular Framework on how to obtain a value for a dependency.
How to configure Injector with the provider?
There are three ways to do it.
1. The Component decorator let us do that.
2. The NgModule decorator let us do that.
3. Using the Injectable decorator, we can do that.
4. Create an independent Angular Module and configure Injector in its NgModule decorator and then import that Angular Module in our Angular Module.
We will talk about all four approaches in this book. This time let’s look into the fourth one.
Custom Angular Module and import approach
The first three approaches are pretty simple and straight forward approaches. Forth one is a little strange. It is asking us to create a custom Angular Module, and then using the third approach, we will configure the Injector and finally import that Module in our Angular Module. When we import one Angular Module in another, their providers get merged.
Those modules are referred to as Service Modules. Just a naming convention.
You must be wondering why so long cut. Let me give you a scenario.
- Let say we have a Service X on which our component ABCD is dependent. To use Service X in the Component ABCD, we must configure Injector with the provider using one of the first three approaches.
- Now the surprise is, Service X is dependent on Service Y and Service Z. Hence configuring Injector only for Service X won’t be enough. We also need to configure it with the provider for Service Y and Service Z, and that’s true for every other dependency on which Service Y and Service Z are dependent.
Isn’t it too much work for consumers of the Service that is for component ABCD.
- Hence the programmer who creates Service X will create an Angular Module. Let’s call it ServiceModule.
- He will configure Injector with the provider for Service X and all other Services in the hierarchy in the NgModule decorator of ServiceModule.
- The programmer who will work on the ABCD Component will just import that ServiceModule in the Module, which holds the ABCD Component.
- Internally all the providers defined in the ServiceModule get merged with ABCD Component’s Module and thus makes developers life easy.
It’s a handy approach when it comes to using third party Services. Usually, whenever you thought about using some third-party service, you always find an Angular Module which needs to be imported in the target Angular Module.
Most importantly, let me tell you, this concept is not new to you. You already imported Browser Module in AppModule, which is responsible for configuring Injector for services needed for DOM manipulation.
Angular is able to all DOM manipulation operations after every actionAlso yo because of those Services.
Also, the same solution was followed by you when it came to RouterModule. It was imported in the AppModule, and so Injector was able to inject the instance of Router service in Customer Component.
Do we have a similar Service Module shortcut for HttpClient?
Internally, HttpClient Service is dependent on an Angular Service HttpInterceptingHandler, which is, in turn, dependent on HtppBackend and so on.
So registering Injector with the provider only for HttpClient won’t be enough. We also need to register for all other dependent Services.
Hence the Angular team has made our job easy by having the HttpClient Module. Simply import it in our App Module, and it will be done.
It is common to have some confusion in understanding the above query. Revisit it after completing the next chapter, and it will get brighter.
Lab – Continued
Step 30 – Import HttpClientModule in AppModule as follows
Add some code to AppModule as follows.
......

import { AppRoutes } from './Routes/app.routes';
import { HttpClientModule } from '@angular/common/http';

@NgModule({
  declarations: [AppComponent, CustomerComponent,LoginComponent],
  imports: [BrowserModule, FormsModule,ReactiveFormsModule,HttpClientModule
  ,RouterModule.forRoot(AppRoutes)],
  providers: [],

......
HttpClientModule is an Angular Module similar to AppModule, but it contains only registration of Services needed for HttpClient Service.
It makes those life easy who want to use HttpClient Service. Import one Module, and that’s it—no need to worry about dependencies and all.
Lab – Continued
Step 31 – Check the output
Finally, you will see zero error, but don’t expect any different output as we have not done anything other than getting the reference.
Step 32 –Invoke the API
Change the “login” method in the Login Component to the following code.
......

  login() {
    this.httpClient.post("http://localhost:4000/signin",this.loginForm.value)
    .subscribe((response:{Token:string})=>{
      if(response.Token==undefined){
        this.IsAuthenticatiionFailed = true;
      }
      else{
        this.router.navigate(['customer']);
      }
    });
  }
}
Discussion – Continued
Http calls in Angular returns “Observables.”
In the above code, “this.httpClient.post(……)” returns Observable.
I assume, in your web development experience, you must have seen “callbacks” while doing asynchronous programming in JavaScript world. Later, “Promise” came to the picture with more significant features. (You can check the comparison between two in ES6 feature chapter).
Angular uses “Rxjs” Observables for this purpose.
I believe you remember “Rxjs.” It is one of the libraries Angular Framework is dependent on.
Don’t get confused with Rxjs and ReactJS. ReactJs is different.
Secondly, Rxjs is not part of Angular. Its an independent library and can be used in other JavaScript-based applications as well.
Rxjs is a wast topic. Covering it in this book will not be possible. I strongly recommend you to learn rxjs, and it will make your Angular life a lot better. It’s not mandatory to learn Rxjs, but it’s better to learn it.
To get the result of the above API call, we need to subscribe to the observable, which we do in the next step.
Lab – Continued
Step 33 – Check the output
Test the applications for two set of values
- Any value – You will get the “Invalid Credentials” error.
- Try with user name as “Admin1” and password as “Admin1” or with user name as “Admin2” and password as “Admin2”. Both are valid credentials, and you will be redirected to Customer Component.
The bitter truth is, no matter what you put, you will always get “Invalid Credentials” in response.
Discussion – Continued
To understand the reason for the above problem, we need to debug our Angular Code.
It’s time to learn how to do it.
Fortunately, there is no much effort here.
Webpack used by the Angular CLI is configured to export source map files on the compilation.
Source map files are JSON files that contain information to map the transpiled code back to the source files.
As a developer, what should I do? How will I debug?
You won’t be doing anything extra. Everything is already configured.
For debugging, open developer tools. In the sources tab, where you usually see our JavaScript files, you will find a tree with a webpack as a tree item. Expand it, and then you will find a tree item with the name “.” inside which you will find your entire Angular Application source code. Open any TypeScript file and put breakpoints in a usual way.
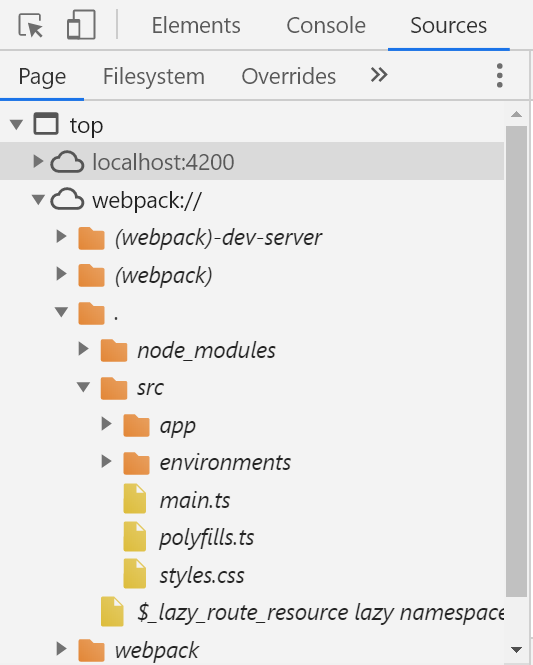
In the next step, we will debug the Login Component to identify the reason for our error.
Lab – Continued
Step 34 – Troubleshoot
Open developer tools in your browser and put a breakpoint in the login method of Login Component.
Next, put proper credentials that are “Admin1” as user name and “Admin1” as password and click “login” button and check the breakpoint.
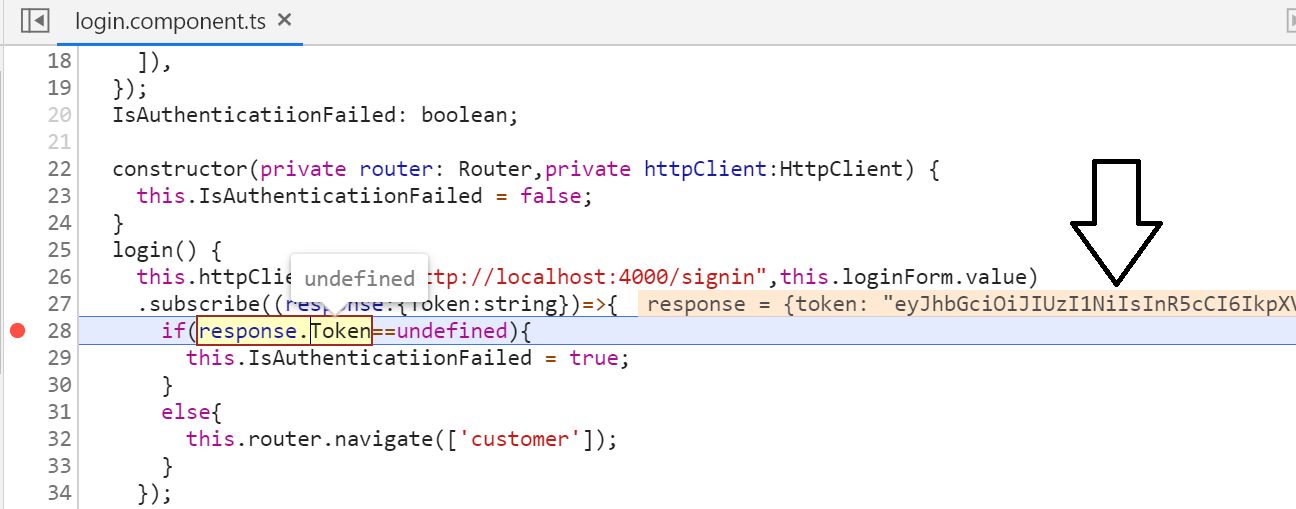
Are you able to identify the reason now? We are trying to read “Token” property from the response object where in reality, it has “token” property.
Step 35 – Correct the Login Component code.
......

    // .subscribe((response:{Token:string})=>{
    //   if(response.Token==undefined){
      .subscribe((response:{token:string})=>{
        if(response.token==undefined){
        this.IsAuthenticatiionFailed = true;

......
Step 36 – Check the output
Check the application for both invalid and valid credentials. This time you will get the expected output.
Discussion – Continued
Give yourself 5 to 10 mins and try to think about what is missing. (No cheating, don’t read next line. Start thinking 😉)
Did we really protect Customer Component from unauthorized access?
As of now, although we have Login Component communicating with real-time API, our application is not indeed protected. You can still access Customer Component without login.
To make it completely protected first, we have to persist the JWT token received from API call at client-side, then we have to protect the Customer Component Route from unauthorized access.
For persisting JWT token, we can use “local storage” at the client-side.
For protecting Route, we will introduce a new Angular concept, “Route Guard.”
Let’s finish on step 1.
Lab – Continued
Step 37 – Store the token
Modify the “login” method in Login Component to the following code.
......

login() {
    this.httpClient.post("http://localhost:4000/signin",this.loginForm.value)
    // .subscribe((response:{Token:string})=>{
    //   if(response.Token==undefined){
      .subscribe((response:{token:string})=>{
        if(response.token==undefined){
        this.IsAuthenticatiionFailed = true;
      }
      else{
        localStorage.token=response.token;
        this.router.navigate(['customer']);
      }
    });
  }
}
Discussion – Continued
What is Route Guard?
Angular’s route guards are interfaces that can tell the router whether or not it should allow navigation to a requested route. They make this decision by looking for a true or false return value from a class which implements the given guard interface
In our application, we need to protect the ‘customer’ Route from access in two scenarios.
- When the user is not logged in, and that means token won’t exist.
- When the user is logged in, but the token is expired.
Let’s start with the first point.
For that, we will use the “CanActivate” Route interface. We create the Guard by creating a class implementing this interface. If the guards return true, navigation will continue, and if it returns false, navigation will be canceled. Let’s see it in action.
Lab – Continued
Step 38 – Create AuthGuard
Create a new folder “Guards” in the “app” folder and then create a file “auth.guard.ts” inside it with the following content. For now, we will return “true.” Later we put the dynamic logic.
import { ActivatedRouteSnapshot, CanActivate, RouterStateSnapshot } from '@angular/router';

export class AuthGuard implements CanActivate {

  canActivate(route: ActivatedRouteSnapshot, state: RouterStateSnapshot) {
    return true;
  }

}
Step 39 – Attach Guard to Route
Next, attach the Route to Customer Component in the “Route.ts” file as follows.
......

import { AuthGuard } from '../Guards/auth.guard';

export const AppRoutes:Routes=[
  {path:'login',component:LoginComponent},
  {path:'customer',component:CustomerComponent,canActivate:[AuthGuard]},
  {path:'',redirectTo:'login',pathMatch:'full'},

......
Step 40 – Check the output
As of now, we don’t have any dynamic logic written. So, don’t expect any magic.
Switch back to the browser and enter http://localhost:[portnumber]/customer in the address bar.
Strangely, instead of getting the Customer Component, you will get a white screen.
Open the developer tools and check the error.

Discussion – Continued
Have you seen anywhere “AuthGuard” object explicitly created?
Like Services, RouteGuards are injectable. Angular DI system will create and inject the instance when needed.
AS I said before, “to get DI into action, we need to configure Injector with the provider.”
How will we configure Injector this time?
If you remember, sometimes back, we discussed three ways to configure Injectors.
They are Component, NgModule, and Injectable decorator.
We will explore all of them step by step in this book.
For now, try to understand that, “Route Guard instances need to be available globally and have to be a singleton. It means the only one instance needs to be created and maintained across the application.”
That can be achieved using the Injectable decorator.
Step 41 – Register the Route Guard
Attach “Injectable” decorator to the “AuthGuard” class as follows.
.....

import { Injectable } from '@angular/core';

@Injectable({providedIn:'root'})
export class AuthGuard implements CanActivate {

......
Step 42 – Check the output
You will see everything is back to work. Also, test the application by returning “false” from the “canActivate” method.
Step 43 – Add dynamic code in AuthGuard
It’s time to stop users from accessing Customer Component without proper login.
For that, modify AuthGuard to the following.
import { ActivatedRouteSnapshot, CanActivate, RouterStateSnapshot, Router }

from '@angular/router';

import { Injectable } from '@angular/core';

@Injectable({providedIn:'root'})
export class AuthGuard implements CanActivate {

  constructor(private router:Router){

  }

  canActivate(route: ActivatedRouteSnapshot, state: RouterStateSnapshot) {
    if(!this.isAuthenticated()){
      this.router.navigate(['login']);
      return false;
    }

    return true;
  }

  isAuthenticated(): boolean {
    const token = localStorage.token;
    return token!=null || token!=undefined;
  }

}
Spend some time and try to understand the code.
Step 44 – Implement Logout
Handle “logout” click in Customer Template as follows.
<nav class="navbar navbar-dark bg-dark justify-content-end">
  <span class="navbar-brand mb-0 h1">Welcome Sukesh,</span><a class="navbar-brand mb-0 h1 underline "
    href='/login' (click)="logout()"><u>Logout</u></a>
</nav>

<div class="container-fluid pt-3">
  <div class="card" [hidden]="IsAddNew">
Then defined “logout” method in the Customer Component class as follows.
  logout(){
    localStorage.clear();
  }
Step 45 – Check the output
Discussion – Continued
Although everything looks accurate in application, there is one major issue.
Did you notice a full page refresh on the “logout” click? If no, try now.
Unlike the “Login” and “Add” button is not doing a partial page update. Instead, it refreshes the entire page.
Well, that’s how anchor tag in HTML behaves, and I believe you know how to change the default behavior of HTML elements in Angular. It will be using Directives, and we have a perfect Directive for this purpose. It is the “RouterLink” Directive.
Step 46 – Change Logout template
Change the “logout” link in Customer Component as follows.
<nav class="navbar navbar-dark bg-dark justify-content-end">
  <span class="navbar-brand mb-0 h1">Welcome Sukesh,</span><a class="navbar-brand mb-0 h1 underline "
    routerLink='/login' (click)="logout()"><u>Logout</u></a>
</nav>

......
Step 47 – Check the output
Now you will get the output where “logout” won’t refresh the entire page.
Discussion – Continued
Next, let’s focus on the second point with regards to protecting Routes.
We have to stop navigation if the token is expired.
How to check if JWT token is expired?
We can achieve it with the help of a library called “@auth0/angular-jwt”. In the next step, you will see it in action.
Let’s understand it with some demo,
Step 48 – Install library for checking Token expiry
Using “npm” install “@auth0/angular-jwt.”
npm install @auth0/angular-jwt --save
Step 49 – Create IsExpired method
Create the “IsTokenExpired” method in the AuthGuard class as follows.
import { JwtHelperService } from "@auth0/angular-jwt";

......

  isTokenExpired():boolean{
    const helper = new JwtHelperService();
    return helper.isTokenExpired(localStorage.token)
  }
Next, change the “canActivate” method as follows.
......

  canActivate(route: ActivatedRouteSnapshot, state: RouterStateSnapshot) {
    if(!this.isAuthenticated() || this.isTokenExpired()){
      this.router.navigate(['login']);
      return false;
    }

    return true;
  }

......
Step 50 – Check the output
To test the above change, you need to change the server code.
- Stop the Server.
- Open the “server.js” file and change the value of “jwtExpirySeconds” to some small number.
- Start the Server.
- Now check the Angular Application. Finish login and Route to Customer Component, and after the specified second, refresh the page. As the token is auto-expired, you will be redirected to Login Component.
Note: Once your testing is done, make sure to set expiration to some higher number such as 1200 and restart the Server. It makes our life easy. Or else you have to log in now and then.
Step 51 – Dynamic greeting message
We have almost everything set up except the greeting message. It is set to hardcoded, “Welcome, Sukesh.” Let’s do this final touchup.
For that, create a variable “LoginUserFirstName” in the Customer Component class and set it to some dummy value.
......

  @ViewChild('myForm') CustomerForm: NgForm;
  LoginUserFirstName:string="DummyFName";

  constructor() {

......
Step 52 – Change greeting message in the template
Next, change the greeting message in the Customer Template with interpolation.
.....

<nav class="navbar navbar-dark bg-dark justify-content-end">
  <span class="navbar-brand mb-0 h1">Welcome {{LoginUserFirstName}},</span>

......
Discussion – Continued
The next question is how we will get the logged user’s first name.
There are different ways to achieve it.
API Call
One way to get it is by performing another API call. In the Customer Component as soon as the component is initialized, we will make an API call passing token and input, and API will return “FirstName” in the response.
FirstName in the token
The second approach involves the Server, including “FirstName” as part of payload in the token. Token will be decoded at the client-side and then used.
IDToken
It’s the third and one of the widely used approaches in the industry.
After successfully validating credentials, the Server will create two tokens—one Authentication token, which will be needed for validating future requests. The client will include this token in the header of every request. Second, ID token will be again a JWT token, and it will contain information about the user, such as “FirstName.”
For our demo, we will use the second approach. Our only token will have “FirstName.”
The next question is how to decode the token.
For that, we will use “jwt-decode,” which is a library for decoding JWT tokens.
Step 53 – install jwt-decode
Install it using “npm install jwt-decode –save” command.
Step 54 – Decode token and retrieve FirstName
Import “jwt-decode” in Customer Component, followed by decoding in the constructor as follows.
.........

import { Customer } from '../Models/customer';
import * as jwt_decode from "jwt-decode";

@Component({
  selector: 'customer',
  templateUrl: './customer.component.html'
})

.........

  LoginUserFirstName:string="DummyFName";

  constructor() {
    const decodedToken = jwt_decode(localStorage.token);
    this.LoginUserFirstName=decodedToken.firstName;
    this.IsAddNew = false;

.........
55 – Check the output
Check the output in the browser and enjoy the dynamic greeting message.
Conclusion
We reached Station 7. In this journey, we implemented authentication in our project. Go to the beginning of the chapter and evaluate everything you have learned so far.
Make sure you practiced everything before jumping to the next level.
What new Angular topics are going to be introduced?
- *ngIf directive
- Introduction to Angular Routing
- Authguards
- Injectable Decorator
- Introduction to DI
- Token-based Authentication
- Using local storage in Angular
- Debugging in Angular
- REST API Integration
- JWT token
- Reactive Forms Module

