Complete series source code can be downloaded from GitHub.
Introduction
This chapter is going to be a fascinating one. We will take up the last project and improve it by actually following a component-oriented style. With this chapter, you will finish your journey to Station 11.
Complete series (Index)
— — — — — — — — — — — — — — — — — — — — — — — — — —— — —

— — — — — — — — — — — — — — — — — — — — — — — — —
Component-oriented style
Component oriented style is a UI designing approach that will let us create our UI as a collection of reusable and composable web components.
Look at the following UI. What comes to your mind when you see it?
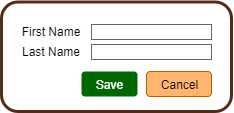
Figure 22.1
Isn’t it merely a composition of two labels, two text boxes, and two buttons.
What precisely those labels, text boxes, and buttons are? They are components.
Now, look at the following one. What do you see?
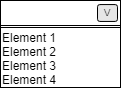
Figure 22.2
You may say – dropdown.
I won’t deny it. It’s indeed a dropdown.
- But It can also be considered a combination of a textbox, a button, and a dynamic box displaying multiple items.
- A button is placed using some CSS so that it looks like part of the text box.
- When that button is clicked, some code is executed, making a dynamic box appear at runtime, showing a couple of line items. When those line items are clicked, it got displayed in the textbox.
What I meant to say is, a dropdown is a component, but it is a composition of other smaller elements or better referred to as components.
Based on whatever lab we have finished so far, I believe you must have a clear idea about components.
A component represents a piece of the entire UI. We put those components together, form a giant component, and keep on doing it until the whole UI is done.
So far, in our application, we have seen a couple of components in action. Such as LoginComponent, CustomerComponent, ErrorComponent and ErrorTestComponent etc.
Component oriented style and Angular
You may be amazed to learn that Angular does not coin a component-oriented style.
You can see a similar approach, followed by other UI technologies such as Polymer, ReactJS, etc.
It’s a standard approach/practice introduced with the emerging of HTML5.
This approach makes our code maintenance easy and lets multiple UI developers work in parallel.
A problem in the current application
Do you think we have followed the component-oriented style in the real manner in the current project we developed so far?
Well, partially yes and partially no.
We broke down the application into multiple components where each component has its role – Login, Customer, ErrorTest, and Error.
These top-level components will be identified based on the features of the project. Such components are referred to as Feature components.
More features introduce more components, and those components will be accessed using mostly routing.
Once a feature component is identified and ready to be developed, the next step will be determining how each feature component will be designed. Creating one huge feature component won’t be a good idea as it makes code unreadable and unmanageable. We should break it down into multiple smaller components.
In our example, the CustomerComponent is expected to be broken down into multiple smaller components. We haven’t done it, and that is the problem.
Container-Presentation pattern
When it comes to breaking down a feature component, the Container-Presentation pattern is widely used and proved.
In this approach, we will break our feature component into multiple components. One of them will be called a container component, and the others as a presentation component.
Some people call it differently.
Container components will be referred to as smart components. They will be the ones who will interact with external APIS for retrieving and updating data. They will be the ones responsible for application state changes.
Presentation components are considered to be dumb components. They are responsible for dealing with only one kind of functionality. They will take care of one part of the entire feature component logic.
They will rely on container components for any interaction with the outside world, such as interacting with external APIs, updating the application state, etc.
You will understand it very well after the next demo.
Lab – Upgrade project to follow container-presentation pattern
To make it happen, we have to introduce two more new components – CustomerList and CustomerAdd.
- One will handle the list, and one will take care of the data entry part.
- Both Components will be encapsulated inside CustomerComponent
- CustomerComponent will deal with CustomerService
Step 1 – Setup Lab 6
Take the source code lab-5 and rename it to lab-6.
Step 2 – Create CustomerListComponent
Create a new Angular component CustomerListComponent inside the Customer folder as follows.
import { Component } from '@angular/core';
  @Component({
    selector: 'customer-list',
    templateUrl: './customer-list.component.html'
  })
  export class CustomerListComponent {
  }
Step 3 – Create CustomerAddComponent
Next, create CustomerAddComponent as follows.
import { Component } from '@angular/core';
@Component({
  selector: 'customer-add',
  templateUrl: './customer-add.component.html'
})
export class CustomerAddComponent {}
Step 4 – Add both components to AppModule
Open app.module.ts and add both components in the declaration section of AppModule.
......
import { CustomerAddComponent } from './Customer/customer-add.component';
import { CustomerListComponent } from './Customer/customer-list.component';
......
@NgModule({
  declarations: [AppComponent, LoginComponent,CustomerComponent, ErrorTestComponent, ErrorComponent, CustomerAddComponent,CustomerListComponent],
 ......
)
export class AppModule {}
Discussion
So now, we have three components related to customer – CustomerComponent, CustomerListComponent, and CustomerAddComponent.
In the first part, let’s prepare our template file for new components.
Lab – Continued
Step 5 – Prepare the CustomerList template
CustomerListComponent will be responsible for the list section of the component.
So, let’s take the list section HTML from CustomerComponent and place it in the CustomerListComponent. (Don’t do any change in CustomerComponent yet. We will come to that part. For now just copy contents in the CustomerList.)
<div class="card">
  <h5 class="card-header">Customer List</h5>
  <div class="card-body">
    <div class="card-title">
      <i class="fas fa-user-plus"></i>
      <input type="button" value="+ Add New"
      class="btn btn-primary fas fa-coffee fa-xs" (click)="AddNew()">
    </div>
    <table class="table table-striped table-bordered">
      <thead class="thead-dark">
        <tr>
          <th scope="col">First Name</th><th scope="col">Last Name</th>
        </tr>
      </thead>
      <tbody>
        <tr *ngFor="let item of (Customers$|async)">
          <td scope="row">{{item.FName}}</td><td>{{item.LName}}</td>
        </tr>
      </tbody>
    </table>
  </div>
</div>
Step 6 – Prepare the view class of CustomerListComponent
CustomerListComponent needs two things – Customers$ variable and the AddNew method.
Let’s add both of them.
......
export class CustomerListComponent {
  Customers$: Observable<Array<Customer>>;
  AddNew() {
  }
}
Step 7 – Prepare the CustomerAddComponent template
Take the entire data entry section from CustomerComponent and place it in the CustomerAddComponent as follows.
<div class="card" ngForm #myForm="ngForm">
<h5 class="card-header">Add New Customer</h5>
<div class="card-body">
<div class="form-group">
<label for="FName">First Name: </label>
<input class="form-control" [ngClass]="{'is-valid':F.valid,'is-invalid':F.invalid}" type="text" name="FName"
[(ngModel)]="this.FirstName" required minlength="3" #F="ngModel">
<!-- error -->
<div class="alert alert-danger" [hidden]="!(F.dirty && F.errors?.required)">
Enter First Name
</div>
<div class="alert alert-danger" [hidden]="!(F.dirty && F.errors?.minlength)">
Minimum 3 characters needed for First Name
</div>
</div>
<div class="form-group">
<label for="LName">Last Name:</label>
<input class="form-control" [ngClass]="{'is-valid':L.valid,'is-invalid':L.invalid}" type="text" name="LName"
[(ngModel)]="this.LastName" required minlength="3" #L="ngModel">
<!-- error -->
<div class="alert alert-danger" [hidden]="!(L.dirty && L.errors?.required)">
Enter Last Name
</div>
<div class="alert alert-danger" [hidden]="!(L.dirty && L.errors?.minlength)">
Minimum 3 characters needed for Last Name
</div>
</div>
<input type="button" class="btn btn-success" value="Save" (click)="Save()" [disabled]="myForm.invalid">
<input type="button" class="btn btn-danger" value="Cancel" (click)="Cancel()">
</div>
</div>
Step 8 – Prepare CustomerAddComponent view class
CustomerAddComponent logically needs the following things – FirstName and LastName variables, CustomerForm variable, Reset, Save, and Cancel method.
export class CustomerAddComponent {
  FirstName: string;
  LastName: string;
  @ViewChild('myForm') CustomerForm: NgForm;
  Reset() {
    this.CustomerForm.reset();
  }
  Save() {}
  Cancel() {}
}
Step 9 – Prepare the CustomerComponent template
Now use both the above components in the CustomerComponent as follows.
<nav class="navbar navbar-dark bg-dark justify-content-end">
  <span class="navbar-brand mb-0 h1"> Welcome {{LoginUserFirstName}},</span>
  <a class="navbar-brand mb-0 h1 underline "
    routerLink='/login' (click)="logout()"><u>Logout</u>
  </a>
</nav>
<div class="container-fluid pt-3">
  <customer-list *ngIf="!(IsAddNew$|async);else AddNewContainer">
  </customer-list>
  <ng-template #AddNewContainer>
   <customer-add></customer-add>
  </ng-template>
</div>

Step 10 – Check the output
Execute the application if you haven’t already done using the ng serve command.
You should get the CustomerListComponent but with empty data, as follows.
Figure 22.3
Discussion – Continued
Next, we need to make everything working again step by step. Let’s start with the list data. If you remember earlier, we obtained it from the service.
Now, as per the container-presentation pattern, the presentation component should not deal with Angular services. It should be purely meant for presentation purposes. Interacting with an Angular service will be the container component’s task.
Then how CustomerListComponent gets the data?
We will pass it from CustomerComponent to CustomerListComponet, and for that, we will use Input properties.
We have already seen input properties in action. It’s time to create our custom Input property, which can be done using the Input decorator.
Lab – Continued
Step 11 – Convert regular property in CustomerListComponent to Input property
Attach Input decorator to Customers$ property in CustomerListComponent and make it an input property as follows.
export class CustomerListComponent {
  @Input()
  Customers$: Observable<Array<Customer>>;
Step 12 – Provide value to input property
As you know, we have a global variable called customer $ in CustomerComponent that holds the reference of customer $ observable in CustomerService. Check the code below for recollecting.
export class CustomerComponent {
  ......
  Customers$: Observable<Array<Customer>>;
  ......
  constructor(private customerService: CustomerService,
              private authenticationService: AuthenticationService){
......
    this.Customers$ = this.customerService.Customers$;
  }
In previous step we have converted Customers$ property in CustomerListComponent to an input property. Hence, it can be accessed and assigned a value in the template of CustomerComponent as follows.
<nav class="navbar navbar-dark bg-dark justify-content-end">
  <span class="navbar-brand mb-0 h1"> Welcome {{LoginUserFirstName}},</span>
  <a class="navbar-brand mb-0 h1 underline "
    routerLink='/login' (click)="logout()"><u>Logout</u>
   </a>
</nav>
<div class="container-fluid pt-3">
  <customer-list [Customers$]="Customers$"
*ngIf="!(IsAddNew$|async);else AddNewContainer">
  </customer-list>
  <ng-template #AddNewContainer>
   <customer-add></customer-add>
  </ng-template>
</div>
Discussion – Continued
In the above code, do you see the following code?
[Customers$]="Customers$"
Please don’t get confused as we have Customers$ on both sides of =.
The left one represents the input property in CustomerListComponent, whereas the right one represents the regular property in CustomerComponent.
Lab – Continued
Step 13 – Check the output
This time you should see the list populated. If you don’t, then recheck your code and confirm that nothing is missed.
(I also recommend you remove the Input decorator from Customers$ property and check the output once. It should generate an error. I request you to examine that error.)
Next, we will complete the AddNew code.
Discussion – Continued
What were we doing earlier on AddNew?
We were invoking the setAddNew method of CustomerService.
Can we do the same now?
Yes, we can. Get the CustomerService instance injected into CustomerListComponent, and then invoke the method.
Should we do it?
No, because CustomerListComponent is a presentation component. The presentation component should not deal with any logic. It should ask the container component for such things.
The final question is how to invoke the container component function when the presentation component’s button is clicked.
That can be done by creating a custom output property in the CustomerListComponent, and for that, we will use an output decorator.
Let’s do the demo and understand the same.
Lab – Continued
Step 14 – Create custom output property in CustomerListComponent
Create a new property OnAddNew of type EventEmitter in CustomerListComponent with Output decorator as follows.
import { Component, EventEmitter, Input, Output } from '@angular/core';
......
export class CustomerListComponent {
  ......
  @Output()
  OnAddNew:EventEmitter<void> =new EventEmitter<void>();
......
Step 15 – Raise the event
Next, raise the event from CustomerListComponent when the AddNew button is clicked as follows.
......
 AddNew() {
    this.OnAddNew.emit();
  }
......
Step 16 – Initialize output property in Customer Component
Open the CustomerComponent template and assign value to the onAddNew property of CustomerListComponent as follows.
<div class="container-fluid pt-3">
  <customer-list [Customers$]="Customers$" (OnAddNew)="AddNew()"
*ngIf="!(IsAddNew$|async);else AddNewContainer">
  </customer-list>
Discussion – Continued
Let’s analyze the above code. Let’s take a portion of the above code and understand it.
(OnAddNew)="AddNew()"
In this code, OnAddNew is an output property defined in the CustomerListComponent, whereas AddNew is a method in CustomerComponent. Here is the full flow.
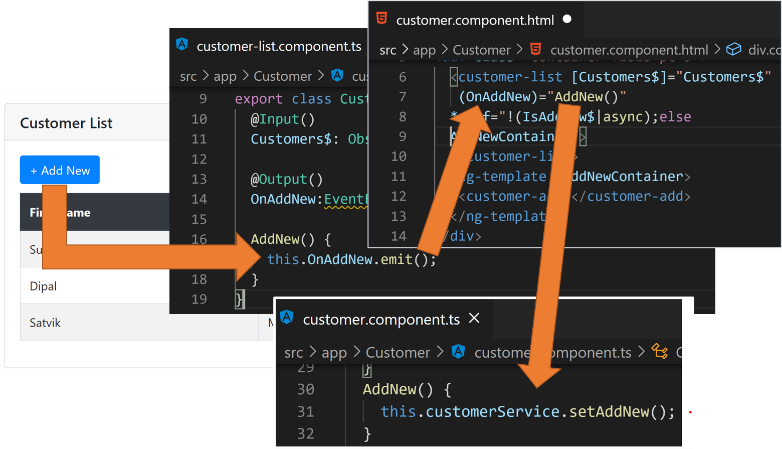
Figure 22.4
Lab – Continued
Step 17 – Check the output
After these changes, you should be able to see AddNew working again.
Step 18 – Declare output property for cancel in CustomerAddComponent
Now it’s time to get the cancel button into action again. For that, create a new property in CustomerAddComponent as OnCancel and attach the output decorator to it.
import { Component, EventEmitter, Output, ViewChild } from '@angular/core';
import { NgForm } from '@angular/forms';
@Component({
  selector: 'customer-add',
  templateUrl: './customer-add.component.html'
})
export class CustomerAddComponent {
......
  @Output()OnCancel:EventEmitter<void>=new EventEmitter<void>();
Step 19 – Raise the event
Emit the event in the cancel method as follows.
......
export class CustomerAddComponent {
......
  Cancel() {
    this.OnCancel.emit();
    this.Reset();
  }
Step 20 – Initialize OnCancel in CustomerComponent
It has two steps. First, we need to refactor the existing Cancel method in the CustomerComponent.
Let’s have a look at the existing implementation of CustomerComponent’s Cancel method
Cancel() {
    this.customerService.setList();
    this.Reset();
  }
  Reset() {
    this.CustomerForm.reset();
  }
CustomerForm is not part of CustomerComponent anymore, and hence it will be undefined. Hence remove the Reset method from CustomerComponent and redefine the Cancel method as follows.
Cancel() {
    this.customerService.setList();
  }
(You will find the Reset method invoked in the Save function as well. Make sure to remove that statement as well to avoid compile error.)
After that, change the CustomerComponent template as follows.
......
  <ng-template #AddNewContainer>
   <customer-add (OnCancel)="Cancel()"></customer-add>
  </ng-template>
</div>
In the above code, OnCancel is the output property of CustomerAddComponent where as Cancel is the method defined in the CustomerComponent.
Step 21 – Check the output
With the above code, cancel should work. Are you getting an empty grid on cancel?
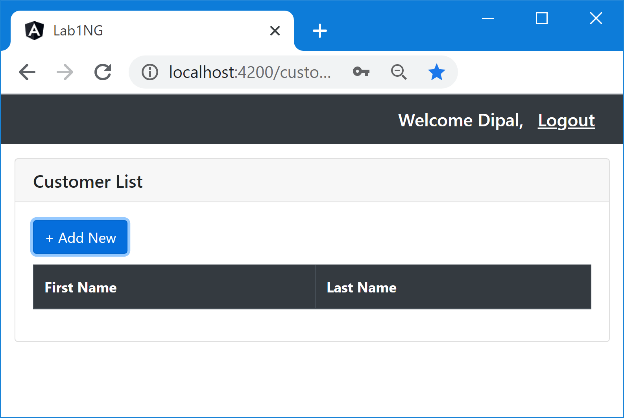
Figure 22.5
If yes, then that means you have not completed the assignment given to you in the chapter 16 – HTTP Service. To make it work, open CustomerService, and invoke the LoadCustomer method in the SetList method.
......
  setList() {
    this.IsAddNewSubject.next(false);
    this.LoadCustomers();
}
......
With this, we have completed three things – initial listing, AddNew, and cancel.
Next, let’s finish Save functionality.
Step 22 – Declare output property for Save in CustomerAddComponent
Create a new property OnSave in CustomerAddComponent with output decorator as follows.
......
import { Customer } from '../Models/customer';
......
  @Output()OnSave: EventEmitter<Customer> = new EventEmitter<Customer>();
......
You can see that the generic argument of EventEmitter is not void anymore – It is Customer.
We need it because while raising the event, we will pass the customer as data.
Step 23 – Raise the event
Change the Save method in CustomerAddComponent as follows.
......
  Save() {
    this.OnSave.emit(new Customer(this.FirstName,this.LastName));
    this.Reset();
  }
......
You can see that while emitting, we are passing the customer object.
Step 24 – Initialise OnSave in CustomerComponent
Attach OnSave event handler to CustomerAddComponent in CustomerComponent as follows
<ng-template #AddNewContainer>
   <customer-add (OnCancel)="Cancel()" (OnSave)="Save($event)"></customer-add>
  </ng-template>
Have you noticed the $event keyword in the above code? It represents the values emitted in the previous step.
Step 25 – Save method in CustomerComponent
Change the Save method in CustomerComponent to the following.
.....
  Save(c: Customer) {
    this.customerService.Save(c);
  }
......
Step 26 – Check the output
Make sure that the save functionality is working correctly after the above steps.
Let’s look at the complete flow in the above code.
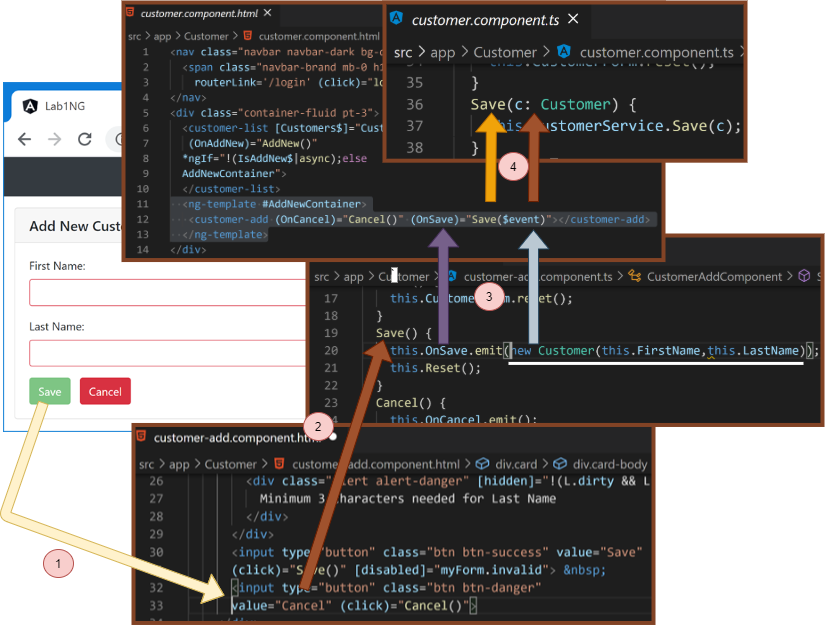
Figure 22.6
With the last step, we have completed save functionality.
Lab – Continued
Step 27 – clean CustomerComponent
Remove all the unnecessary code from CustomerComponent. It should look like the following, finally.
export class CustomerComponent {
  IsAddNew$: Observable<boolean>;
  Customers$: Observable<Array<Customer>>;
  LoginUserFirstName = 'DummyFName';
  constructor(private customerService: CustomerService,
              private authenticationService: AuthenticationService) {
    const decodedToken = jwt_decode(localStorage.token);
    this.LoginUserFirstName = decodedToken.firstName;
    this.IsAddNew$ = this.customerService.IsAddNew$;
    this.Customers$ = this.customerService.Customers$;
  }
  AddNew() {
    this.customerService.setAddNew();
  }
  Save(c: Customer) {
    this.customerService.Save(c);
  }
  Cancel() {
    this.customerService.setList();
  }
  logout() {
    this.authenticationService.logout();
  }
}
Discussion – Continued
Revision on Container-Presentation pattern
With the last step, we completed our demo on the Container-Presentation pattern.
Let’s quickly discuss how to decide what to go where.
What part of our code should be considered in a container, and what should be the presentation?
All operations related to the presentation will be part of the Presentation component.
It includes sorting, paging, validating fields, formatting data, resetting the form, etc.
All smart operations, such as decision making, routing, and, most importantly, coordination with Angular service, will be part of the Container component.
Pending issues
Before we end this chapter, let’s solve two pending issues in the lab – Autofocus in the first control and default-enter. Let’s start with autofocus.
If you are thinking about using the autofocus attribute in HTML, you will be disappointed.
HTML autofocus attribute sets focus on the element when the page is loaded for the first time.
Try it out quickly.
- Set the autofocus attribute on the firstName textbox and execute the application.
- Click AddNew, you will find the focus on the firstName textbox.
- Click cancel, click AddNew again. Unfortunately, you won’t find the focus set back.
To solve this problem, we will use the ViewChild decorator and template reference variable. Using these two, we can get view element access in the component class.
The next question is when we will set the focus. We have set focus as soon as the component is loaded and control is ready to focus.
Let’s try with the constructor.
Lab – Continued
Step 28 – Attach template reference variable
Let’s attach a template reference variable to the firstname textbox.
 <input #firstName class="form-control"
[ngClass]="{'is-valid':F.valid,'is-invalid':F.invalid}"
type="text" name="FName"[(ngModel)]="this.FirstName" required
minlength="3" #F="ngModel">
In the above code you can notice a template reference variable firstname is attached to the textbox.
Step 29 – Create a reference to control in the Component class
Open CustomerAddComponent class and create a variable FirstNameControl of type ElementRef as follows.
......
import { Component, ElementRef, EventEmitter, Output, ViewChild }
from '@angular/core';
......
export class CustomerAddComponent{
......
  @ViewChild("firstName") FirstNameControl: ElementRef;
......
Step 30 – Set focus
Set the focus using the following code in the constructor.
export class CustomerAddComponent implements AfterViewInit  {
......
  constructor(){
    this.FirstNameControl.nativeElement.focus();
  }
......
Step 31 – Check the output
Open the application and click on AddNew. You will land on the error page. To check the error, you have to check the local storage.
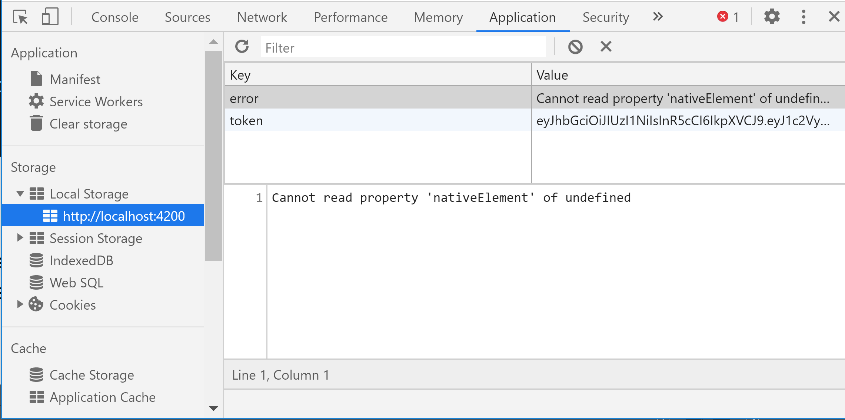
Figure 22.7
Discussion – Continued
Error handler issue
Is it annoying to check errors like this?
Whenever there is an error, you will get redirected to an error page. Then you have to find out the error in the local storage.
That may be an ideal way in the production environment, but in the development environment, I think the default approach makes sense more where the red error gets displayed in the console.
Is there a better way? Yes, there is. Open your AppErrorHandler and add the following block of code at the beginning of the handleError function.
if(!environment.production){
      throw error;
    }
The complete handleError function look like below.
......
import { Router } from '@angular/router';
import { environment } from 'src/environments/environment';
@Injectable()
export class AppErrorsHandler implements ErrorHandler {
......
  handleError(error: Error | HttpErrorResponse) {
    if(!environment.production){
      alert('Run-time error occured. Kindly check developer tools')
      throw error;
    }
    if (error instanceof HttpResponseBase) {
      this.HandleServerSideError(error); // Indicates its a server side error
    } else {
      this.HandleClientSideError(error); // Indicates its a client side error
    }
  }
......
After this change, your custom error handler comes to a picture only if the current environment is a production environment.
How to solve the focus issue?
Now the question is how to tackle the focus issue. Writing logic insider constructor is not working. A constructor is invoked when the instance of CustomerAddComponent got created. The textbox is not even existed at that moment.
One solution is the Angular life cycle events. Angular lets us hook into the Angular execution process by exposing a lot of life cycle methods. We can put our custom logic into those methods and do custom things.
One such life cycle method is ngOnInit. It executes once the component is initialized.
Let’s try it out.
Lab – Continued
Step 32 – Implement ngOnInit and add focus logic
For that, implement CustomerAddComponent with OnInit interface, which will force us to define the ngOnInit method. In ngOnInit, set the focus on the firstName textbox.
import { Component, ElementRef, EventEmitter, OnInit, Output, ViewChild }
from '@angular/core';
......
@Component({
  selector: 'customer-add',
  templateUrl: './customer-add.component.html'
})
export class CustomerAddComponent implements OnInit  {
  ......
  @ViewChild("firstName") FirstNameControl: ElementRef;
  ngOnInit(){
    this.FirstNameControl.nativeElement.focus();
  }
......
Step 33 – Check the output
Unfortunately, this won’t work either.
Discussion – Continued
Unfortunately, ngOnInit was not helpful. It gets invoked once the component is initialized. At this point, controls are not rendered, hence this.FirsNameControl will be undefined.
Note: Kindly understand that the constructor component was not even initialized, whereas, during ngOnInt, it is initialized but not rendered.
We have a perfect life cycle method for this situation – ngAfterViewInit. It is an ideal candidate for logic that needs access over rendered controls.
Let’s use the same.
Lab – Continued
Step 34 – Implement ngAfterViewInit
Implement CustomerAddComponent with AfterViewInit interface and then define the ngAfterViewInit method as follows.
import { AfterViewInit, Component, ElementRef, EventEmitter,
Output, ViewChild } from '@angular/core';
......
export class CustomerAddComponent implements AfterViewInit  {
.......
  @ViewChild("firstName") FirstNameControl: ElementRef;
Step 35 – Check the output
Finally, you will find it working. You will notice that the firstName textbox will have focus every time CustomerAddNewComponent was accessed.
Discussion – Continued
So with the last step, we were successful with the focus thing. Next, let’s solve the default enter issue.
If you remember, previously, we achieved it by putting the entire section inside a form tag and changing the regular button with a submit button.
We will follow the same methodology this time.
Lab – Continued
Step 36 – Implement default enter
Replace the container div element in the CustomerAddComponent with form tag and regular button to submit the button as follows.
<form class="card" #myForm="ngForm"> <h5 class="card-header">Add New Customer</h5> ...... <input type="submit" class="btn btn-success" value="Save" (click)="Save()" [disabled]="myForm.invalid"> ...... </div> </form>
Step 37 – Check the output
Enter some values in both the text boxes and just press enter. It will trigger the Save function automatically, and so we have achieved our target.
Discussion – Continued
Though everything looks fantastic, there is something different compared to last time. Did you notice it?
The ngForm directive was explicitly attached to the div tag before.
Did you notice we have not attached the ngForm directive explicitly to our form tag? Then how come everything is working.
Well, in template-driven forms, ngFrom directive gets automatically attached to form elements—no need to do it explicitly.
That is the reason why we removed it when we changed div to form.
Summary
So that will take us to Station 11. Let’s quickly revise our learning.
- We discussed a new UI development approach in the modern world – component-oriented style. It is a UI designing approach that will let us create our UI as a composition of multiple smaller and reusable components.
- We learned that Angular is not the pioneer of the component-oriented approach. It is just following it. Other technologies, like react and polymer, follow a similar process.
- We learned that this approach makes our code maintenance easy and lets multiple UI developers work in parallel.
- We spoke about the components that represent the application’s main components and are mostly accessed via routing.
- We learned that sometimes it is considered to breakdown a feature component into smaller components to make code readable and manageable. The container-presentation pattern is one of the commonly followed in industry for this purpose.
- We had a quick discussion on the difference between container and presentation components. The container component is usually the smart one, whereas presentation components are termed as dumb components and deal with the UI presentation.
- We created the custom input property for passing data from the outer component to the inner component.
- We created the custom output property for raising even from the inner component that can be handled in the outer component.
- We revisited the Viewchild decorator and template reference variable and learned to reference the component class’s view element.
- We learned about using the environment again in this chapter. We made our error handler code behave differently for different environments(dev and production).
- We revisited ngOnInit and learned how it is best suited for initialization logic.
- We learned about the ngAfterViewInit life cycle, a perfect candidate for logic that needs access over rendered controls.
- We learned that we are not required to explicitly assign ngForm directive to the form tag in template-driven forms.

