Complete series source code can be downloaded from GitHub.

What we have in this chapter?
In the last chapter, we will look into Angular services. This chapter will not only take you to Station 8 but also answer many of your unanswered questions.
We will upgrade our Lab 3 to Lab 4 by introducing custom Services in the project.
Complete series (Index)
— — — — — — — — — — — — — — — — — — — — — — — — — —— — —


— — — — — — — — — — — — — — — — — — — — — — — — —
What new Angular topics are going to be introduced?
- Custom Angular Service
- Deep into Angular Injectors, Providers, and DI
- HTTP interceptors
What is dependency?
Throughout this chapter, we will encounter the word “dependency” again and again.
So let’s understand what it is first.
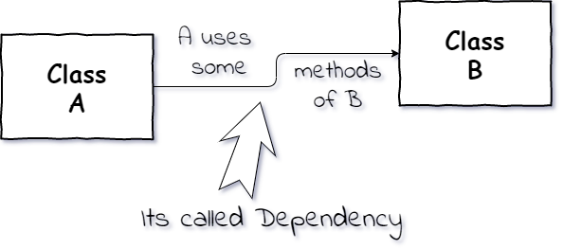
Understand Tightly coupling
The best way to understand tight coupling is through the human body.

Can you imagine a human replacing his hand with some more strong hands when he/she wants to do some heavy work or replacing his brain with an extraordinary one at the time of the exam?
It’s not possible because the body is tightly connected with body parts, but can you imagine how great it would be possible if that were possible.
The same principle applies to the programming world. Look at the following code.
class EmailLayer{
    sendEmail(){}
}

class LogicLayer{
    Save(){
        let b:EmailLayer=new EmailLayer();
        b.sendEmail();
    }
}

//UI Code
let l:LogicLayer=new LogicLayer();
l.Save();
In the above code, you can see that the class LoginLayer has a direct connection with the class EmailLayer.
Now try to answer the following questions.
- What if there is some error in class EmailLayer? Will you be able to test the “save” method of the LogicLayer class?
- Let’s say there is another UI where the same LogicLayer class can be reused, but Instead of Email, it wants SMS notification. Could it be possible to achieve it?
Answer for both the above question is simply no because “LoginLayer” and “EmailLayer” are tightly coupled.
Understand Loosely coupling
Imagine a motor vehicle.

Unlike human body parts, a motor vehicle is more loosely connected with his parts.Tiers can be replaced with other or engine can be swapped with some other based on the need.It’s possible because the motor vehicle is loosely connected with its parts.
Imagine a situation where it was tightly connected. If a tier damaged, then replace the entire motor vehicle. It will not be at all cost-effective.
The same principle applies to the programming world.
Look at the following code.
abstract class NotificationLayer{
    abstract Notify():void;
}

class EmailLayer extends NotificationLayer{
    Notify() {
        //Send email code
    }
}
class SMSLayer extends NotificationLayer{
    Notify() {
        //Send SMS code
    }
}

class LogicLayer{

    constructor(private notificationLayer:NotificationLayer) {
    }
    Save(){
        this.notificationLayer.Notify();
    }
}

//UI Code
let l:LogicLayer=new LogicLayer(new EmailLayer());
l.Save();
In the above code, LogicLayer is loosely connected with the Notification Layer.
As a result, the same LogicLayer can be used with both EmailLayer and SMSLayer. It will be compatible with all the derived classes of NotificationLayer. LogicLayer can be tested even if any of the NotificationLayer is buggy as LogicLayer is loosely coupled with NotificationLayer.
Understand DI
DI or dependency injection is a pattern of injecting dependency instance into the system by the external framework known as IOC containers or DI framework.
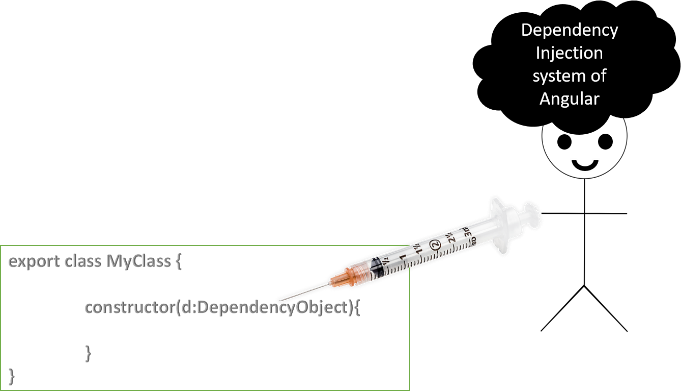
Nowadays, most of the modern technologies are equipped with DI frameworks. We already saw a demonstration of DI in the previous chapter, where we never created the instance of HttpClient and Router Services. It was created by the Angular DI system and made it available to us.
DI makes Application loosely coupled. It makes it testable and maintainable in the long run.
In this chapter, you will see DI in Angular in detail.
Angular Services
Quickly revising the definition of Angular Service we learned in the previous chapter.
They are injectable application logic. It can be any logic, and the Angular DI system handles the instance creation and injecting at the right place for us.
Lab 4 – Angular Services in the project
As of now, the Component class of LoginComponent contains some code that should not be there as a best practice. As a best practice, the Component class should not be equipped with any business logic. Every business logic in the Application should be moved into Services. Let’s do the same.
Step 1 – Rename the project
Rename lab3-ng to lab4-ng.
Step 2 – Create an Authentication Service
Create a new folder Services in the app folder and then create a new file authentication.services.ts as follows.
export class AuthenticationService{
}
Step 3 – Connect Login Component to the Authentication Service
Get the reference of Authenticate Service in the Component class by specifying it as a constructor parameter.
......

import { HttpClient } from '@angular/common/http';
import { AuthenticationService } from '../Services/authentication.service';

......

  constructor(private authenticationService:AuthenticationService,
    private router: Router,private httpClient:HttpClient) {
    this.IsAuthenticatiionFailed = false;
  }

  login() {

......
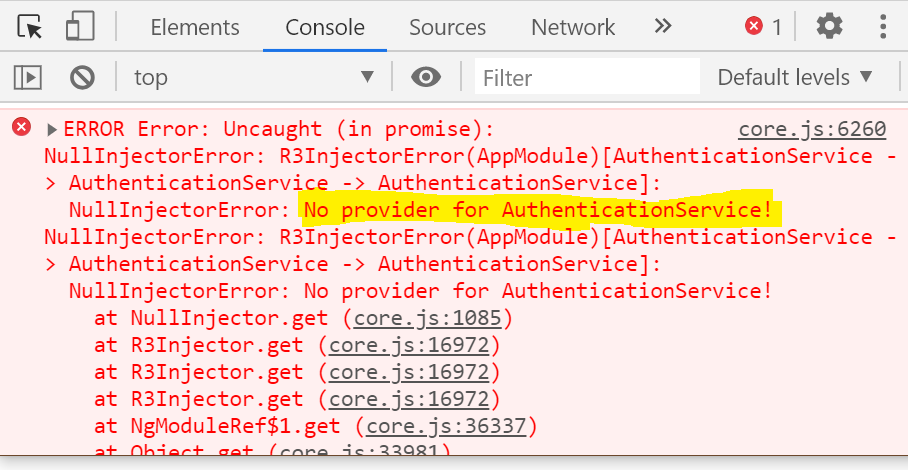
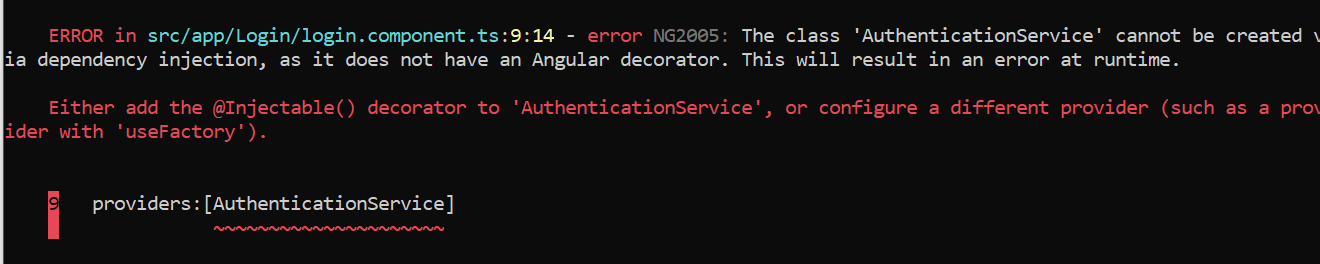
Step 4 – Check the output
It will break the Application. Check the error in developer tools.
Discussion
Its time to get back to the previous chapter statement once again.
“To make DI work, we to register Injector with the provider.”
Let’s dig more into Injector. It’s a theory, so don’t bother much about it. Again come back later here and revise it.
Injector
At the core of the DI framework, we have an Injector.
- The Angular Injector is responsible for instantiating the dependency and injecting into the various part of the Application, such as Components and Services.
- As an application developer, we will not create an Injector manually. We will configure it with the provider, and using that provider Angular creates the Injector
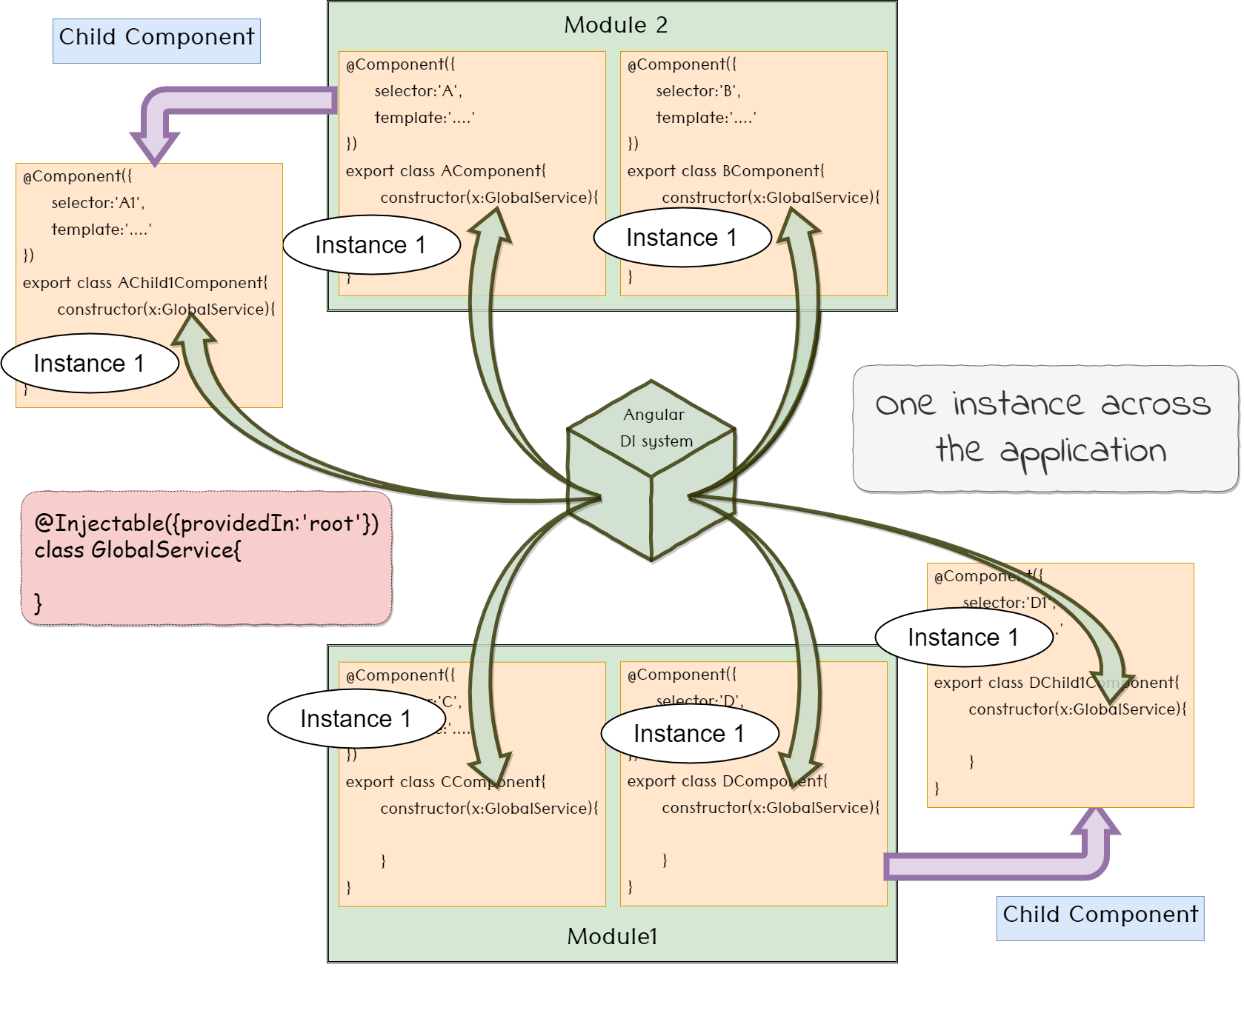
- Angular creates two kinds of Injector – Module Injector and Element Injector.
- When the Application is bootstrapped, Angular creates a Module injector, which is referred to as root injector.
(We haven’t seen multiple Angular Modules in action yet. So let’s not worry about child Module injectors for now. For now, assume that there is no only Module Injector get created and that is root Injector) - Angular also create an Element Injector for every Component and maintains tree hierarchy similar to the component tree in the Application.
In the current Application, as of now, we have a straightforward component hierarchy. We have an App Component, which has two children. Customer and Login Component. Hence we will have an Injector for App Component, which will be a parent to the Injectors created for Customer and Login Component. - When a dependency is expected in the Angular Component, then the first request will be sent to its Element injector. If it cannot be resolved, then it will be forwarded to the parent’s element Injector, and so on until dependency is resolved.
- If App Component Injector is unable to resolve the dependency, it will be forwarded to the Module Injector. The module injector also maintains a tree that we haven’t discussed yet. In case Module Injector tree too fail to resolve the instance, then Angular will throw “no provider…” error.

Provider
A provider is an object which links DI token with a dependency.
DI Token
- The tokens are used to locate the provider.
- We can create three types of token – Type Token, string token & Injection Token.
As I said, don’t worry about theory. It will take a couple of revisions to understand it completely.
Lab – Continued
Step 5 – Configure the Injector for Authentication Service
Add Login Service to the “providers” collection in the Component decorator as follows.
import { AuthenticationService } from '../Services/authentication.service';

@Component({
  selector: 'login',
  templateUrl: './login.component.html',
  providers:[{provide: AuthenticationService ,useClass: AuthenticationService }]
})

export class LoginComponent {
Discussion – Continued
Let’s understand what we did above.
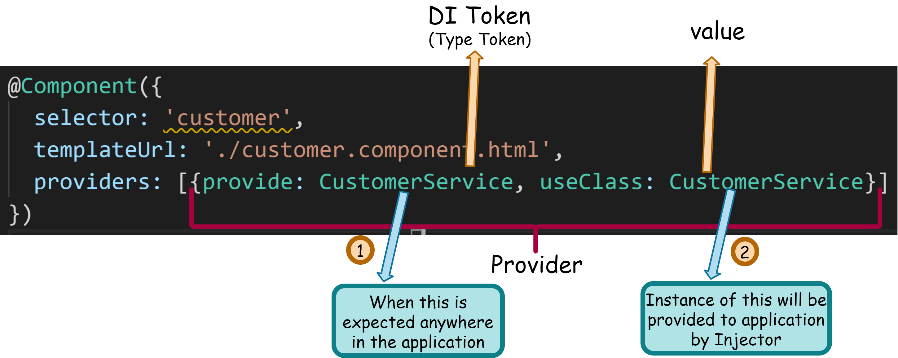
By writing the above code, we added a provider to provider collection of Customer Component, which is going be used by Customer Component’s Element Injector.
In the code, DI token used is of type Type Token.
In the above example, both provide and useClass hold the same value, but both can be different if needed.
Because of the current configuration, Injector will inject the instance of CustomerService(because that’s what is mentioned in useClass) when we expect CustomerService(because that’s what is mentioned in provide. The instance created will be destroyed when the Customer Component instance is destroyed.
Short syntax
When both attributes (provide and useClass) share the same value, there is the simpler syntax we can use.
......

import { AuthenticationService } from '../Services/authentication.service';

@Component({
  selector: 'login',
  templateUrl: './login.component.html',
  providers[AuthenticationService]
})

export class LoginComponent {
We will explore other types of DI tokens in the next chapter.
Step 6 – Check the output
Execute the Application. This time you will find everything working again.
Step 7 – Create a User Model
Create a new Model file user.ts with the following contents.
export class User{
  UserName: string;
  Password: string
}
Step 8 – Create a Response Model
Create a new folder called Http Responses in the Models folder and then create a new file inside authentication.response.ts with the following content.
export class AuthenticationResponse{
  token: string;
}
Step 9 – Define the Authenticate method
Define a method authenticate in Authentication Service as follows.
import { Observable } from 'rxjs';
import { AuthenticationResponse } from '../Models/HttpResponses/authentication.response';
import { User } from '../Models/user';
import { HttpClient } from '@angular/common/http';

export class AuthenticationService{
  constructor(private httpClient:HttpClient) {
  }

  authenticate(user:User):Observable<AuthenticationResponse>{
    return this.httpClient.post<AuthenticationResponse>("http://localhost:4000/signin",user);
  }
}
This time we have used a generic version of the post method instead of the non-generic one.
Non-generic version return Observable<object> whereas generic one returns Observable<T>. Using the generic one is the best practice, considering the REST service response is compatible with generic argument.
For instance, our REST service is returning an object with a property token.
AuthenticationResponse is a class containing a property token.
Discussion
Now, something is fascinating.
We must add Injectible decorator to Authentication Service as well.
Or else we will get an error like below.
In the last chapter, we mentioned three ways of configuring Injector with the provider – using Component decorator, using NgModule decorator, and using Injectable decorator.
While creating Route Guard, we followed the Injectable decorator methodology.
For the Authentication Service, we followed the Component decorator methodology but still is expecting to us add an Injectable decorator.
Why so?
Because in Angular, “every consumer of Service must be decorated with the Injectable decorator.”
If that’s the case, then why is the Login Component not decorated with the Injectable decorator?
It’s because the above rule applies to only those consumers who are otherwise not decorated with any other decorator.
Does it mean every custom Service in the Application will be decorated with the Injectable decorator?
Technically, no. We have to attach an Injectable decorator to custom Service only when custom Service is dependent on some other Service. Truth is mostly custom Services are dependent on other services. Hence in the real-time project, you will notice most of the Services will be decorated with an Injectable decorator.
After attaching the Injectable decorator, do we still need to providers in the Component decorator?
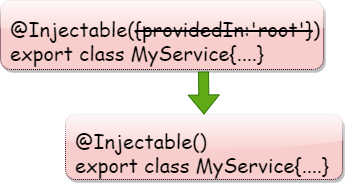
While configuring Injector for RouteGuard Service in the last chapter, we passed a parameter to the decorator.
@Injectable({providedIn:'root'})
By doing so, we are configuring the root Injector.
This time we will only attach decorator, we won’t pass any parameter.
The rule is, either we have to pass the parameter, or we have to specify the provider at the Component level or Module level.
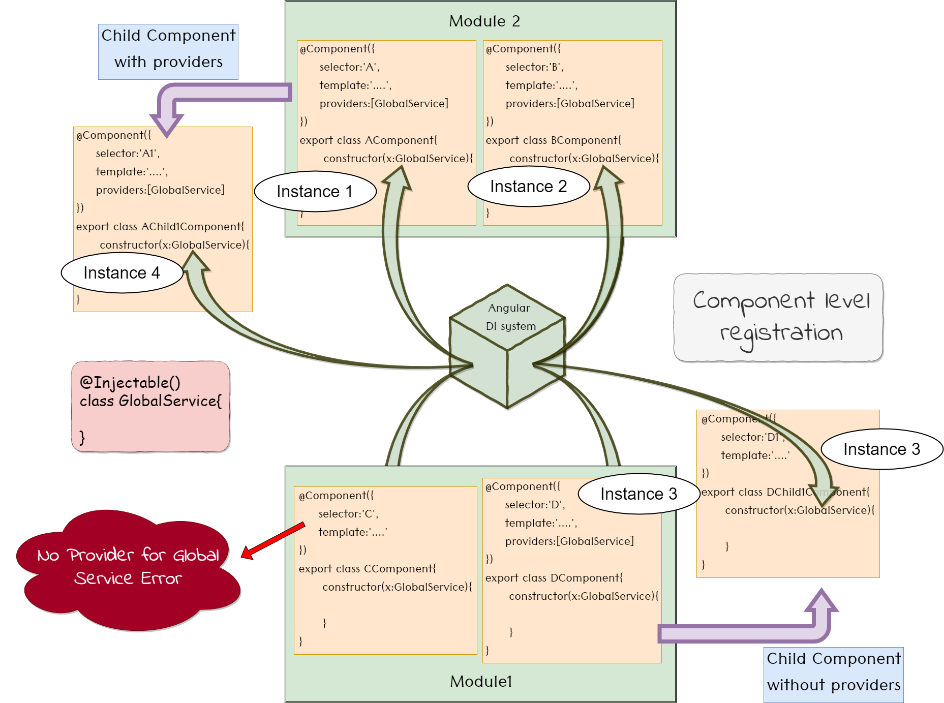
By specifying the provider at the Component level, we configured the Element Injector of that Component.
What is the difference between the two configuration methods?
When root Injector is configured to provide an instance of Service
1 – Only one instance of that Service will be created for the entire Application.
2 – The same instance will be injected wherever it is expected.
3 – This instance will have the life span of the Application. It will get destroyed only when the Application is terminated.
4 – Services such as Logger, Authentication, Route guards are recommended to be at the root level. Those services will be used again and again in the system. Hence it’s better to be maintained as a singleton(only one instance).
When Element Injector is configured to provide an instance of Service –
1 – One instance of the Service will be created per Component instance and shared across all child components.
2 – Life of a Service will depend on the life of a Component instance. When that Component is destroyed, Service instance also get terminated.
3 – Feature level services such as Customer Service, Product Services are recommended to be configured in this way as they won’t be needed after a specific Component is destroyed.
Isn’t it proper to configure root Injector to provide Authenticate Service instance instead of an Element Injector of Login Component?
Yes, it is. Authentication Service is a Services needed throughout the Application, and hence it is recommended to have a singleton instance throughout the Application. By configuring Injector at the Component level, we made a mistake, which we will soon correct.
What is unique about configuring Injector using NgModule decorator?
Both Injectable decorator and NgModule decorator let us configure Module Injectors.
We will answer this question later. For not continue with the lab. Still, now we have only configured Injector using Component decorator and Injectable decorator.
Lab – Continued
Step 10 – Attach Injectable decorator to Authentication Service
.......

import { HttpClient } from '@angular/common/http';
import { Injectable } from '@angular/core';

@Injectable()
export class AuthenticationService{

.......
Step 11 – Modify Login Component
Change the “login” method in Login Component as follows.
.....

  login() {
    this.authenticationService.authenticate(this.loginForm.value)
      .subscribe((response:{token:string})=>{
        if(response.token==undefined){
        this.IsAuthenticatiionFailed = true;
      }

      else{
        localStorage.token=response.token;
        this.router.navigate(['customer']);
      }
    });
  }
]
Discussion
Do you think we achieved our target?
If you put some thinking, you will realize that our Login Component still contains some logic, such as redirect logic, decision-making logic, etc.
It is bad practice, and we will take it out using RxJs.
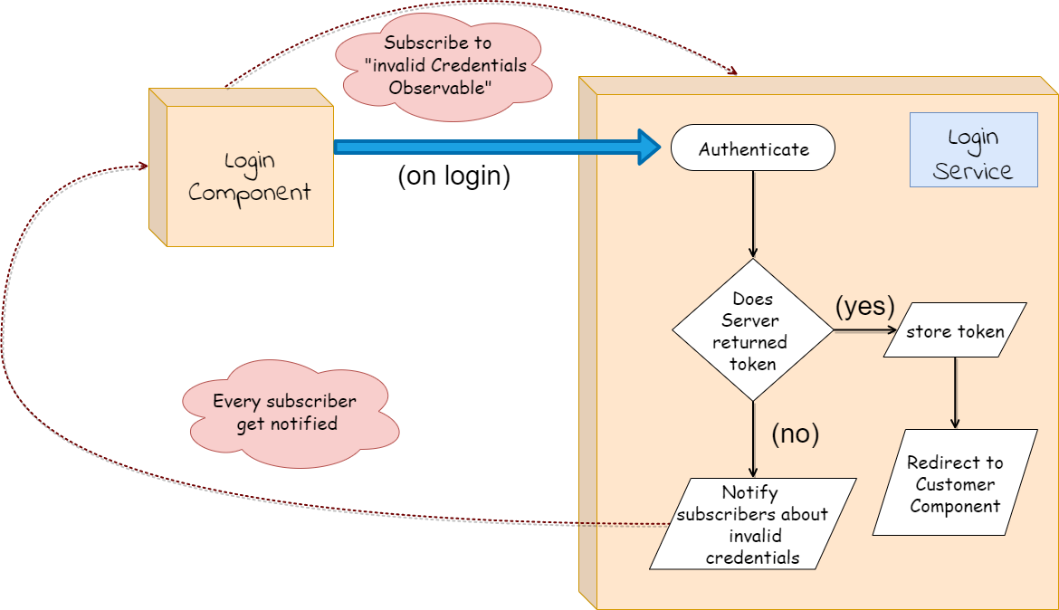
Imagine the following process.
- Login Service will make an Http call.
- If credentials are invalid, the Login Component will be notified about it, and the Login Component will display an error message in UI.
- If credentials are valid, then Login Service will store the response in local storage and redirect to Customer Component.
What is your feeling about the above process?
Don’t you think if we do it, we get rid of every logic from Login Component and make it simple?
It’s not a complicated task. It will be done using RxJS very quickly.
Let’s do it step by step.
Lab – Continued
Step 12 – Handle Authentication success
Let’s start with dealing with Authentication success. Change the “authenticate” method in Authenticate Service as follows.
@Injectable()

export class AuthenticationService {

  // Change no 1 - Router Service injected
  constructor(private router: Router, private httpClient: HttpClient) {}
  // Change no 2 - Return type is void
  authenticate(user: User): void {
    // Change no 3 - Observable is subscribed
    this.httpClient
      .post<AuthenticationResponse>('http://localhost:4000/signin', user)
      .subscribe((response: { token: string }) => {
        if (response.token !== undefined) {
          localStorage.token = response.token;
          this.router.navigate(['customer']);
        }
      });
  }
}
You will notice three changes.
- We are no more returning Observables
- We are subscribing to Observables in Service itself
- We are routing to Customer Component in the Service itself.
Discussion – Continued
Part of the work is done. Next, we need to notify the Login Component in case of invalid credentials.
For that, we will use the Subject class in RxjS. We will discuss the Subject in more detail after the demo.
Let’s do a demo and then talk more about it.
Step 13 – Handle Invalid credentials
Handle else part of the authenticate method as follows.
......

import { Subject } from 'rxjs';

......

export class AuthenticationService {

  // Change 4 - Subject for dealing with invalid credentials
  isAuthenticationFailedSubject: Subject<boolean>;
  // Change no 1 - Router Service injected
  constructor(private router: Router, private httpClient: HttpClient) {
    this.isAuthenticationFailedSubject = new Subject<boolean>();
  }

  // Change no 2 - Return type is void

  authenticate(user: User): void {
    // Change no 3 - Observable is subscribed
    this.httpClient
      .post<AuthenticationResponse>('http://localhost:4000/signin', user)
      .subscribe((response: { token: string }) => {
        if (response.token !== undefined) {
          localStorage.token = response.token;
          this.router.navigate(['customer']);
        }else{
          // Change 5 - Notify subscriber that credentials are invalid
          this.isAuthenticationFailedSubject.next(false);
        }
      });
  }
}
In the above code, you can notice three new things.
- At the top, we declared an instance of Subject passing boolean as an argument.
- In the constructor initialized it.
- Subscribers are notified in the else part by invoking the next method of the Subject.
Discussion – Continued
Why boolean with Subject?
Well, in our use case, boolean makes sense. It can be any data type, including user-defined objects.
Step 14 – Modify Login Component
No more logic in the login method needed. Simply invoke the authenticate function as follows.
 login() {
    this.authenticationService.authenticate(this.loginForm.value);
  }
Step 15 – Handle invalid credentials
Subscribe to isAuthenticationFailedSubject in the constructor as follows.
constructor(private authenticationService: AuthenticationService) {
    this.IsAuthenticatiionFailed = false;
    this.authenticationService.isAuthenticationFailedSubject.subscribe((x) => {
      this.IsAuthenticatiionFailed = x;
    });
  }
Step 16 – Check the output
Execute the Application if not already, and check the updated output. Check with invalid credentials.
Sadly you won’t get the expected output.
I don’t want you to check the next step. Instead, try to debug the TypeScript file and try to find out the issue. Let’s confirm that you practiced it well.
Step 17 – Solve the error.
The issue is, we are passing false as value to the next method. It should be true in our case.
......

   else{
          // Change 5 - Notify subscriber that credentials are invalid
          this.isAuthenticationFailedSubject.next(true);
        }

......
Step 18 – Check the output
Now you will get the expected output.
Discussion – Continued
Let’s understand the difference between Observable and Subject. But first, let’s explore the concept of Observable and Observer in reactive programming.
Observable and Observer
In the reactive programming world, we have a concept of Observable and Observer.
Think of Twitter. Let’s say you visit my Twitter account(@sukeshmarla) and click on follow. What exactly happens then? Twitter adds you to my follower list. Whenever I tweet, all my followers get the notification. In this case, I am (who you followed) is Observable, and Twitter is Observer, and followers are consumers or Subscribers.
The one which you observe is called the Observable. The subscriber subscribes for its changes.
The one who makes Observable change its state is called Observer. The subscriber gets a subscription because of observer feed something into Observable.
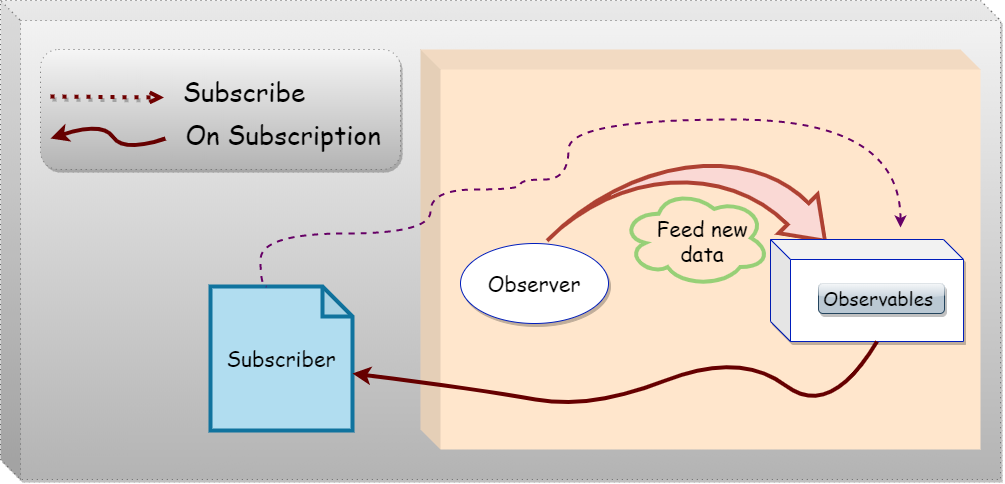
Please note, Observable and Observer are standard concepts. You will see them in action in a lot of technologies. Most of the technologies provide classes or methods to work with them.
Subject in RxJs
We have introduced RxJs in one of the previous labs. It’s a JavaScript library for reactive kind of programming. By the end of this book, you will get a good idea about reactive programming. Don’t worry about that.
In RxJS, we have a class called Subject, which is both reactive programming Observable and Observer.
Recollect our last lab.
- We created the Subject.
- We subscribed to it in the Login Component. Hence it is an Observable.
- We fed data to it with the next method. Hence it is an Observer.
RxJs Subject vs. RxJs Observable
In RxJs, we also have a class called Observable, which represents the reactive programming Observable.
Observable can only be subscribed, whereas the Subject can also emit new values. It won’t expose any method to feed new data to it. In simple words, we do have Subject.next method, but we don’t have Observable.next.
Extracting Observable from Subject
In real-time projects as a best practice, we never expose the Subject to subscribers directly.
Imagine that Subject is subscribed by multiple subscribers, and one of the subscribers invokes the next method. Can you imagine what happens now? Every other subscriber will get notified of that.
Hence in the reactive programming, it is recommended to declare Subject as private, and it’s underlying Observable is exposed to the subscriber for subscribing. The Subject class has a method asObservable, which will let us extract underlying Observable from it.
Let’s see the solution.
Lab – Continued
Step 19 – Convert Subject to Observables
Mark Subject as private and expose Observables instead. Check the below code.
// Change 4 - Subject for dealing with invalid credentials
  private isAuthenticationFailedSubject: Subject<boolean>;

  // Change 6 - Declare Observable
  isAuthenticationFailed$: Observable<boolean>;

  // Change no 1 - Router Service injected
  constructor(private router: Router, private httpClient: HttpClient) {
    this.isAuthenticationFailedSubject = new Subject<boolean>();
    // Change 7 - Get Observable from Subject
    this.invalidCredentialsObservable$ = this.isAuthenticationFailedSubject.asObservable();

  }
Note: Adding “$” to the Observable variables is a naming convention followed in the industry.
Step 20 – Subscribe for Observables
Now, in Login Component instead of Subject, subscribe to the Observable.
......

  constructor(private authenticationService: AuthenticationService) {
    this.IsAuthenticatiionFailed = false;
    this.authenticationService.invalidCredentialsObservable$.subscribe((x) => {
      this.IsAuthenticatiionFailed = x;
    });

......
Step 21 – Check the output
Happy output again. Here is the schematic flow of the Application.
Discussion – Continued
The above communication methodology is known as the Observer pattern, where many subscribers subscribe to the Observable’s changes.
Unsubscribing subscription
One important thing is, no matter what technology stack you are using when it comes to the Observer pattern along with the subscription, unsubscription is equally essential. Imagine that a couple of subscribers have subscribed to our Observable, and some of the subscribers are no more interested in receiving notifications.
Or better, let’s say some subscribers don’t even exist anymore. Does active subscription make sense in such a case?
Unsubscribing subscription of RxJS observable
The best practice is, once the subscription is no more needed, it should be unsubscribed, or else it will lead to a memory leak. Fortunately, RxJS Subscription provides a way to unsubscribe it.
When should we unsubscribe?
The next question is, in the case of our Application, where should we unsubscribe.
In our case, once we do a successful login, we redirect to Customer Component, which will destroy the Login Component. Once Login Component has destroyed no point of subscription.
Angular provides us various life-cycle events, and one of them is ngOnDestroy. We will unsubscribe from the subscription in the same method.
We will explore other life-cycle events in the future chapter.
Lab – Continued
Step 22 – Implement ngOnDestroy method
It’s a two-step process. First, implement the LoginComponent class with the OnDestroy interface, which will force you to define the ngOnDestroy method.
import { Component, OnDestroy } from '@angular/core';

......

export class LoginComponent implements OnDestroy {
......

  ngOnDestroy(): void {
  }

......
Step 23 – Unsubscribe from subscription
Again it’s a two-step process. First, hold the subscription in a global variable and then, in the ngOnDestroy method, unsubscribe it.
......

import { FormControl, FormGroup, Validators } from '@angular/forms';
import { Subscription } from 'rxjs';

......

export class LoginComponent implements OnDestroy {
  invalidCredentialsSubscription: Subscription;

......

  constructor(private authenticationService: AuthenticationService) {
    this.invalidCredentialsSubscription = this.authenticationService.isAuthenticationFailed$.subscribe(
      (x) => {
        this.IsAuthenticatiionFailed = x;
      }
    );
  }

  ngOnDestroy(): void {
    this.invalidCredentialsSubscription.unsubscribe();
  }

......
Discussion – Continued
Now that you understood how vital unsubscribing a subscription is, its time to look into the better approach to achieve the same. It can be done using an async pipe.
The pipe is an Angular concept that will be used in the Component templates to transform the data.
Using the async pipe, we can make subscribe/unsubscribe code easier.
It subscribes to an Observable and returns the latest value it has emitted. The best part is, when the Component is destroyed, the async pipe unsubscribes automatically to avoid potential memory leaks.
For instance, let’s say we have an Observable ABCD, which is going to return some value, and that value has to be displayed in UI. The known approach will be as follows.
//In the Component class

    this.somesubsctiption=ABCD.subscribe(
      (x) => {
        this.myValue = x;
      }
    );

......

  ngOnDestroy(): void {
    this.invalidCredentialsSubscription.unsubscribe();
  }

<!-- In Template -->

<span>{{myValue}}</span>
Using the async pipe, it will be as follows.
<span>{{ABCD | async}}</span>
Isn’t it easier compare to the earlier one? 😊
Let’s implement the same in our Application.
Lab – Continued
Step 24 – Implement Async pipe
It will be a 3 step process.
In step 1, we will remove unnecessary code from the Login Component. In Step 2, we will create a new global variable in the Login Component to hold the Observable for representing Invalid Credentials.
Finally, in step 3, we will use the async pipe in the template.
Let’s start with Component class changes.
export class LoginComponent // implements OnDestroy

/* Read: Implementing OnDestroy is not needed
      as unsubscribing will be handled by async pipe */
{
  /*Read: No need to hold the subscription as observable
        will be auto unsubscribed when the Component is destroyed */
  // invalidCredentialsSubscription: Subscription;

  loginForm = new FormGroup({
    UserName: new FormControl('', [
      Validators.required,
      Validators.minLength(6),
    ]),

    Password: new FormControl('', [
      Validators.required,
      Validators.minLength(6),
    ]),
  });

  /* Read:  no boolean variable needed
      instead we need Observable boolean */

  IsAuthenticatiionFailed$: Observable<boolean>;
  // IsAuthenticatiionFailed: boolean;

  constructor(private authenticationService: AuthenticationService) {
    // this.IsAuthenticatiionFailed = false;
    this.IsAuthenticatiionFailed$ = this.authenticationService.isAuthenticationFailed$;

    /* Read: No need for a manual subscription,
          the async pipe will take care of subscription */

    // this.invalidCredentialsSubscription = this.authenticationService.isAuthenticationFailed$.subscribe(
    //   (x) => {
    //     this.IsAuthenticatiionFailed = x;
    //   }
    // );
  }

  // ngOnDestroy(): void {
  //   this.invalidCredentialsSubscription.unsubscribe();
  // }

  login() {
    this.authenticationService.authenticate(this.loginForm.value);
  }

}
Finally, let’s use the async pipe in the template.
        <div class="alert alert-danger" *ngIf="IsAuthenticatiionFailed$|async" >
          Invalid User Name or Password
        </div>
Step 25 – Check the output
You will get a similar output. Only code becomes much more straightforward.
Step 26 – Refactor Logout
In the last step, we have refactored our authentication logic. Next, let’s refactor the logout. It has to be handled in the Service as well.
Create a new method “logout” in the Authentication Service as follows.
......

@Injectable({ providedIn: 'root' })
export class AuthenticationService {

......

  logout(){
    localStorage.clear();
}
Step 27 – Modify the Customer Component
As of now logout method in Customer Component contains the logic of clearing local storage. Let’s remove it and instead invoke the Authentication Service’s logout method as follows.
......

export class CustomerComponent {
......

  constructor(private authenticationService: AuthenticationService) {
    const decodedToken = jwt_decode(localStorage.token);
......

}

......

  logout() {
   this.authenticationService.logout();
  }

......
Step 28 – Check the output
You will notice that the Login Component will work great, but after a successful login, Customer Component won’t get displayed.
On inspecting the developer tool, you will find “No provider for AuthenticationService” error.
Discussion – Continued
As of now, the Element Injector of Login Component is configured to inject an instance of Authentication Service.
Hence only Login Component has access to the Authentication Service.
We have to make the Authentication Service instance available to Customer Component as well.
How to do it?
That will be possible only if we do one of the following in the existing Application.
- Also, configure Element Injector of Customer Component with the provider for Authentication Service.
- Instead of configuring the Element Injector of Login configure Element injector of App Component.
- Configure root Injector instead of Element injector using NgModule decorator of the App Module.
- Configure root Injector instead of Element Injector using Injectable decorator with {providedIn: ‘root’} parameter.
Way 1
If we go with the first way, then we will end up into two instances of Authentication Services, one for Login Component and one for Customer Component.
Authentication Service is a kind of Service we will be needed again and again in the Application. Hence it is recommended to keep one Applicationwide instance instead of multiple that keep destroying and creating now and then.
Way 2, 3, 4
Now, if we follow any of the other ways mentioned above, then We don’t need provider in the Login Component as we will end up into one singleton instance which will be available to every other Component.
Way 2 – How it is singleton?
As I said before, technically, Element Injector makes Service instances available to that Component and all of its child components. That Service instance will get destroyed when the component instance gets destroyed. The interesting point is, App Component is our root Component, and hence it will never get destroyed. So ultimately Services registered at root Component logically becomes global singleton instance.
But using Element Injector for singleton instances is not a practice followed in the industry. We have to choose either way-3 or way-4.
Way 3 vs. 4
Both of these will serve the purpose. It will register the server at the root level and maintains a singleton instance.
The biggest question is which one to choose between way-3 and way-4.
provided in root is introduced in Angular 6. Before that only available option to create root-level instance was by registering it in the NgModule decorator.
A recommended approach is provided in root.
Why is the Injectable decorator recommended?
Injectable enables Tree-Shaking of the services if nothing injects it.
In short, Service won’t be included in the final build of Service if it is never used anywhere in the Application. This concept is called Tree Shaking.
So finally, we are going with way-4 that is an Injectable decorator.
Lab – Continued
Step 29 – Remove Provider from Login Component
First, open the Login Component class and remove the providers.
Step 30 – Register Service at the root level
Register Service at the root level using the Injectable decorator as follows.
......

@Injectable({ providedIn: 'root' })
export class AuthenticationService {

......
Step 31 – Check the output
Now you will notice that both login and logout will work properly.
Step 32 – Refactor Guard
Now that we are refactoring everything let’s refactor our guards too.
Simply move isAuthenticated and isTokenExpired methods from the AuthGuard class to the AuthenticationService class.
After that, the refactor Auth Guard using Authentication Service as follows.
@Injectable({ providedIn: 'root' })
export class AuthGuard implements CanActivate {

  constructor(
    private router: Router,
    private authenticationService: AuthenticationService
  ) {}

  canActivate(route: ActivatedRouteSnapshot, state: RouterStateSnapshot) {
    if (
      !this.authenticationService.isAuthenticated() ||
      this.authenticationService.isTokenExpired()
    ) {

      this.router.navigate(['login']);
      return false;
    }
    return true;
  }

}
Step 33 – Check the output
It’s always good to test the changes. Try to navigate to Customer Component directly without proper login. If you are getting redirected to Login Component, then everything is correct.
Step 34 – Autofocus
Are you tired of getting cursor into UserName textbox manually every time page is refreshed?
It can be resolved using HTML purely. No Angular power needed.
Simply attach the autofocus attribute to any input control and automatically focus will be set on that control when the page is loaded.
 <label for="UserName">User Name: </label>
        <input class="form-control" autofocus
        [ngClass]="{'is-valid':loginForm.

......
Step 35 – Check the output
Now every time you refresh the page, the focus will be set on UserName textbox automatically.
Step 36 – Enter on submit
Another irritating thing in the Application right now is Login click. We have to take focus on it and click manually. End users usually prefer the enter key. Again it can be done with purely HTML.
It will be a two-step process.
First, convert the login button to the submit button from the standard button.
      <input type="submit" class="btn btn-success" value="Login"
      (click)="login()"  [disabled]="loginForm.invalid" >
Then instead of using “div” as a container for all form controls, use the “form” tag.
......

    <h5 class="card-header">Login</h5>
    <!-- <div class="card-body" [formGroup]="loginForm"> -->
      <form  class="card-body" [formGroup]="loginForm">
      <div class="form-group">
        <div class="alert alert-danger" *ngIf="IsAuthenticatiionFailed$|async" >

......
Step 37 – Check the output
Refresh the login page. Enter some credentials (so that validation passed) and press enter key in the keyboard. If you followed every step rightly, you could expect the desired output now.
(Don’t try to implement the same solution in Customer Component as of now. It won’t work. We will do it shortly.)
Step 38 – Cleanup Customer Component with Customer Service
Create a new file customer.service.ts in the Services folder with the following contents.
import { Injectable } from '@angular/core';
import { Observable, of } from 'rxjs';
import { Customer } from '../Models/customer';

@Injectable()
export class CustomerService {

  private Customers: Array<Customer>;
  IsAddNew$: Observable<boolean>;
  Customers$: Observable<Array<Customer>>;

  constructor() {
    this.IsAddNew$ = of(false);
    this.Customers = new Array<Customer>();
    this.Customers.push(new Customer('Sukesh', 'Marla'));
    this.Customers.push(new Customer('Just', 'Compile'));
    this.Customers.push(new Customer('Ram', 'Lakhan'));
    this.Customers$ = of(this.Customers);
  }

  setAddNew(){
    this.IsAddNew$ = of(true);
  }

  setList(){
    this.IsAddNew$ = of(false);
  }

  Save(customer: Customer) {
    this.Customers.push(customer);
    this.Customers$ = of(this.Customers);
    this.IsAddNew$ = of(false);
  }
}
Discussion – Continued
Dummy Service to real service migration
Very soon, we will connect our Customer Component to real-time REST service. In the above code, we have designed our Customer Service in a way that the subscriber of the Service (that is Customer Component) can be easily adapted.
We have already seen an example of using HttpClient Service and learned that it returns Observables, which the subscriber will subscribe to. We have designed our Customer Service with dummy logic in a way that later, when we create real Service, it gets easily adapted.
Don’t worry about it for now. You will understand it later.
Code explanation
- of is an RxJs method that creates an Observable from a value.
- We have encapsulated the IsAddNew flag and Customer object array with Observable, which will be subscribed by Customer Component.
You can find almost all the logic in Customer Component is now part of Customer Service.
Let’s finish the Customer Component code, and then it will become more apparent.
Lab – Continued
Step 39 – Configure Injector for Customer Service
I believe you must have figured out the best way to do it.
We don’t need Custome Service to be available globally as a singleton instance. So the best will be configuring Element Injector of Customer Component with the provider for Customer Service.
......

import { CustomerService } from '../Services/customer.service';

@Component({
  selector: 'customer',
  templateUrl: './customer.component.html',
  providers:[CustomerService]
})

export class CustomerComponent {
......
Step 40 – Inject Customer Service in Customer Component
Inject Customer Service into Customer Component constructor as follows.
......

export class CustomerComponent {
  Customers: Array<Customer>;
  IsAddNew: boolean;
  FirstName: string;
  LastName: string;
  @ViewChild('myForm') CustomerForm: NgForm;
  LoginUserFirstName: string = 'DummyFName';

  constructor(private customerService: CustomerService,private authenticationService: AuthenticationService) {

......
Step 41 – Declare Observables
Create two global variables in the Customer Component class and point it to the respective Observables in Customer Service.
export class CustomerComponent {
  IsAddNew$: Observable<boolean>;
  Customers$: Observable<Array<Customer>>;
  FirstName: string;
  LastName: string;
  @ViewChild('myForm') CustomerForm: NgForm;
  LoginUserFirstName: string = 'DummyFName';

  constructor(private customerService: CustomerService,private authenticationService: AuthenticationService) {

......

......

    this.IsAddNew$ = this.customerService.IsAddNew$;
    this.Customers$ = this.customerService.Customers$;
  }
Step 42 – Handle other functionalities
Redefine Save, AddNew, and Cancel method in Customer Component as follows.
........

  AddNew() {
    this.customerService.setAddNew();
  }

  Reset() {
    this.CustomerForm.reset();
  }

  Save() {
    this.customerService.Save(new Customer(this.FirstName, this.LastName));
this.Reset();
  }

  Cancel() {
    this.customerService.setList();
this.Reset();
  }

  logout() {
    this.authenticationService.logout();
  }

}
As you can see, now our Component class is much cleaner than before.
All operations are simply redirected to Angular Service.
Step 43 – Handle Observables in Template
Next, we need to handle both IsAddNew$ and Customers$ Observables in the Customer template.
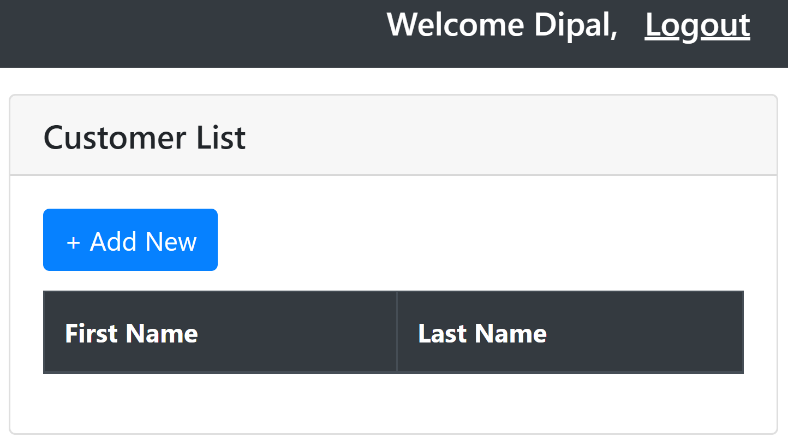
  <div class="card" [hidden]="IsAddNew$|async">
    <h5 class="card-header">Customer List</h5>

......
<table class="table table-striped table-bordered">
        <thead class="thead-dark">
          <tr>
            <th scope="col">First Name</th>
            <th scope="col">Last Name</th>
          </tr>
        </thead>
        <tbody>

          <tr *ngFor="let item of (Customers$|async)">
......

  <div class="card" [hidden]="!(IsAddNew$|async)" ngForm #myForm="ngForm">
    <h5 class="card-header">Add New Customer</h5>

......
Step 44 – Check the output
There shouldn’t be any syntax error as of this moment. You should be able to see Customer Component after login.
But there is one small problem. That is, you will find that the AddNew button won’t be working anymore.
Discussion – Continued
Let’s troubleshoot the above code and try to understand the reason for it.
Step 1
let’s examine the current value emitted by IsAddNew$.
In the Customer template, just after the nav element, add the h1 tag as follows.
<h1>IsAddNew value is {{IsAddNew$|async}}</h1>
Now, check the output.
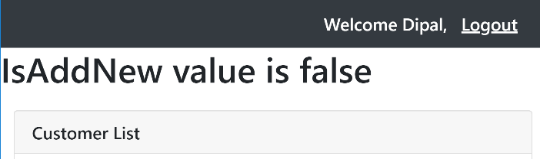
It proves that IsAddNew$ observable is properly subscribed as emitted values are displayed in the h1 tag.
Step 2
Next, let set the default value to false in the Service and see the output.
  constructor() {
    this.IsAddNew$ = of(true);
.......
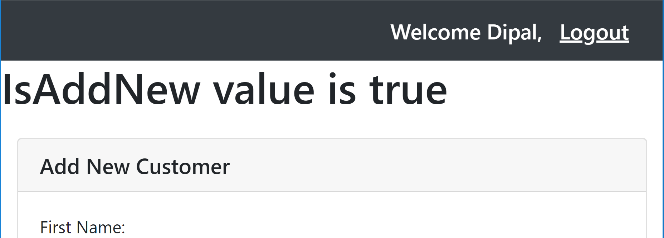
Surprisingly, not only we got proper value displayed in the h1 tag, but you will also notice that visibility is toggled now. No more Customer list is visible now. It got switched with Customer data entry.
Undo all the troubleshooting code, and let’s understand the reason.
Our troubleshooting proved that it was working correctly in the beginning but not on the AddNew click.
Let’s analyze the code in AddNew click.
  AddNew() {
    this.customerService.setAddNew();
  }
In the AddNew click, we have simply invoked the setAddNew method of Customer Service.
  setAddNew(){
    this.IsAddNew$ = of(true);
  }
In the setAddNew method, we have simply reassigned the IsAddNew$ with new Observable.
Reason for the error
It’s the simple object-oriented programming concept. Observable is a class and so reference type.
We have a variable IsAddNew$ in the Customer Service. It points to an Observable object which is subscribed by the Customer Component, and it emits false in the beginning.
- When the AddNew button is clicked, Customer Service creates a new Observable using the RxJs of method and assigns it to the IsAddNew$ variable.
- Technically, Customer Component has subscribed to the old Observable object.
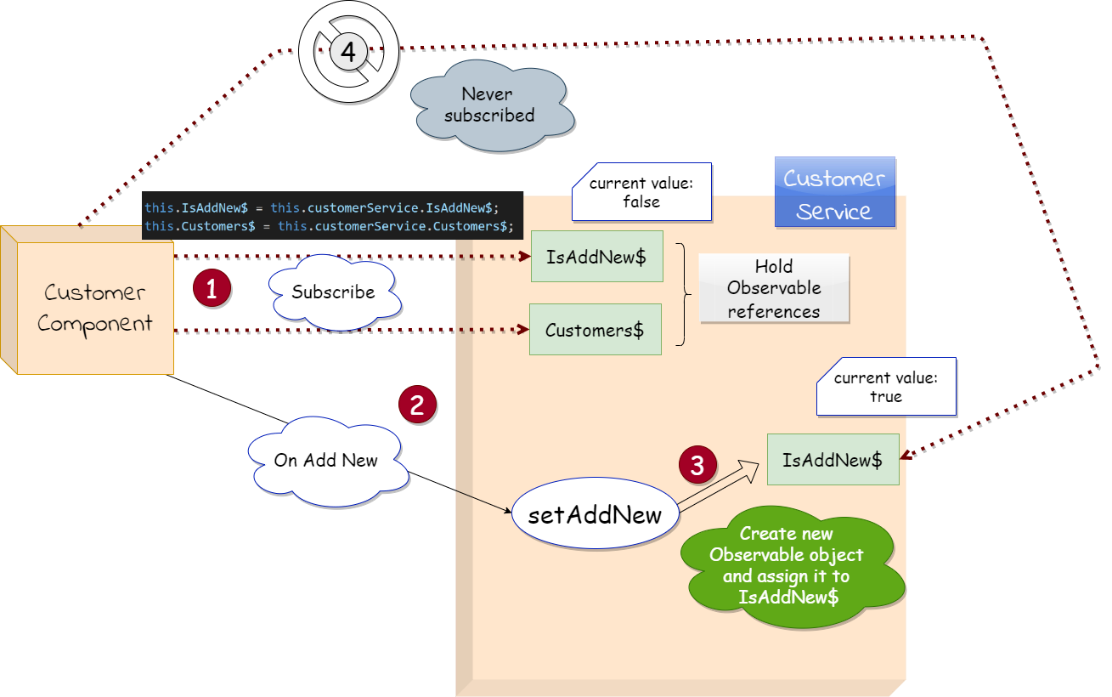
Solution
The solution is, instead of creating new Observable, we have to emit value from existing Observable.
Technically, an Observable class in RxJs won’t expose any methods for it.
Do you remember our previous discussion about the Subject? The Subject is both Observable and Observer.
Here are the steps.
- Customer Service maintains a Subject.
- Customer Component will subscribe to the Observable exposed by the above Subject.
- Custom Service emits new value using the same Subject.
Now, let’s implement this logic in the code.
Lab – Continued
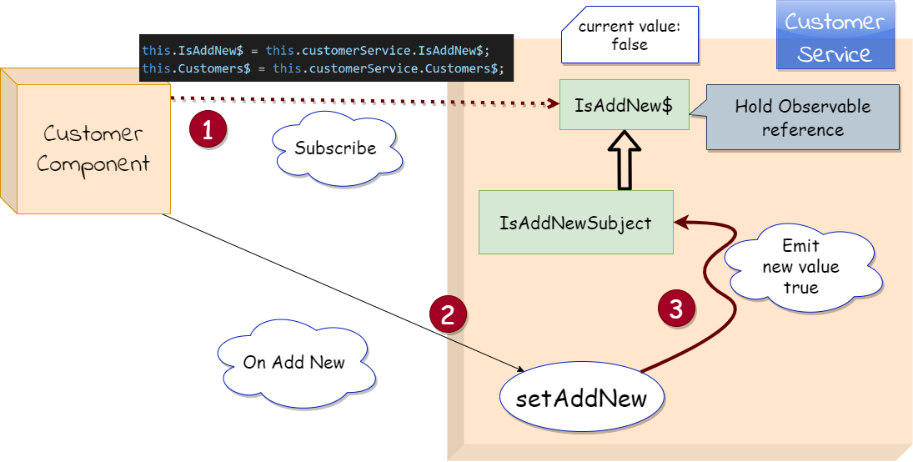
Step 45 – Subject in the Service
Create an object of Subject in the Customer Service and implement the logic mentioned in the last step as follows.
export class CustomerService {

  private Customers: Array<Customer>;
  private IsAddNewSubject: Subject<boolean>;
  IsAddNew$: Observable<boolean>;
  Customers$: Observable<Array<Customer>>;

  constructor() {
    this.IsAddNewSubject = new Subject<boolean>();
    this.IsAddNew$ = this.IsAddNewSubject.asObservable();
.........

  }

  setAddNew() {
    this.IsAddNewSubject.next(true);
  }

  setList() {
    this.IsAddNewSubject.next(false);
  }

  Save(customer: Customer) {
    this.Customers.push(customer);
    this.Customers$ = of(this.Customers);
    this.IsAddNewSubject.next(false);
  }
}
Step 46 – Check the output
Now both AddNew and Cancel action works as expected. (Don’t worry about Save method for now. We will come back to it)
Discussion – Continued
Although everything seems perfect, there is a small glitch in our lab. To find it out, let’s do a quick temporary change in the code.
In the Customer Components template file immediately after the nav tag, add the h1 tag as follows.
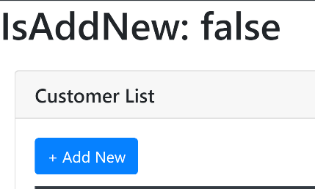
<h1>IsAddNew: {{IsAddNew$|async}}</h1>
Now, check the output. Let’s see what will get displayed in the Customer Component in the beginning.
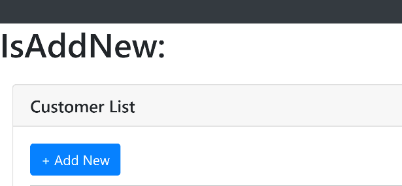
As you can see, it is displaying nothing.
Click Add New button and check the output.
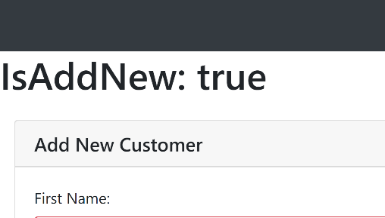
As expected, true is displayed.
Next, click Cancel and check the output.
Strangely, now it is displaying false, which was expected in the beginning.
Take some time and try to think about the reason.
Are you still not able to figure out the reason? Let’s do one more experiment.
Replace the code into the following.
<h1>IsAddNew: {{(IsAddNew$|async).toString()}}</h1>
This time, you will see everything broken with a runtime error that you can inspect in the developer tool.
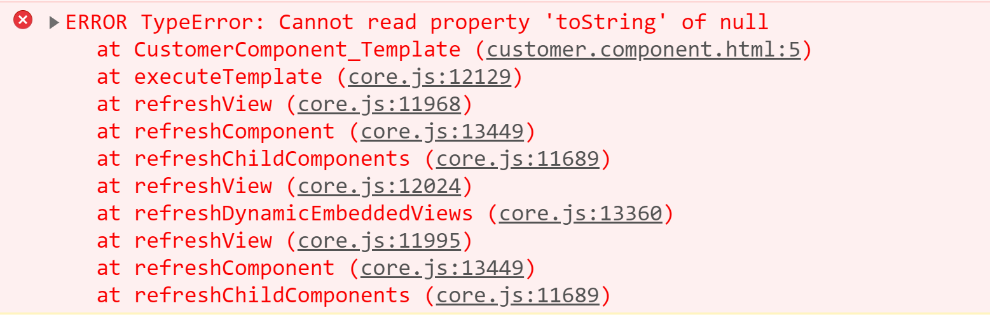
IsAddNew$ Observable emits value only when it is feed with some data using IsAddNewSubject.next method, and in the beginning, there is no value, and hence it is null.
Angular interpolation displays empty if the value is null.
In the Customer template, the list section is configured to get hidden when IsAddNew$ emits true with the help of the following code.
<div class="card" [hidden]="IsAddNew$|async">
IsAddNew$ emits nothing in the beginning, so IsAddNew$|async leads to the null value, which is not true; hence list section remains visible in the beginning.
On the other side, the data entry section is configured to get visible when IsAddNew$ emits false with the help of the following code.
<div class="card" [hidden]="!(IsAddNew$|async)" ngForm #myForm="ngForm">
Try to check the value of !null in JavaScript. You will find it will be true, and hence the data entry section remain hidden in the beginning.
You can ignore this glitch as output is as per expectation, but as a best practice, it should be solved.
It can be achieved using BehaviorSubject instead of the Subject.
Unlike Subject, the BehaviorSubject constructor accepts a parameter. That value will be emitted as soon as it is subscribed.
In simple words, with BehaviorSubject, we will get the opportunity to assign(emit) default values.
Let’s do the same.
Step 47 – Change the Subject
Open Customer Service and replace the Subject with BehaviorSubject as follows.
......

  private Customers: Array<Customer>;
  private IsAddNewSubject: BehaviorSubject<boolean>;
  IsAddNew$: Observable<boolean>;
  Customers$: Observable<Array<Customer>>;

  constructor() {
    this.IsAddNewSubject = new BehaviorSubject<boolean>(false);
    this.IsAddNew$ = this.IsAddNewSubject.asObservable();
......
As you can see in the above code, we are passing false as the parameter to the BehaviorSubject constructor as we want the default value to be false.
Step 48 – Check the output
Now cross-check the output with the help of the temporary header tag used in the above discussion.
(Don’t forget to remove the temporary code after testing.)
Discussion – Continued
Are we done or still missing something? 😉
Unfortunately, there is one more issue that can be easily ignored but shouldn’t be. To find out the same, I would like to share the new way of debugging in Angular.
Follow the following steps one by one.
Step 1 – Select Customer Component
Open developer tools in chrome, navigate to the Elements tab, and finally select Customer Component.
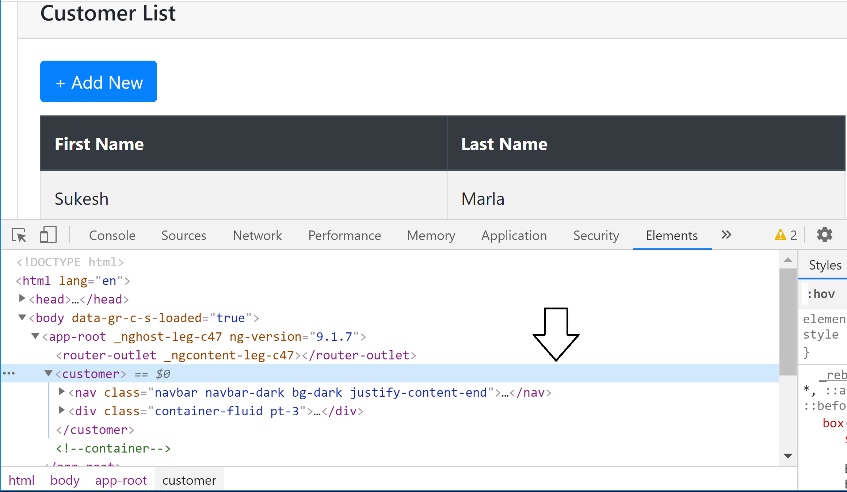
Step 2 – Display selected Component
Now get into the console tab and type “$0” and press enter.
It returns the currently selected DOM element.
Step 3 – Get the Component
Next, write the following code in the console.
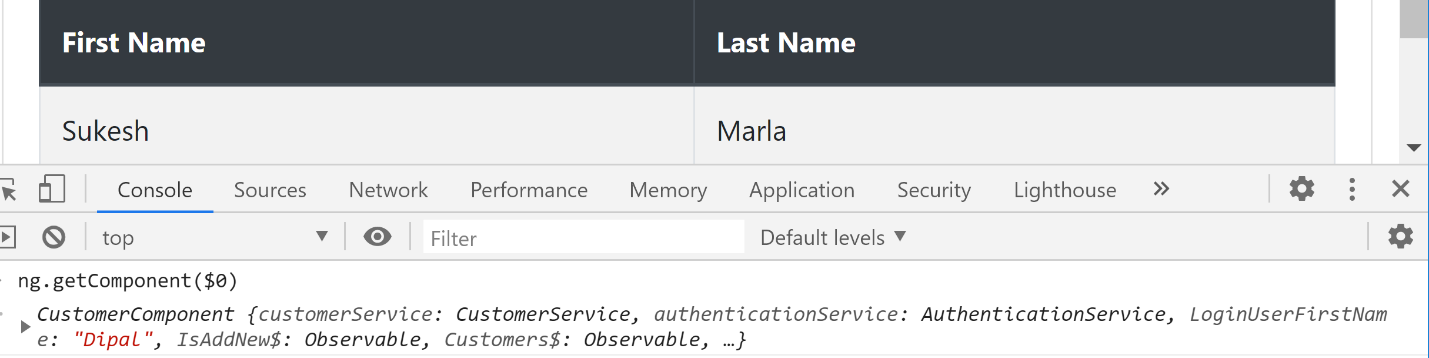
Cool, isn’t it? It displays the instance Customer Component attached to the selected element.
Don’t jump to any kind of additional experiment with it for now. Later in this book, we will discuss “Change Detection,” and only after that will you able to take real advantage of such kind of discussion.
For now, follow the next step so that we can identify the current issue.
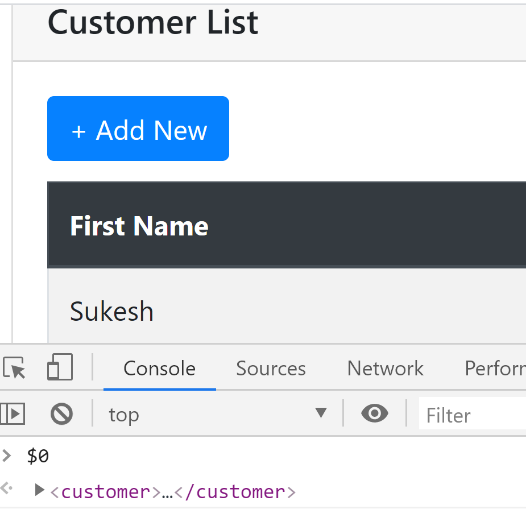
Step 4 – Explore “IsAddNew$”
First, expand Customer Component and then IsAddNew$.
You will find a property called source. It is BehaviorSubject.
Expanding it, you will find a property called observers, which represents the collection of subscribers subscribed to the Observable.

In our case, you can see two subscribers. It means we have subscribed to IsAddNew$ two times.
If you cross-check the code, you will notice mentioning {IsAddNew$|async} twice. Once for showing and once for hiding. Every time an async pipe is used, Observable will be automatically subscribed, and all the subscription objects will be destroyed when containing Component instance is destroyed.
As a best practice, we should avoid unnecessary subscriptions.
It can be achieved by manually subscribing and unsubscribing instead of using an async pipe.
There are other ways too.
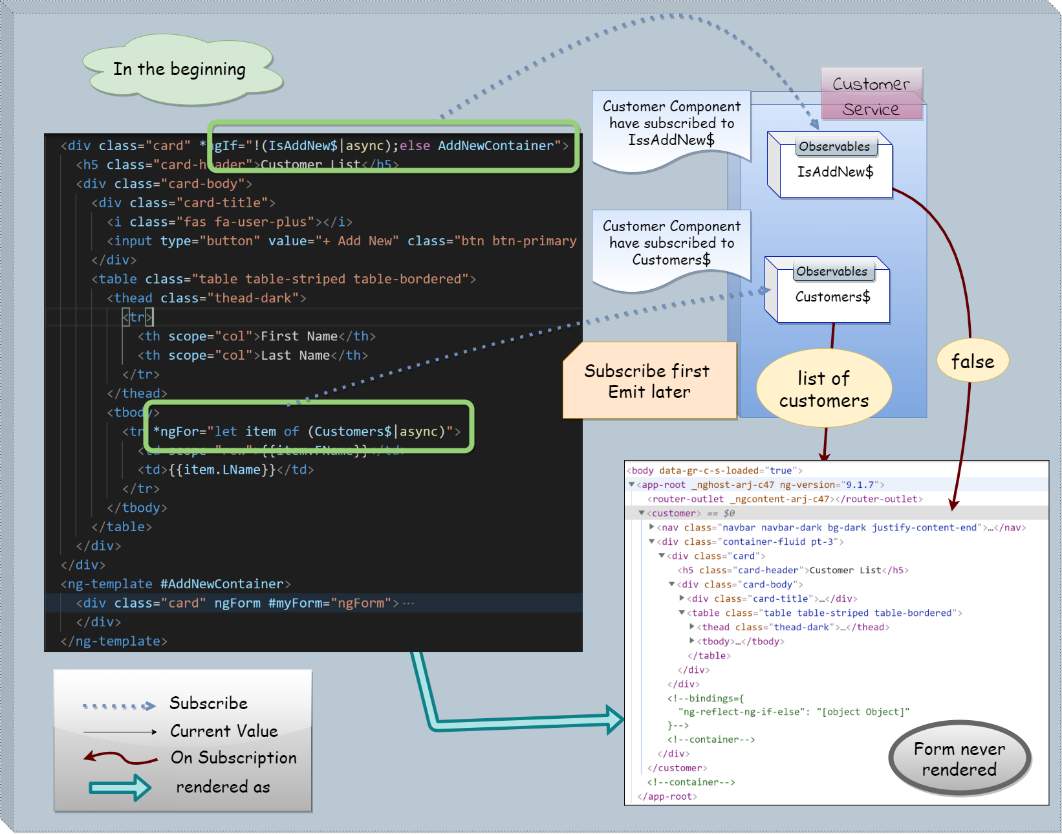
*ngIf and “async as”
Check the following image.
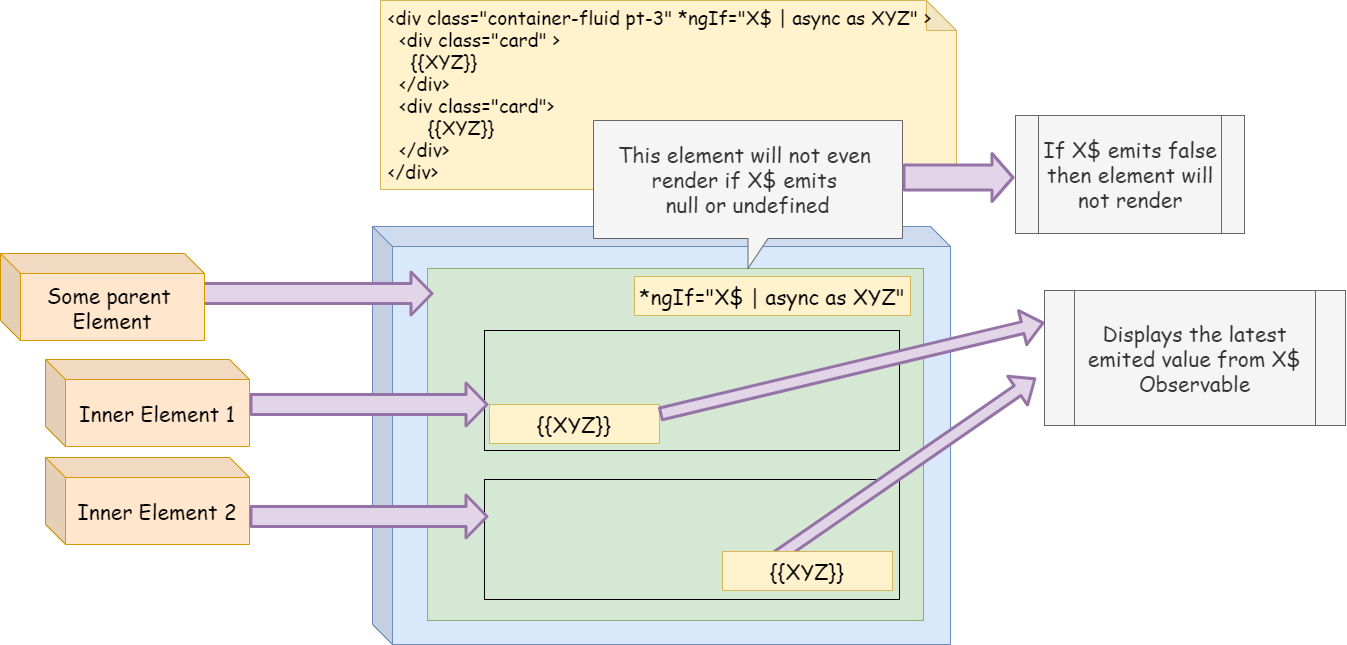
First of all, let’s understand what it is, and then let’s talk about the use cases where this solution can be implemented.
- Is this approach, we will attach the *ngIf directive to an element and assign it to Observable with the async pipe followed by an alias name. In the above image, we have a parent div element to which we have attached the *ngIf directive.
- When Observable emits a value, it will be stored in a variable accessible inside the element. In our case, XYZ will hold the latest value emitted by the Observable.
Now the drawback of this approach is Observable must emit some value, and that value cannot be false.
- Let’s say X$ Observable in the above example returns a boolean value false. In such a situation, the parent element containing the *ngIf directive won’t even get rendered because that’s how *ngIf works.
- If Observable emits boolean value true or any non-null value, then element gets rendered, and the latest value will be held into XYZ. It can be used any number of times inside that div.
So in the current scenario of IsAddNew$, we cannot implement this solution. (I suggest you to try it, to make it more clear.)
You must wonder, what if just negate the value while using *ngIf.
Well, that’s not possible either as negation won’t work with async as syntax.
async as may seems like a useless feature to you.
It is not useless. You will see it in action very soon.
The new solution – *ngIf and else approach
In this approach, we will use *ngIf with else.
We already have an example of *ngIf. Well, there is some extension to it. We can specify the else part as below.
<div class="card" *ngIf="!(IsAddNew$|async);else AddNewContainer">
Are you wondering what AddNewContainer is? It is a template reference variable. We have to attach it to the other element. In our case, it is the data entry div.
The problem is we can’t do that because we have already used a template reference variable with that div element to get the instance of the ngForm directive.
<div class="card" ngForm #myForm="ngForm">
So the solution is to have another parent element surrounding the above div element. Doing so, we may disrupt the HTML structure, and our UI may get affected.
Fortunately, Angular has a provision to create a virtual parent element. The element which won’t affect the UI and just act as a parent. It is ng-template. We can call it a silent parent. We can attach Directives to it, but it won’t do any effect on our design.
So without further dues, let’s implement it.
Lab – Continued
Step 49 – Apply *ngIf with else
Change Customer Template as follows.
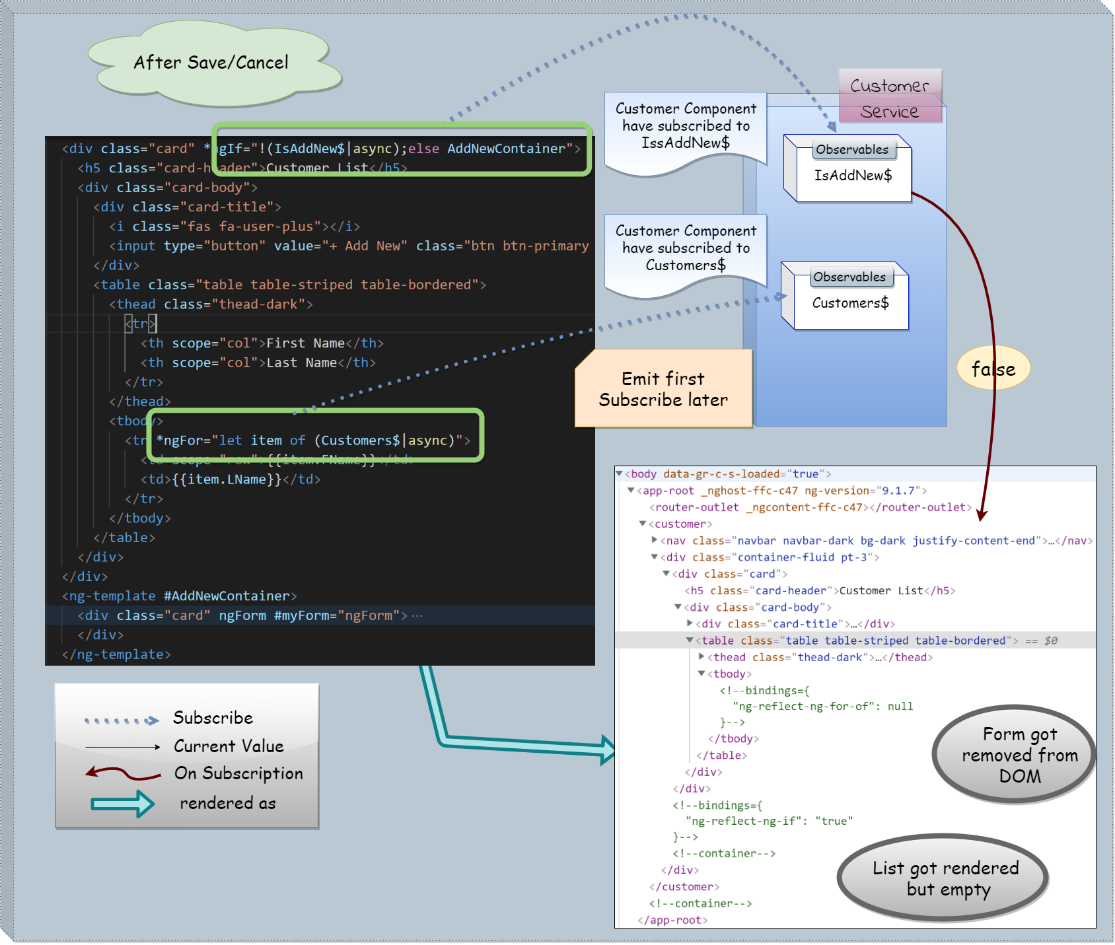
......

<div class="container-fluid pt-3" >
  <div class="card" *ngIf="!(IsAddNew$|async);else AddNewContainer">

    ......
  </div>

  <ng-template #AddNewContainer>
   <div class="card" ngForm #myForm="ngForm">

    ......
</div>
</ng-template>
</div>
Step 50 – Check the output
Finally, you will find a correctly working output. Also, check the number of subscriptions happening using the procedure followed in the last discussion.
Before jumping to the next step, I want you to try adding a new record. Put some values into FirstName and LastName textboxes and save a new Employee. Fortunately, that will work perfectly fine too.
Discussion – Continued
Now there is confusion.
Isn’t the above theory applies to Customers$ also?
Customers$ is a variable in the Customer Service pointing to an Observable object which is subscribed by the Customer Component. When the Save button is clicked, the new Observable object is created and assigned to the Customers$ variable.
In short, Observable subscribed by Customer Component and the Observable pointed by Customers$ after save are different.
In a much simpler word, it should exhibit the same issue we had with IsAddNew$ before.
The confusion part is, it will not exhibit any issues. If you have tested save functionality during the last testing, you must have noticed that save works without any problem. Unfortunately, after learning the IsAddNew$ issue, it wasn’t the expected output.

Let’s dig more into it.
Let’s start with IsAddNew$ and understand what was happening before the Subject or BehaviorSubject solution was implemented.
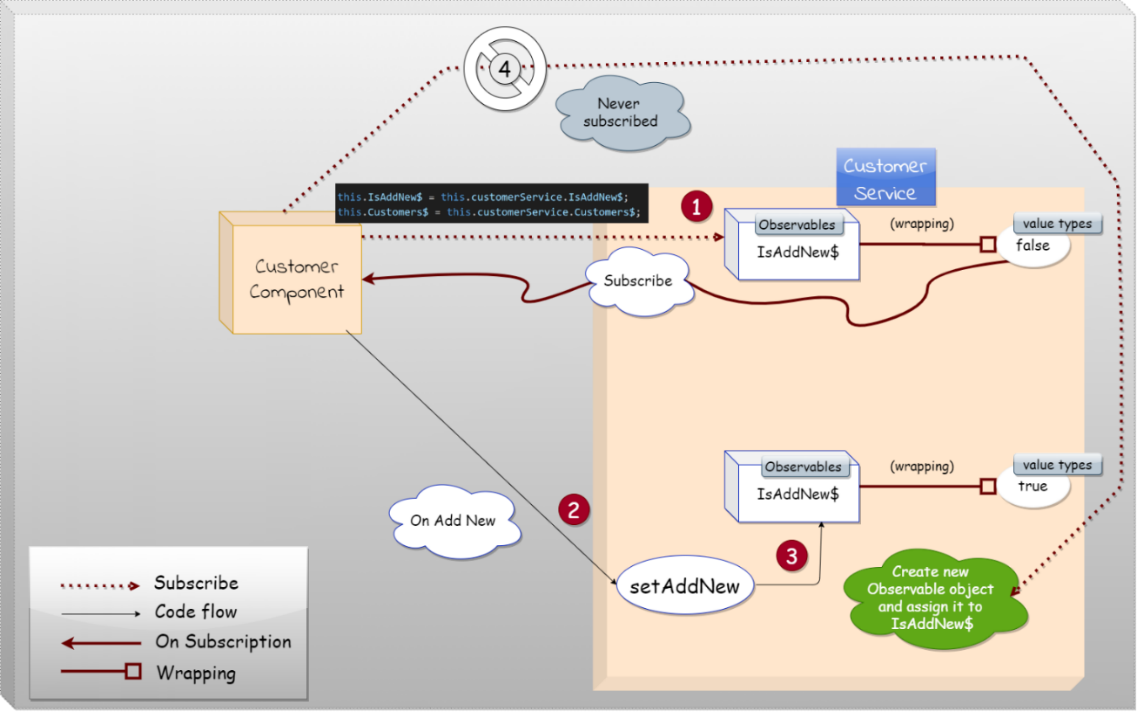
- As concluded before, the IsAddNew$ variable is pointing to two sets of Observables one in the beginning and one after the Add New action.
- Both of those Observables are emitting boolean values.
- Customer Component has subscribed to the first Observable, and hence it will get the values only emitted by first Observable and not second.
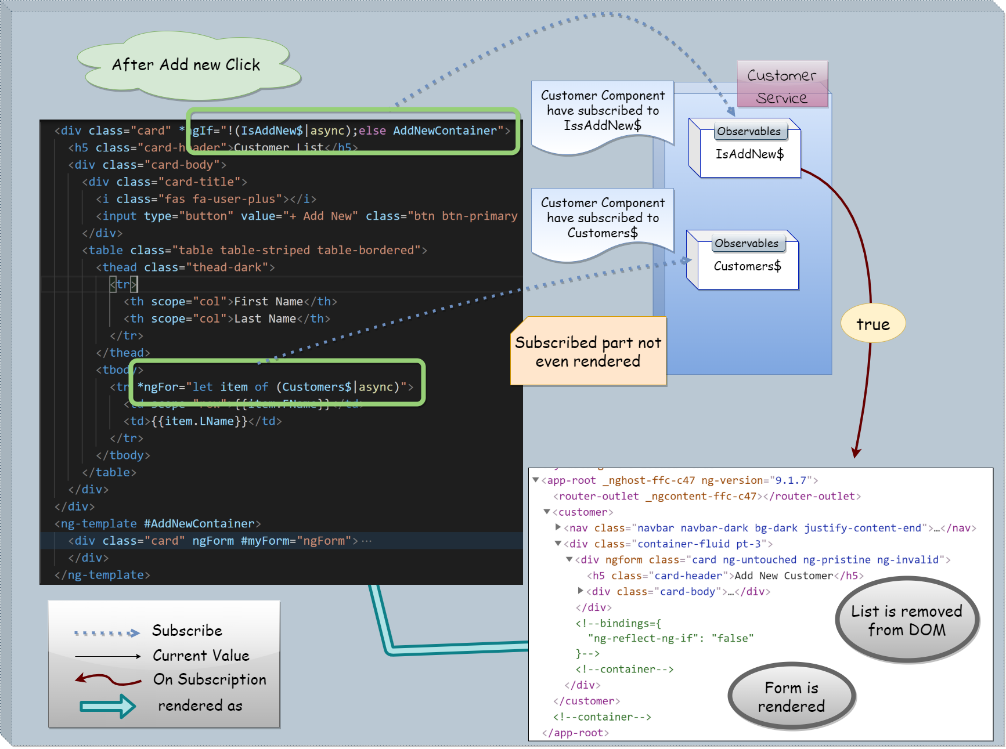
Look at the complete flow below.
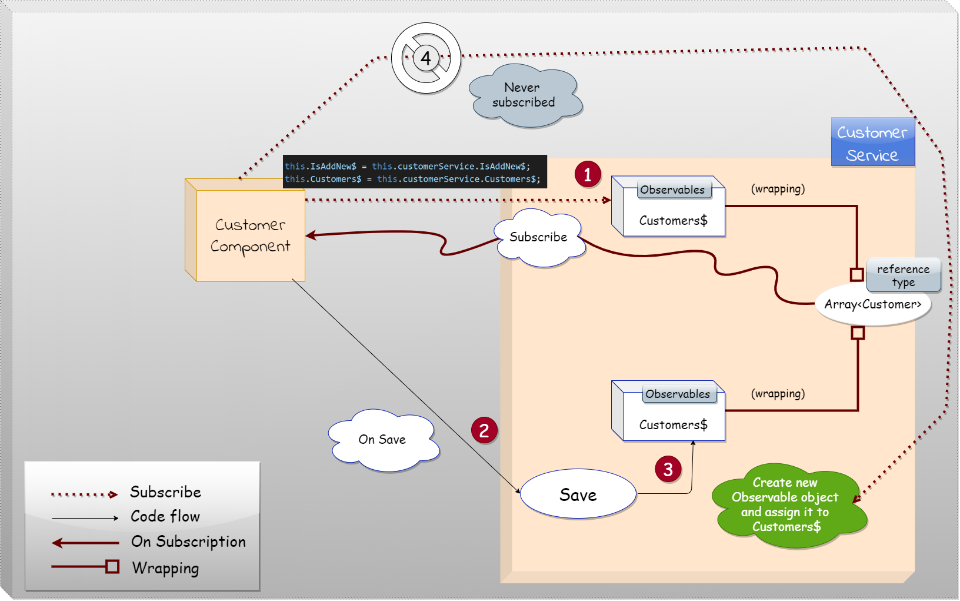
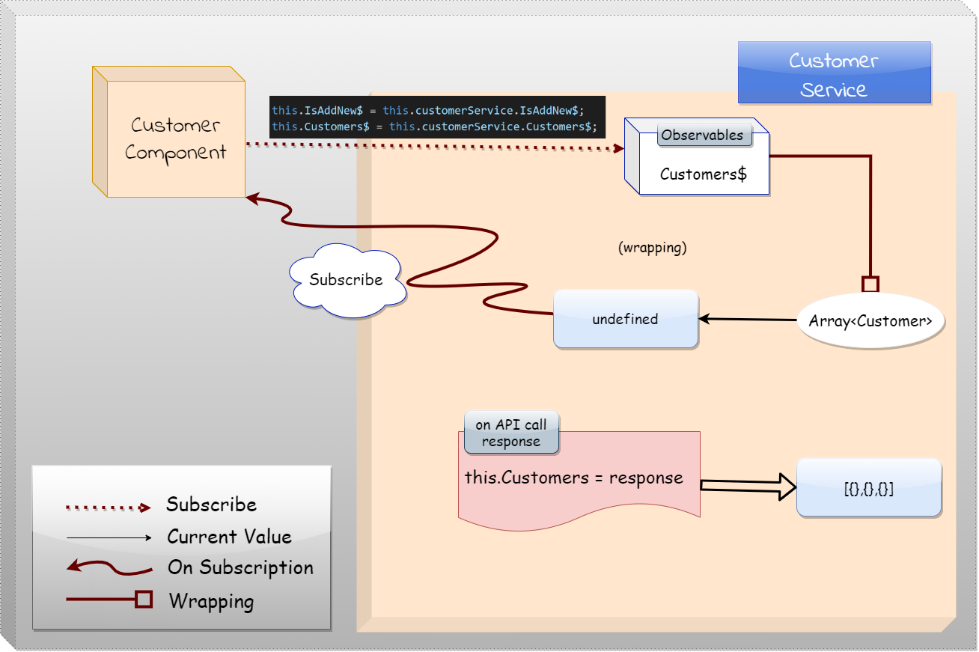
The story of Customers$ is a little different. (Check out the below image)
- In the Customer Service, a class-level variable is defined of type Array of Customer.
- We also have an Observable in Customer Service called Customers$, which emits above class-level variables.
- Customer Component has subscribed to above Customers$, and so it will get the reference of Array Customer defined in the Customer Service. Please note, Customer Component will get the reference not value as Array is a reference type.
- In the Save method of Customer Service, we are adding a new Customer element to the Array of Customer. (Don’t forget that both Customer Component and Customer Service share same reference Array).
- So, in this case, what we do with Observable or Subject doesn’t matter. Customer Component always sees the updated Array.
That is the reason why everything is working as per expectation. That won’t be the case once we connect real-time REST service in Customer Service. As of now, we are dealing with a dummy hardcoded list.
In fact, nothing will work once real-time API is connected.
So next, we will connect it to real-time Service.
Step 51 – Inject HttpClient into the Customer Service
The first thing is, get the HttpClient Service injected into Customer Service as follows.
.........

import { HttpClient } from '@angular/common/http';

@Injectable()
export class CustomerService {

.......

  constructor(private httpClient: HttpClient) {

......
Step 52 – Get the latest server code
Make sure to download the latest server code for Lab4 from the GitHub and run it using the “node server.js” command just like before.
Step 52 – Get customers from REST Service
Change the code in the constructor of Customer Service as follows to get real-time data.
......

  Customers$: Observable<Array<Customer>>;

  constructor(private httpClient: HttpClient) {

    this.IsAddNewSubject = new BehaviorSubject<boolean>(false);
    this.IsAddNew$ = this.IsAddNewSubject.asObservable();
    // this.Customers = new Array<Customer>();
    // this.Customers.push(new Customer('Sukesh', 'Marla'));
    // this.Customers.push(new Customer('Just', 'Compile'));
    // this.Customers.push(new Customer('Ram', 'Lakhan'));
    this.Customers$ = of(this.Customers);
    this.httpClient.get<Array<Customer>>('http://localhost:4000/signin').subscribe(x => {

      this.Customers = x;

    });
  }
...
Step 53 – Check the output
Complete the login and get into the Customer Component.
Unfortunately, we will get something like below.
Open developer tools and see if there is any runtime error.
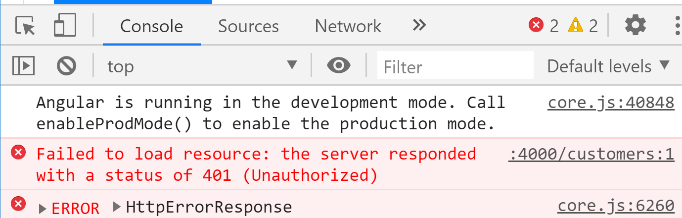
Discussion – Continued
Do you remember our discussion in the previous chapter about token-based authentication?
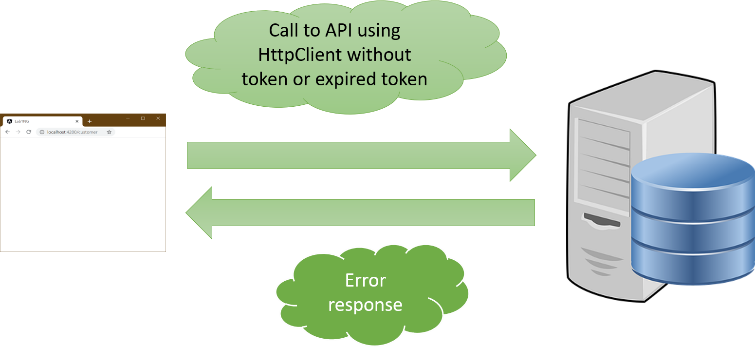
We have to make sure to pass token while making API calls as APIs are protected from unauthorized access. Let’s do the same.
Lab – Continued
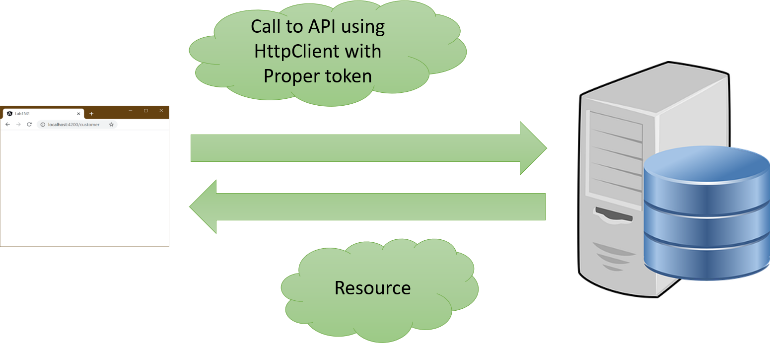
Step 54 – Pass token in the header
Change code in the Customer Service constructor to the following.
......


      this.Customers$ = of(this.Customers);
      this.httpClient
      .get<Array<Customer>>('http://localhost:4000/customers', {
        headers: { 'x-access-token': localStorage.token },
      })
      .subscribe((x) => {
        this.Customers = x;
      });

......
As you can see, we are passing token in the header of Http call. That’s because our server is expecting that way. It may be different for other server code.
Step 55 – Check the output
Strangely if even after adding a token, you still not get the output. Check the command prompt where you executed “ng serve” in the beginning.
Did you any anything? No, that means there is no compile error.
Next, Open developer tools in chrome and check if there is an error. There won’t be any error that means there is no runtime error.
Finally, let’s put a breakpoint and let’s confirm if there is any logical error. Put breakpoint inside subscribe and check what is returned from the server.
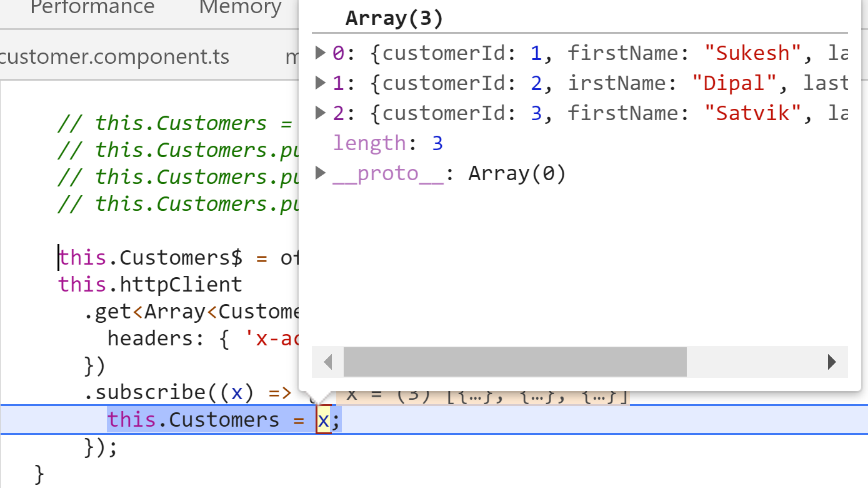
It seems API successfully invoked, and the proper response is returned from the server.
So what’s the problem? Let’s discuss the same.
Discussion – Continued
Let’s analyze the existing code step by step.
- Customer Component has a reference Customer$ Observable in Customer Service with the help of the following code.
this.Customers$ = this.customerService.Customers$;
2. This Observable is subscribed using the async pipe as following.
......
<tr *ngFor="let item of (Customers$|async)">
......
3. Customer$ is initialized in the constructor of Customer Service.
this.Customers$ = of(this.Customers);
this.Customers$ = of(this.Customers);
In the above code, Customers is a class variable defined in the Customer Service and have not assigned any default value.
In the above code, where we are trying to initialize Customers$ variable, Customers variable doesn’t have any value, or the better statement is value is undefined.
4. Hence the subscriber will get undefined as the emitted value. That’s the reason why the Customer list is showing no records.
5. Next, in the constructor of the Customer Component, we have made the API call to get the dynamic Customer collection.
this.httpClient
get<Array<Customer>>('http://localhost:4000/customers', {
headers: { 'x-access-token': localStorage.token },
})
.subscribe(......);
- After that, Customers variable in the Customer Service is re-initialized with the API call response.
subscribe((x) => {
this.Customers = x;
});
But this new value creates a new reference in memory, and our Customers variable will be pointing to it instead of undefined value.
At this point, our Customer Component neither has any connection with this new reference, nor it got notified about the value update.
Check the image below.
The existing code is not going to serve the purpose. We need a solution where as soon as API returns the response, that response should be emitted to Customer Component. Do you know how to do it? Think about it for a while, and then jump to the lab.
Lab – Continued
Step 56 – Create Subject and Observable in Customer Service
Remove the Customers variable from the Customer Service.
Then create a variable CustomersSubject of type Subject as follows.
......

export class CustomerService {

  // private Customers: Array<Customer>;
  private IsAddNewSubject: BehaviorSubject<boolean>;
  IsAddNew$: Observable<boolean>;
  private CustomersSubject: Subject<Array<Customer>>;
  Customers$: Observable<Array<Customer>>;
  constructor(private httpClient: HttpClient) {
......
Step 57 – Initialize Subject and Observable
Initialize both CustomersSubject and Customers$ in the Customer Service constructor, just like we did IsAddNewSubject and IsAddNew$, respectively, in the constructor.
constructor(private httpClient: HttpClient) {

    this.IsAddNewSubject = new BehaviorSubject<boolean>(false);
    this.IsAddNew$ = this.IsAddNewSubject.asObservable();
    this.CustomersSubject = new Subject<Array<Customer>>();
    this.Customers$ = this.CustomersSubject.asObservable();
Step 58 – Emit Customers
Emit the response retrieved from the API call using the next method of the Subject as follows.
this.httpClient
      .get<Array<Customer>>('http://localhost:4000/customers', {
        headers: { 'x-access-token': localStorage.token },
      })
      .subscribe((x) => {
        this.CustomersSubject.next(x);
      });
Step 59 – Comment Save logic
As of now, you will find a few syntax errors in the Save method in Customer Service. Comment the code in the Save method for now.
 Save(customer: Customer) {
    // this.Customers.push(customer);
    // this.Customers$ = of(this.Customers);
    // this.IsAddNewSubject.next(false);
  }
Step 60 – Check the output
This time you will get a weird output.
Discussion – Continued
In the above output, you can see three rows. It means API is returning a list with three records. This time to find out the reason for this, we will follow a new approach of troubleshooting or debugging.
Open Customer Template and then create the div element after the nav element as follows.
......

</nav>

<div>
  {{Customers$|async}}
</div>

<div class="container-fluid pt-3">

......
Now check the output.
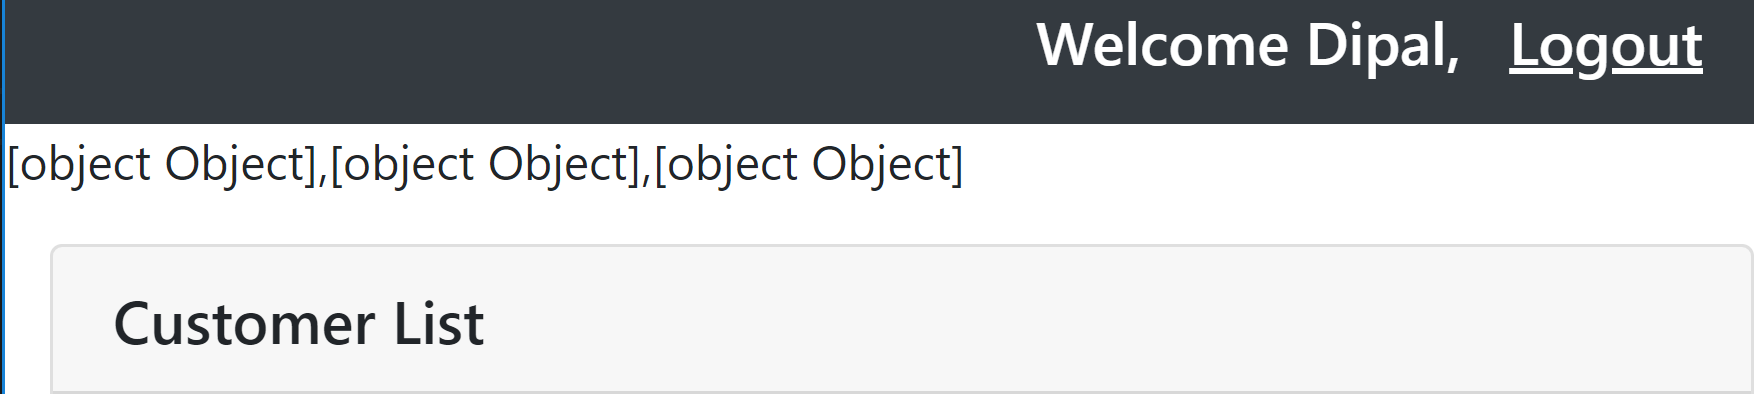
It’s not helping, isn’t it? It just proved that we are getting three objects.
What if I say, there is a way to display its JSON-format representation.
That can be possible using the json pipe
json pipe converts a value into its JSON-format representation.
Apply json pipe after the async pipe as follows.
<div>
  {{Customers$|async|json}}
</div>
The above code indicates that the async pipe will be attached to Customer$, and the json pipe will be attached to the response returned by the async pipe. So the sequence is crucial when multiple pipes are attached.
Now check the output.
Were you able to understand why we were getting three empty rows?
We are getting firstName and lastName, whereas, in the Customer template, we are displaying FName and LName. In simple words, our model is not compatible with the API response.
Hence we have to transform the API response into our Customer model before emitting it to the subscriber that is Customer Component, and for that, we can use the map operator of RxJs.
Lab – Continued
Step 61 – Use map operator
Use the map operator of RxJs to transform the actual response to the required response as follows.
......
import { BehaviorSubject, Observable, Subject } from 'rxjs';
import { map } from 'rxjs/operators';
import { Customer } from '../Models/customer';
......

    this.httpClient
      .get<Array<{firstName: string, lastName: string}>>('http://localhost:4000/customers', {
        headers: { 'x-access-token': localStorage.token },
      }).
      pipe(map(customerAPIResponse => {
        return customerAPIResponse.map(customer => new Customer(customer.firstName, customer.lastName));
      }))
      .subscribe((x) => {
        this.CustomersSubject.next(x);
      });
  }

......
Discussion – Continued
Let’s understand the above code step by step.
Let’s start with Observable<Array< <{firstName: string, lastName: string}>>.
It represents Observable emitting an Array. That Array is a collection of the object which will have two properties firstName and lastname.
Please note that you may choose to create separate classes for holding API responses, and that will be a best practice too.
But many times in the Application, we end up in a situation where we don’t want to create a separate class but need something dynamically. In such a case, we can use it in this way.
But for this scenario, it’s good to create a custom class for the same.
Lab – Continued
Step 62 – Create CustomerItemResponse class
Create a new file customer.response.ts in the Modes/HttpResponses folder with the following content.
export class CustomerItemResponse{
  constructor(public firstName: string, public lastName: string) {
  }
}
Step 63 – Use CustomerItemResponse class
Rewrite our Customer Service API logic to following
......
    this.httpClient
      .get<Array<CustomerItemResponse>>('http://localhost:4000/customers', {
        headers: { 'x-access-token': localStorage.token },
      }).
......
Discussion – Continued
Now, let’s explore the code further and understand it better.
In the current code, get method returns Observable<Array<CustomerItemResponse>>.
Don’t get confused between the Observable.pipe and the Observable.subscribe method.
The pipe method is for chaining Observable operators, and the subscribe is for activating the Observable and listening for emitted values.
In more straightforward words, we subscribe to the Observable to get the emitted value.
Before it reaches the subscribe method, emitted value pipe through the various operators who may alter the value or may even stop from further emitting.
In the above case, we have configured the emitted record to pipe through the map operator. map operator let us transform the value to something else.
As you can see, in the above code, we have transformed Array<CustomerItemResponse> to Array<Customer>.
Finally, inside the subscribe method callback, x represents Array<Customer>.
Lab – Continued
Step 64 – Check the output
Finally, the one output we have been waiting for a long time.
Discussion – Continued
Let’s solve the last part of the puzzle. That is saving record with an API
Lab – Continued
Step 65 – Create Request entity
Create a new folder inside the Models folder as HttpRequests and then create a new file newcustomer.requests.ts with the following content.
export class NewCustomer{
  constructor(public firstName: string, public lastName: string) {
  }
}
You must be wondering why we haven’t used one of the existing classes. Well, you can if you wish. 😊
I prefer to have three different sets of entities in my Application – one for representing the data needed in the view, one for representing responses, and one for serving requests.
Step 66 – map “Customer” to “NewCustomer”
Now in the Save method of Customer Service, create an instance of the NewCustomer class using the Customer class instance as follows.
Save(customer: Customer) {
    // this.Customers.push(customer);
    // this.Customers$ = of(this.Customers);
    // this.IsAddNewSubject.next(false);
    const newCustomer: NewCustomer = new NewCustomer(
      customer.FName,
      customer.LName
    );
  }
Step 67 – Save the Customer
Make API call in the Save method in Customer Service as follows.
Save(customer: Customer) {
    // this.Customers.push(customer);
    // this.Customers$ = of(this.Customers);
    // this.IsAddNewSubject.next(false);
    const newCustomer: NewCustomer = new NewCustomer(
      customer.FName,
      customer.LName
    );

    this.httpClient
      .post('http://localhost:4000/customers', newCustomer)
      .subscribe(() => {
        this.IsAddNewSubject.next(false);
      });
  }
As you can see, this time, we have to use the post method instead of the get method of HttpClient as we want to post data.
In the subscribe, we are emitting true value from the IsAddNewSubject, which will switch us back to the list screen.
Step 68 – Check the output
Try to save a new Customer. It won’t work for sure. Can you guess the reason? Try to think.
If you couldn’t be able to find out the reason, then open developer tools, and you will find a known issue. API is protected from unauthorized access. We need to pass the token.
Step 69 – Pass the token
Pass the token in header similar to what we did during the get request.
this.httpClient
      .post('http://localhost:4000/customers', newCustomer, {
        headers: { 'x-access-token': localStorage.token },
      })
      .subscribe(() => {
        this.IsAddNewSubject.next(false);
      });
Step 69 – Check the output
Try to create a new Customer with the first name as “Gabbar” and last name as “Singh.” After saving, you will have a weird output like below.
What just happened? Let’s discuss this.
Discussion – Continued
Before you read further, I recommend you to do a hard refresh (F5) in your browser.
Strangely you will see the new record added and so displayed in the list.
Let’s understand what is going on here, step by step. Let’s start exploring what we get in the beginning.
- IsAddNew$ is subscribed by the Customer Component using the async pipe, and *ngIf directive will use emitted value.
- *ngIf directive let element created, only when the value is true. Hence, in the beginning, only the list section gets rendered, and form section won’t even get rendered into the DOM.
- In the Service, a list of Customers is obtained from API and emitted via Subject.
- Those emitted lists of customers get displayed in the view.
Now let’s understand when we click the Add New button.
- IsAddNew$ emits false, which makes the list section gets removed from the DOM and form section get rendered.
- Now no one is subscribed to Customers$. At this point, if it emits something, there will not be anyone to catch it.
Finally, let’s take a look at the picture after Save/Cancel.
- IsAddNew$ again emits true.
- It results in the removal of the form section from DOM and re-creation of the list section.
- Now the surprise is, the newly created list is not the same old one.
The old list element, along with the corresponding subscription, was already gone completely when the Add New button was clicked.
Its created again, and although it subscribed to Customer$, it won’t get the last emitted value as it’s a new subscription.
So what’s the solution? One solution will be to use RxJs BehaviorSubject or ReplaySubject instead of the Subject. Both of these catch the last response, and as soon as the new subscriber comes to picture, it gets the previous emitted value.
You have already seen BehaviorSubject in action with IsAddNew$.
ReplaySubject is new. Unlike BehaviorSubject, it is not limited to only the last value. It can cache the n number of emissions, and new subscribers get all of them. In contrast, it cannot have a default value, which is possible with BehaviorSubject.
I recommend you to try replacing Subject with BehaviorSubject or ReplaySubject just for fun and check the output.
Now that we understood the reason for such issues and how those can be tackled, let’s think if the same solution can be implemented in the current situation.
The answer is no.
After Save, we expect a new set of records to be loaded form API again and then displayed in the UI. By using BehaviorSubject, we will only emit the last set records to new subscribers. We are also interested in the newly added as well.
So for us, the solution is making a new API call after Save and emit a new set of records.
Lab – Continued
Step 70 – Create “LoadCustomers” method
As logic for reading new Customers is going to be the same as before (the one in the constructor), let’s simply create a reusable function and use it in both places.
......
    constructor(private httpClient: HttpClient) {
    this.IsAddNewSubject = new BehaviorSubject<boolean>(false);
    this.IsAddNew$ = this.IsAddNewSubject.asObservable();
    this.CustomersSubject = new Subject<Array<Customer>>();
    this.Customers$ = this.CustomersSubject.asObservable();
    this.LoadCustomers();
  }

  private LoadCustomers(): void{
    this.httpClient
    .get<Array<CustomerItemResponse>>('http://localhost:4000/customers', {
      headers: { 'x-access-token': localStorage.token },
    })
    .pipe(
      map((customerAPIResponse) => {
        return customerAPIResponse.map(
          (customer) => new Customer(customer.firstName, customer.lastName)
        );
      })
    )
    .subscribe((x) => {
      this.CustomersSubject.next(x);
    });
  }
......
Step 71 – Update the “Save” method
Change the Save method in the Customer Service as follows.
Save(customer: Customer) {
 const newCustomer: NewCustomer = new NewCustomer(
   customer.FName,
   customer.LName
 );
  this.httpClient
    .post('http://localhost:4000/customers', newCustomer, {
      headers: { 'x-access-token': localStorage.token },
    })
    .subscribe(() => {
      this.LoadCustomers();
      this.IsAddNewSubject.next(false);
    });
}
Step 72– Check the output
Finally, we are on track again.
Discussion – Continued
Is there anything that can be improved in the current code.
Go through complete code once again as a revision before moving further if you can find the room for improvement, then excellent.
The problem is adding a token. We have to do it in almost every API call moving on.
The solution is HTTP Interceptors. Using it, we can transform every outgoing request or incoming response in between.
In our demo, we will create and register an interceptor, which will transform every outgoing request by adding a token in the header.
Excited to see it in action, let’s do it.
Lab – Continued
Step 73 – Create TokenInterceptors
Inside the Services folder, create a new folder Interceptors and then create a new file, http.interceptor.ts, as follows.
import { HttpEvent, HttpHandler, HttpInterceptor, HttpRequest }
                  from '@angular/common/http';
import { Injectable } from '@angular/core';
import { Observable } from 'rxjs';

@Injectable()
export class TokenInterceptorService implements HttpInterceptor {

  constructor() {}
  intercept(req: HttpRequest<any>, next: HttpHandler): Observable<HttpEvent<any>> {

     const token = localStorage.token;
     let newHeaders = req.headers;
     if (token) {
       // if token is not undefined
        newHeaders = newHeaders.append('x-access-token', token);
     }

     // HttpRequests are immutable so it cannot be altered
     // Hence we are creating a clone out of it along with adding headers
     const authReq = req.clone({headers: newHeaders});
     return next.handle(authReq);
  }
}
Discussion – Continued
Does it look like a Service to you?
It should be because it is a Service, indeed. In the next step, we even configure Injectors.
Understand the code
It is a simple code.
We have a class implementing the HttpInterceptor interface, which forces us to define the intercept method.
Inside the “intercept” method, we are cloning the existing Http request because we cannot modify the Http request directly as they are immutable.
Immutable means they cannot be changed.
As you can see, we have passed the custom header to the “clone” method. Hence the new request object will have authentication headers attached to it.
Which Injector should be configured for TokenInterceptors?
As I said, we need to configure Injector with a provider to make Angular DI system support injecting of TokenInterceptor. But before that, let’s revise what we learned so far.
- So far, we have created a couple of Services and configured both Module and Element Injectors.
- For configuring Module Injector, we have used an Injectable decorator, and for Element Injectors, we have used Component decorator.
- As of now, we have only one Angular Module in action, and that is our root Module. Hence we have only one Module Injector that is root Injector, and it creates an applicationwide singleton instance.
- We have configured the Element Injector of Customer Component. It creates a Service instance with a scope of Component and component life span.
In the future chapters, we will create more Components and more Modules and then will talk about Injectors once again.
Now based on whatever you have learned about Services, what do you think, which Injector should be choosen for Interceptors?
It should be root Module Injector, but this time there is a twist.
We cannot use an Injectable decorator for it.
Do you remember how we defined DI token(provide) for dependency(Customer Service) in the very beginning?
providers:[{provide: AuthenticationService ,useClass: AuthenticationService }
Then we said as both provide and useClass have the same value, we can use the short syntax as follows.
Providers:[ AuthenticationService]
Now, although Injectable decorator is the recommended approach because of the tree-shaking concept we discussed before in this chapter, we cannot use it as it won’t allow so much customization. It won’t allow us to specify DI token while configuring.
For configuring Injector for Http Interceptor, we need to specify DI token(HTTP_INTERCEPTORS) explicitly.
So finally you will see configuring Module Injector with the help of NgModule decorator
Step 74 – Configure the Injector
Configure root Module Injector in App Module as follows.
import { HttpClientModule, HTTP_INTERCEPTORS } from '@angular/common/http';
......
import { TokenInterceptorService } from './Services/Interceptors/http.interceptor';
@NgModule({
  ......
  providers: [{provide: HTTP_INTERCEPTORS, useClass: TokenInterceptorService}],
  bootstrap: [AppComponent],
})
export class AppModule {}
Step 75 – Check the output
Seems all good now. Switch to the browser and check the output.
You get the best output so far. “A white screen.”
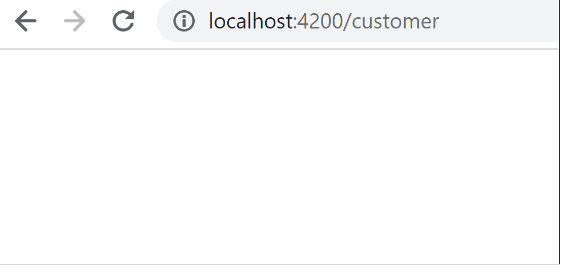
Check developer tools. You will find a new kind of error.
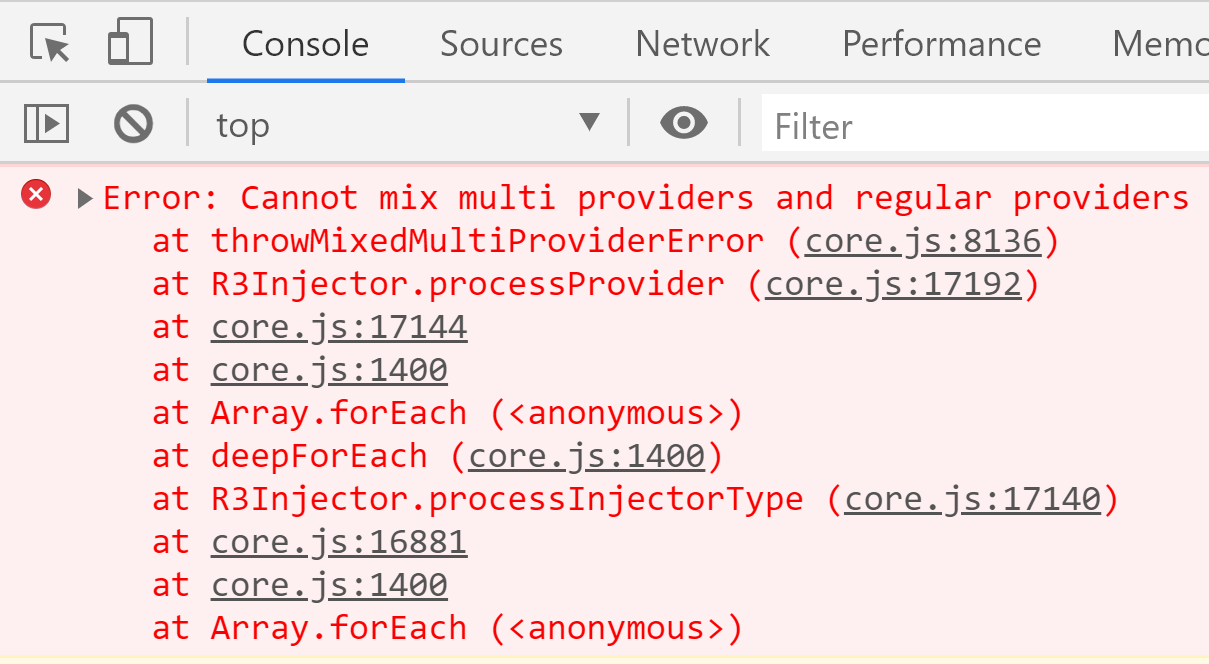
We will discuss this error, but before that, let’s finish this lab.
Step 76 – convert regular provider to multi provider
For that, attach the multi attribute to the provider with value as true.
......
  providers: [{provide: HTTP_INTERCEPTORS,
              useClass: TokenInterceptorService, multi:true}],
  bootstrap: [AppComponent],
})
export class AppModule {}
Step 77 – Check the output
Finally, we are ready to go. Check the output and confirm that both list and save functionality is working.
Discussion – Continued
Please note below discussion can be skipped for now and continued later. It is all about multi providers.
After looking at the last error, you must have understood that there is more than one kind of provider in Angular.
There is a regular provider, and there is a multi provider.
Regular providers
The provider we defined for Customer Service, Authentication Service, Auth guard all falls under regular providers.
It means, for one DI Token, one provider will be defined. Defining more than one will simply override the previous one.
Multi Providers
For one DI token, multiple providers will be defined. When one DI token is expected to be injected in the Application, Injector injects an array.
Let’s a quick RND understand the same.
Create a new Service MultiRndService as follows.
@Injectable()
export class MultiRndService{
    m1(){
      console.log('MultiService1');
    }
}
Now create one more Service MultiRndService2 as follows.
@Injectable()
export class MultiRndService2{
    m2(){
      console.log('MultiService2');
    }
}
Now configure root Injector with a regular provider as follows.
.......
  providers: [{provide: HTTP_INTERCEPTORS,
           useClass: TokenInterceptorService, multi: true},
    {provide:MultiRndService, useClass: MultiRndService},
    {provide:MultiRndService, useClass: MultiRndService2},
  ],
  bootstrap: [AppComponent],
})
export class AppModule {}
As you can see, we have used the same DI token for both providers.
Next, specify a parameter of type MultiRndService in the constructor of Customer Component.
......
constructor(private customerService: CustomerService,
              private authenticationService: AuthenticationService,
              private rndService: MultiRndService
              ) {
    const decodedToken = jwt_decode(localStorage.token);
......
Now put a breakpoint inside the constructor, and let’s check what gets injected.
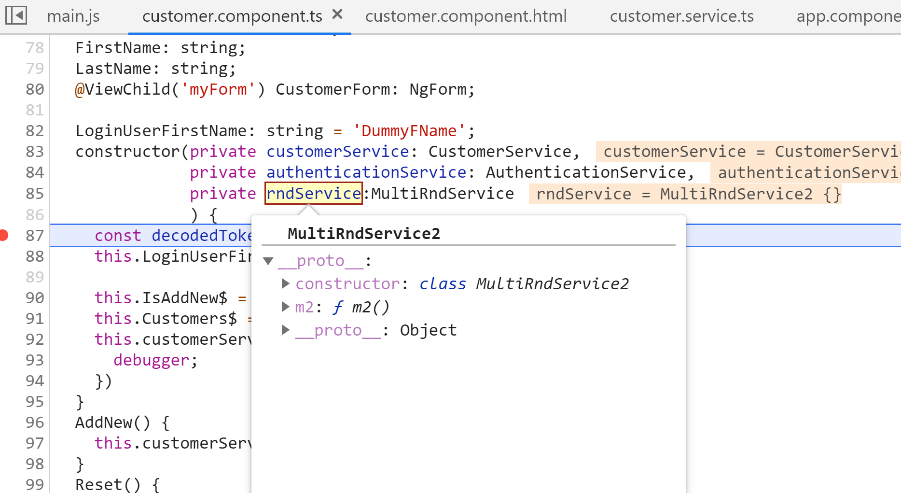
You can see that the instance of MultiRndService2 class got injected. You can even find the m2 method of expanding.
Now before we proceed, I want to make your life easy by explaining how an incompatible type (MultiRndService2) got injected.
Well, remember injection happens at runtime, and at runtime, everything is JavaScript, so no matter what you expect, anything can be injected based on the provider.
In a real-time system, I would have defined a base class or an interface on top of both types and used it as a DI token.
I wanted to demonstrate this behavior, too hence purposely defined in that way.
Now back to our research. Simply attach multi attribute with true value to both providers and check the output.
 providers: [{provide: HTTP_INTERCEPTORS,
useClass: TokenInterceptorService, multi: true}
   ,{provide:MultiRndService, useClass: MultiRndService, multi: true},
   {provide:MultiRndService, useClass: MultiRndService2, multi: true},
 ],
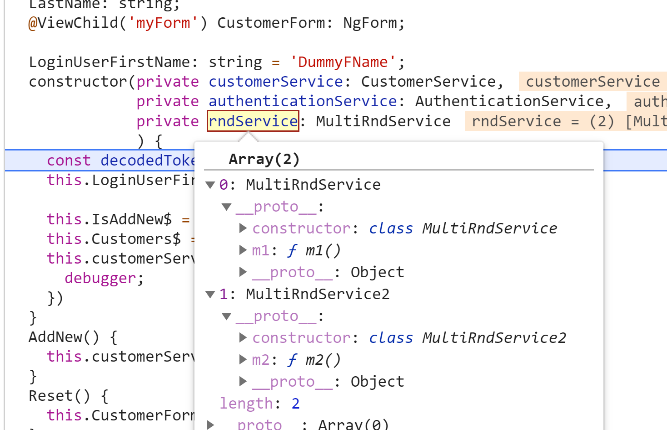
As you can see, this time, instances of both classes got injected in the form of an array.
What happens if we specify one of them is a multi provider and one regular?
In such a case, we will get “cannot mix multi providers and regular providers” error.
Why are we getting “cannot mix…” error while configuring Injector for HTTP_INTERCEPTOR?
We have not discussed multiple Angular Modules yet. We will do it shortly.
For now, try to understand that, once we have multiple Angular Modules in action, either we will eagerly load them or we lazily load them, or we import them in one of the loaded Angular Module.
(Forget about eager loading and lazy loading for now. Let’s discuss importing.)
If you remember, in one of the previous labs, we imported HttpClientModule in our AppModule.
(check imports section of NgModule decorator in AppModule)
When we import one Angular Module into another, providers get merged. So in our case, all the providers defined in the HttpClientModule got merged to the providers of AppModule.
Isn’t the type of the parameter in the constructor should be an array as we are going to get Array?
Question is, aren’t we suppose to write CustomerComponent constructor following.
......
  constructor(private customerService: CustomerService,
              private authenticationService: AuthenticationService,
              private rndService: Array<MultiRndService>
              ) {
......
If we do it, we get an error as follows.
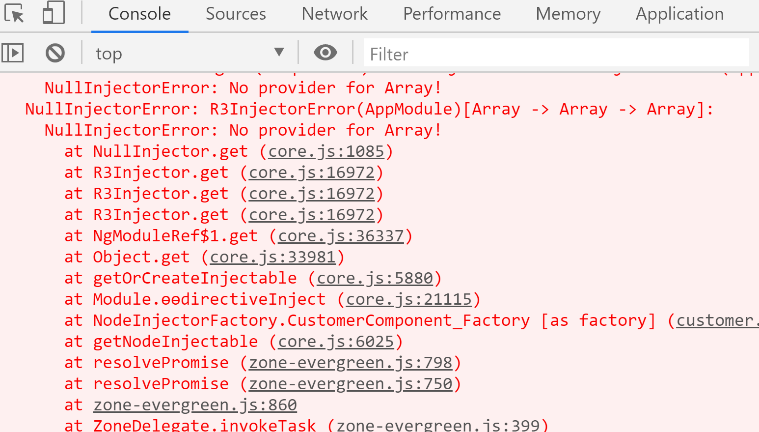
We need to define a provider for Array.
In such cases, we use InjectionToken or String Token instead of TypeToken.
DI Tokens
Do you remember our discussion of DI token?
We learned that Injector uses a token to identify the correct provider when it has to inject in the Application.
We also learned that there are three kinds of tokens – Type Token, String Token, and Injection Token.
So far, we were using Type Token.
But there are scenarios where we won’t be able to specify the type as a token. Such as the one above.
So in such cases, we use string token or Injection token.
String token example
Start with a provider, instead of type using some string value as token.
......
  providers: [{provide: HTTP_INTERCEPTORS,
useClass: TokenInterceptorService, multi: true}
    , {provide: "RND_VALUE", useClass: MultiRndService, multi: true},
    {provide: "RND_VALUE", useClass: MultiRndService2, multi: true},
  ],
  bootstrap: [AppComponent],
})
export class AppModule {}
Next, change the Component constructor as follows.
constructor(private customerService: CustomerService,
            private authenticationService: AuthenticationService,
            @Inject("RND_VALUE")x: Array<MultiRndService>
            ) {
You will notice a specialized decorator is attached to the constructor parameter now-Inject.
@Inject() is a manual mechanism for letting Angular know that a parameter must be injected.
The best thing is the parameter type. It is an Array of MultiRndService.
Debug like before, and you will notice both Service instances injected as an Array.
Injection token example
Using Magic strings is always considered as bad practice in programming. So using string token is also regarded as bad practice as there is a chance of spelling mistakes and so run time errors.
So the recommended approach is using Injection token instead.
To do that, first of all, declare a const variable of type InjectionToken as follows. (it’s just RND, so define it in the same file where you have created MultiRNDService.)
export const RND_TOKEN = new InjectionToken<MultiRndService[]>
('CollectionOfRNDService');
Next change provider as follows.
......
import { MultiRndService, MultiRndService2, RND_TOKEN } from './Services/multi-rnd.service';
@NgModule({
  ......
  providers: [{provide: HTTP_INTERCEPTORS,
      useClass: TokenInterceptorService, multi: true}
    // , {provide: "RND_VALUE", useClass: MultiRndService, multi: true},
    // {provide: "RND_VALUE", useClass: MultiRndService2, multi: true},
    , {provide: RND_TOKEN, useClass: MultiRndService, multi: true},
    {provide: RND_TOKEN, useClass: MultiRndService2, multi: true},
  ],
  bootstrap: [AppComponent],
})
export class AppModule {}
There is no more hard coded string anywhere. Any spelling mistake and we will get compile error.
Finally, change the Component constructor as follows.
constructor(private customerService: CustomerService,
            private authenticationService: AuthenticationService,
           // @Inject("RND_VALUE")x: Array<MultiRndService>
            @Inject(RND_TOKEN)x: Array<MultiRndService>
            ) {
Do the same debugging to check the output.
Why we need a multi provider?
Now you know what does multi do in provider.
You know how to create a multi provider.
The final question is why we need it.
We need it when we are creating reusable libraries.
Assume that you are creating a library which involves a Service.
Now, let’s part of service logic will be defined as a part of the library itself, and part of it will be provided by the one who uses the library. Using multi providers, it becomes straightforward.
“get” method of “HttpClient” client returns “Observable<Array< <{firstName: string, lastName: string}>>
- In this there is
- Error in http
- NG_VALIDATORS
- Not connected to server
- Loading Service
- ng-container
- Module level vs Injectable
- Usevalue
- Constants (Injected)
- Usefactory
- Deps
using the publisher-subscriber approach.
Publisher – Subscriber approach
You can see this approach implemented all around you.
- In this online world, you subscribe to a lot of online newsletters. Whenever there is new news, you get it in your email. You are the subscriber in this case, and the one who published that news is called subscriber.
- You follow someone on twitter, and whenever they tweet, you get a notification. You are the subscriber here and that someone is a publisher.
Observable and Observer
But there is more in it, something interesting other than publisher and subscriber.
- Observable – The one which you observe is called the Observable. In the Twitter example that the Twitter Account was Observable, and you are observing it.
- Observer – The one who makes Observable change its state is called Observer. For instance, in the Twitter example, the Twitter system is the Observer.
So far we have seen RxJs Observables. Consumer subscribes the observable and so they get notification as soon as it changes.
For instance in the exmple of HttpClient, “post” method returns a observable which is subsribebed by Login Component. As soon as Server response is returned, Observale got updated and Login Component get the notifcation.
Let’s explore two important terminologies – Observable and Observer
General non-technical explanation
Let me give you a non-technical example about those terminlogies. It makes technical defination much easiler.
Think of Twitter. Let’s say you visit my twiiter account(@sukeshmarla) and click on follow. What exactly happens then? Twitter add you to my follower list. Whenever I tweet all my followers gets the notification. In this case I am (who you followed) is an observable and Twitter is Observer and we can call all the followers consumers.
Technical defination
Lets say you have a class X and whenever any of it’s state get changed couple of other classes (let’s say class A, class B and class C) should get notification so that they cant act upon it. In such case class X is Observable.
Look at the following code block.

