Complete series source code can be downloaded from GitHub.
Introduction
In this chapter, we will start our journey to Station 10, and by the end of this station, you will learn everything about run-time error handling in Angular.
Before we dive into the lab, let’s understand the different kinds of run-time exceptions an Angular application can have.
- Client-side errors – these are unhandled run-time errors in the client-side logic.
- Server-side errors – It can be further categorized into the following three areas.
- Unhandled run-time error
- Not-authorized error from the server
- Server not connected error – when an HTTP call is attempted, and the server is not available.
In this chapter, we will learn to handle all four kinds of errors.
Complete series (Index)
— — — — — — — — — — — — — — — — — — — — — — — — — —— — —


— — — — — — — — — — — — — — — — — — — — — — — — —
Lab – Error handling in Angular
Step 1 – Rename the application
Start renaming the application from lab4-NG to lab5-NG.
Step 2 – Get the new server
Next, download the lab5 server from Github and execute it using the node server.js command.
This new server exposes a new endpoint for testing server-side errors.
Step 3 – Create a component for testing errors
If we are going to handle the error, then first we need error. So, let’s create a folder ErrorTest inside the app folder and then create a new component ErrorTesComponent inside it as follows.
import { component } from '@angular/core';

@Component({
   selector: 'error-test',
   templateUrl: './error-test.component.html'
})
export class ErrorTestComponent {
 }
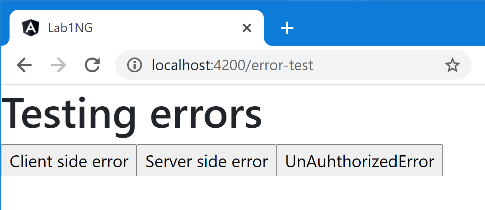
<h1>Testing errors</h1>
    <input type="button" value="Client side error" (click)="throwClientError()">
<input type="button" value="Server side error" (click)="throwServerError()">
<input type="button" value="UnAuhthorizedError"
(click)="throwUnAuthorizedError()">
As you can see, we have three buttons – each button leads to one kind of error discussed initially.
Step 4 – Add Component to Module
Every component in Angular must belong to an Angular module. Let’s add ErrorTestComponent to AppModule.
import { ErrorTestComponent } from './ErrorTest/error-test.component';

@NgModule({

declarations: [
   AppComponent,
   LoginComponent,
   CustomerComponent,
   ErrorTestComponent],
   imports: [
   BrowserModule,

})
export class AppModule {}
Step 5 – Update Routes
Next, open app.routes.ts and update the routes for accessing the above component.
    import { ErrorTestComponent } from '../ErrorTest/error-test.component';
    export const AppRoutes: Routes = [
    { path: 'login', component: LoginComponent },
        { path: 'customer', component: CustomerComponent, canActivate: [AuthGuard] },
    { path: 'error-test', component: ErrorTestComponent },
    ];
Step 6 – Prepare client-side logic error
Next, define throwClientError in ErrorTestComponent as follows.
    throwClientError() {
    throw new Error('Testing client side error !!!');
    }
Step 7 – Prepare server-side logic error
Next, define throwServerError in ErrorTestComponent as follows.
    constructor(private appConfigService: AppConfigService,
                 private httpClient: HttpClient) {
    }
    ......
    throwServerError(){
        this.httpClient.get(`${this.appConfigService.apiUrl}/getError`).subscribe();
    }
As you can see in the above code, we are making an API call that will throw a run-time error on the server-side.
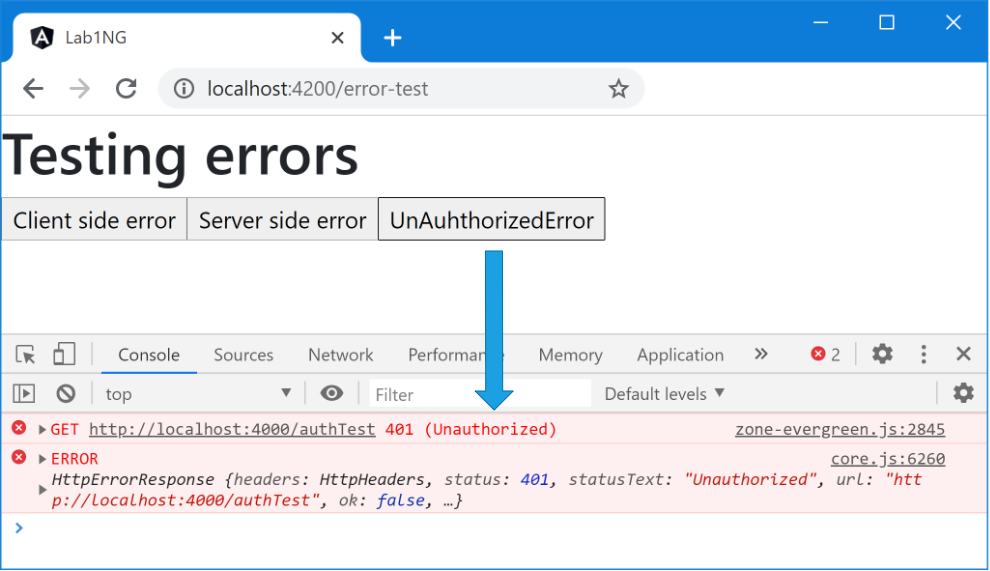
Step 8 – Prepare unauthorize error
Define throwUnAuthorizedError in ErrorTestComponent as follows.
    throwUnAuthorizedError(){
    this.httpClient.get(`${this.appConfigService.apiUrl}/authTest`).
    subscribe();
    }
Technically above code is also making an API call, but users have to be authenticated first for this API.
Step 9 – Check the output
It’s good to confirm that everything is done correctly before moving to the real work.
Execute the Angular application using ng serve –open command and then put the URL of ErrorTestComponent in the address bar of the browser explicitly and confirm that expected output is generated.
Then click the first two buttons and make sure that it throws a run-time error.
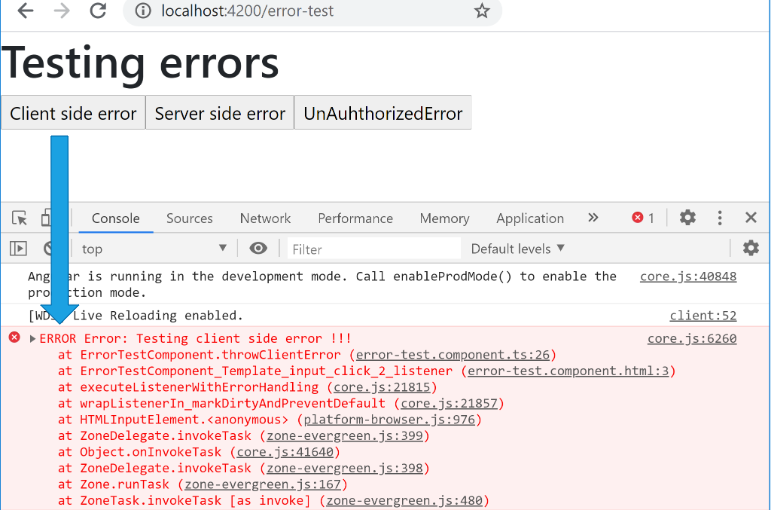
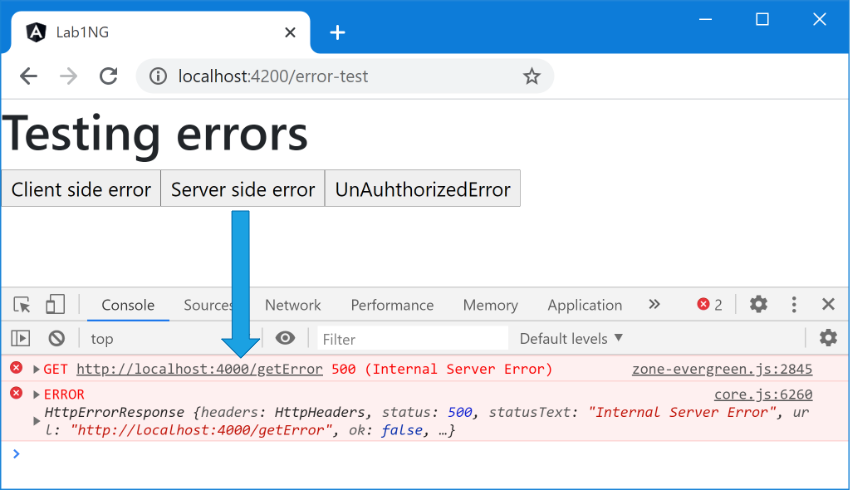
With this, we assured that our demo is set for client-side run-time error and server-side run-time error.
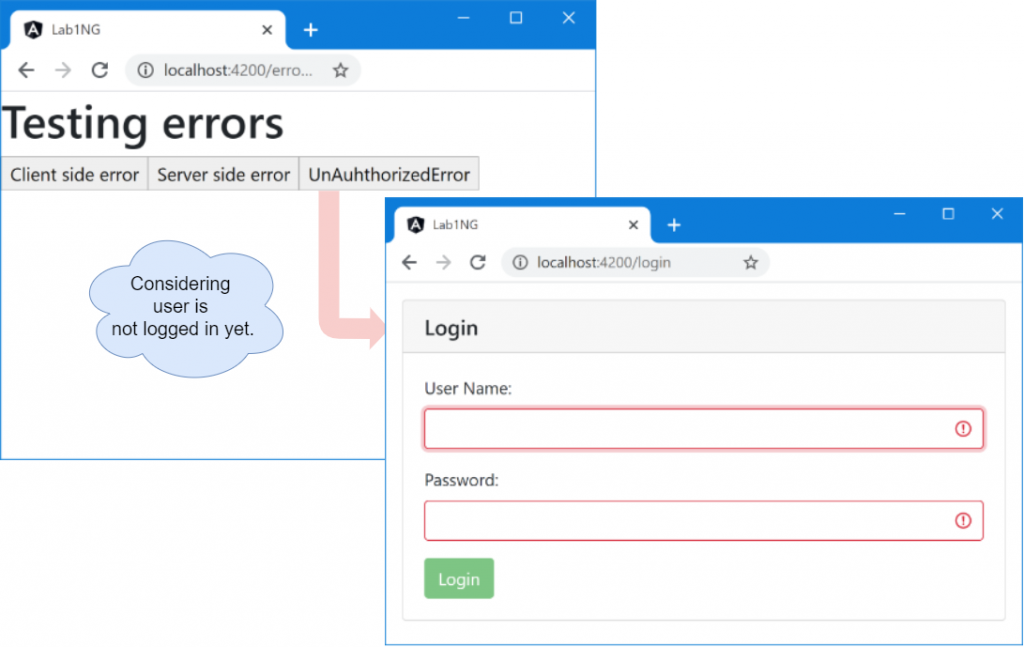
The third button lets us assure that our demo is set for the unauthorized access error. For that, make sure that first, you are not logged in. To ensure that go to the login page, finish login, and then logout. Once back on the login screen, navigate to the ErrorTestComponent by explicitly changing the URL. Then click the third button.
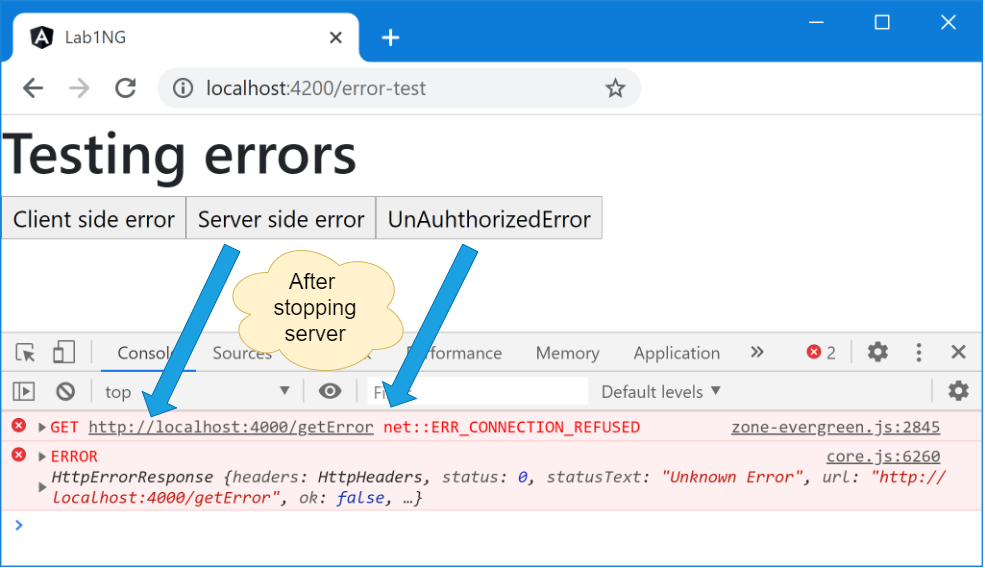
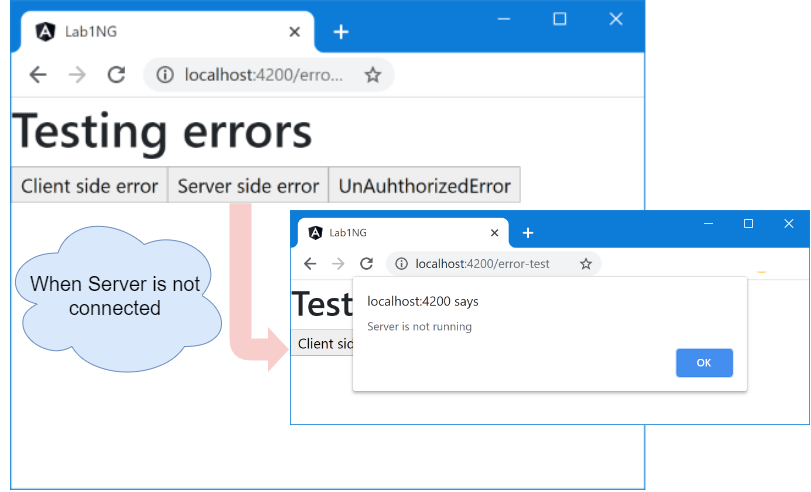
Now for testing the fourth type of error, you have to stop the node server. For that, switch to the command prompt (the one currently executing node server) and press cntrl+c.
Once you are done with it, click any of the second or third buttons and see the error in action.
Discussion
So we have our component ready, which will throw an error and help test the error handling logic.
Next, let’s decide what we want to do when an unexpected error is encountered in the system.
- For unexpected run-time errors (both client and server), the most followed involves two steps.
1) Redirect the user to some custom-designed page.
2)Persist (log) error in some storage medium so that later can be examined for troubleshooting. - For unauthorized errors, the preferred approach is, redirecting to the login screen.
- For the failure generated because of the server’s unavailability, the preferred approach is displaying some custom messages.
So now we know what has to be done for each kind of error.
Lab – Continued
Step 10 – Create Custom error component
Create a new folder called Error in the app folder and then create a component called ErrorComponent as follows.
    import { Component } from '@angular/core';

    @Component({
       selector: 'app-error',
       templateUrl: './error.component.html'
     })

     export class ErrorComponent {
       constructor() { }
     }
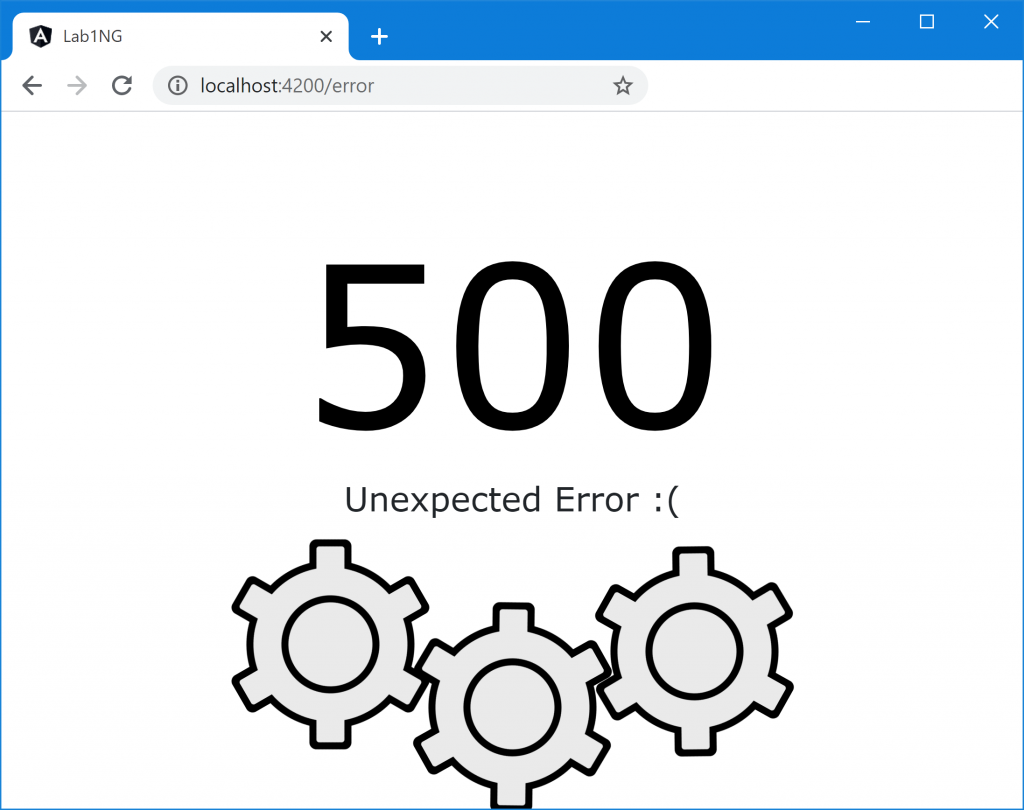
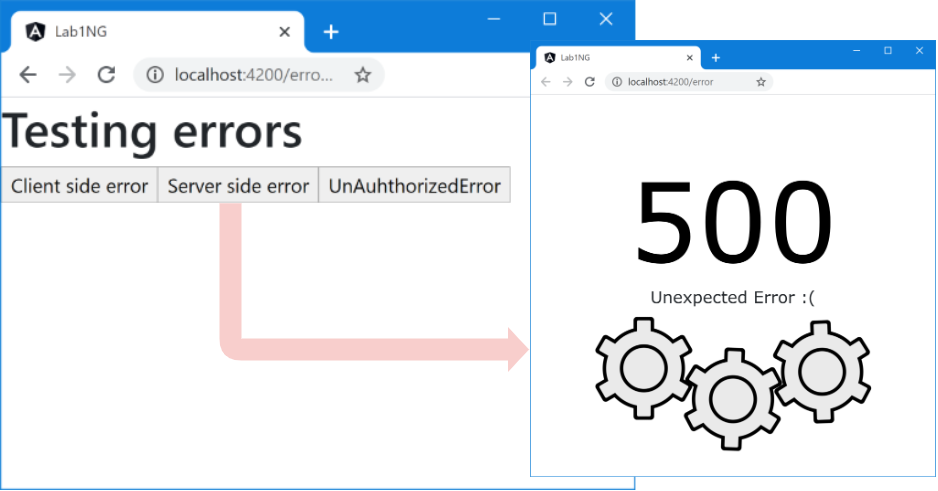
     <h1>500</h1>
     <h2>Unexpected Error <b>:(</b></h2>
     <div class="gears">
       <div class="gear one">
         <div class="bar"></div>
         <div class="bar"></div>
         <div class="bar"></div>
       </div>
       <div class="gear two">
         <div class="bar"></div>
         <div class="bar"></div>
         <div class="bar"></div>
       </div>
       <div class="gear three">
         <div class="bar"></div>
         <div class="bar"></div>
         <div class="bar"></div>
       </div>
     </div>
Step 11 – Add ErrorComponent to Module
I think you know how to do it now.
     ......
     import { ErrorComponent } from './Error/error.component';
     ......
     @NgModule({
       declarations: [AppComponent, LoginComponent,
         CustomerComponent,ErrorTestComponent,ErrorComponent],
     .........
     export class AppModule {}
Step 12 – Create Component CSS
As usual, we created a component class (aka View class) and a template (aka view). Together both of them formed an Angular component.
This time we need to add one more into this – Component CSS. We have a provision to create and attach a CSS to a component that becomes part of that component. Let’s try the same.
Create a CSS file error.component.css and attach it to the component as follows.
    1. body {
    2.     background: #eaeaea;
    3.   }
    4.   h1 {
    5.     margin: 100px auto 0 auto;
    6.     color: black;
    7.     font-family: 'Encode Sans Semi Condensed', Verdana, sans-serif;
    8.     font-size: 10rem; line-height: 10rem;
    9.     font-weight: 200;
    10.     text-align: center;
    11.   }
    12.   h2 {
    13.     margin: 20px auto 30px auto;
    14.     font-family: 'Encode Sans Semi Condensed', Verdana, sans-serif;
    15.     font-size: 1.5rem;
    16.     font-weight: 200;
    17.     text-align: center;
    18.   }
    19.   h1, h2 {
    20.     -webkit-transition: opacity 0.5s linear, margin-top 0.5s linear; /* Safari */
    21.     transition: opacity 0.5s linear, margin-top 0.5s linear;
    22.   }
    23.   .loading h1, .loading h2 {
    24.     margin-top: 0px;
    25.     opacity: 0;
    26.   }
    27.   .gears {
    28.     position: relative;
    29.     margin: 0 auto;
    30.     width: auto; height: 0;
    31.   }
    32.   .gear {
    33.     position: relative;
    34.     z-index: 0;
    35.     width: 120px; height: 120px;
    36.     margin: 0 auto;
    37.     border-radius: 50%;
    38.     background: black;
    39.   }
    40.   .gear:before{
    41.     position: absolute; left: 5px; top: 5px; right: 5px; bottom: 5px;
    42.     z-index: 2;
    43.     content: "";
    44.     border-radius: 50%;
    45.     background:#eaeaea;
    46.   }
    47.   .gear:after {
    48.     position: absolute; left: 25px; top: 25px;
    49.     z-index: 3;
    50.     content: "";
    51.     width: 70px; height: 70px;
    52.     border-radius: 50%;
    53.     border: 5px solid black;
    54.     box-sizing: border-box;
    55.     background: #eaeaea;
    56.   }
    57.   .gear.one {
    58.     left: -130px;
    59.   }
    60.   .gear.two {
    61.     top: -75px;
    62.   }
    63.   .gear.three {
    64.     top: -235px;
    65.     left: 130px;
    66.   }
    67.   .gear .bar {
    68.     position: absolute; left: -15px; top: 50%;
    69.     z-index: 0;
    70.     width: 150px; height: 30px;
    71.     margin-top: -15px;
    72.     border-radius: 5px;
    73.     background: black;
    74.   }
    75.   .gear .bar:before {
    76.     position: absolute; left: 5px; top: 5px; right: 5px; bottom: 5px;
    77.     z-index: 1;
    78.     content: "";
    79.     border-radius: 2px;
    80.     background: #eaeaea;
    81.   }
    82.   .gear .bar:nth-child(2) {
    83.     transform: rotate(60deg);
    84.     -webkit-transform: rotate(60deg);
    85.   }
    86.   .gear .bar:nth-child(3) {
    87.     transform: rotate(120deg);
    88.     -webkit-transform: rotate(120deg);
    89.   }
    90.   @-webkit-keyframes clockwise {
    91.     0% { -webkit-transform: rotate(0deg);}
    92.     100% { -webkit-transform: rotate(360deg);}
    93.   }
    94.   @-webkit-keyframes anticlockwise {
    95.     0% { -webkit-transform: rotate(360deg);}
    96.     100% { -webkit-transform: rotate(0deg);}
    97.   }
    98.   @-webkit-keyframes clockwiseError {
    99.     0% { -webkit-transform: rotate(0deg);}
    100.     20% { -webkit-transform: rotate(30deg);}
    101.     40% { -webkit-transform: rotate(25deg);}
    102.     60% { -webkit-transform: rotate(30deg);}
    103.     100% { -webkit-transform: rotate(0deg);}
    104.   }
    105.   @-webkit-keyframes anticlockwiseErrorStop {
    106.     0% { -webkit-transform: rotate(0deg);}
    107.     20% { -webkit-transform: rotate(-30deg);}
    108.     60% { -webkit-transform: rotate(-30deg);}
    109.     100% { -webkit-transform: rotate(0deg);}
    110.   }
    111.   @-webkit-keyframes anticlockwiseError {
    112.     0% { -webkit-transform: rotate(0deg);}
    113.     20% { -webkit-transform: rotate(-30deg);}
    114.     40% { -webkit-transform: rotate(-25deg);}
    115.     60% { -webkit-transform: rotate(-30deg);}
    116.     100% { -webkit-transform: rotate(0deg);}
    117.   }
    118.   .gear.one {
    119.     -webkit-animation: anticlockwiseErrorStop 2s linear infinite;
    120.   }
    121.   .gear.two {
    122.     -webkit-animation: anticlockwiseError 2s linear infinite;
    123.   }
    124.   .gear.three {
    125.     -webkit-animation: clockwiseError 2s linear infinite;
    126.   }
    127.   .loading .gear.one, .loading .gear.three {
    128.     -webkit-animation: clockwise 3s linear infinite;
    129.   }
    130.   .loading .gear.two {
    131.     -webkit-animation: anticlockwise 3s linear infinite;
    132.   }
[Now, if you have any difficulty understanding the above CSS, then ignore it. Let’s focus on Angular.]
For attaching this stylesheet file to the component, we will use the styleUrls property of the Component decorator.
    1. @Component({
    2.   selector: 'app-error',
    3.   templateUrl: './error.component.html',
    4.   styleUrls:['./error.component.css']
    5. })
    6.
    7. export class ErrorComponent {
Discussion – Continued
You must be wondering what is so special about attaching the CSS file to a component.
We have a separate chapter. – Angular Styles, where we talk about it in detail.
Step 13 – Update Routes
Next, open app.routes.ts and update the routes for accessing the above component.
    1. ......
    2. import { ErrorComponent } from '../Error/error.component';
    3. import { ErrorTestComponent } from '../ErrorTest/error-test.component';
    4. ......
    5.
    6. export const AppRoutes: Routes = [
    7.   { path: 'login', component: LoginComponent },
    8.   { path: 'customer', component: CustomerComponent, canActivate: [AuthGuard] },
    9.   { path: 'error-test', component: ErrorTestComponent },
    10.   { path: 'error', component: ErrorComponent },
    11. ......
Step 14 – Check the output
Let’s test our Error Component. Execute the application, put the URL of the ErrorComponent, and confirm that the below output is displayed.
Discussion – Continued
Now that all ingredients are set for action, it’s time to learn how to handle errors.
Fortunately, Angular has centralized exception handling already set in place. The default implementation prints the error messages to the console.
The default behavior can be overridden using a custom Angular service and injecting it into the Angular pipeline as a new error handler. Let’s do the same.
Lab – Continued
Step 15 – Create the custom Error Handler
Create a new file app-error-handler.service.ts inside the Services folder with the following contents.
    1. import { HttpErrorResponse, HttpResponseBase } from '@angular/common/http';
    2. import { ErrorHandler, Injectable, NgZone } from '@angular/core';
    3. import { Router } from '@angular/router';
    4.
    5. @Injectable()
    6. export class AppErrorsHandler implements ErrorHandler {
    7.   constructor(
    8.     private router: Router,
    9.     private zone:NgZone
    10.   ) {}
    11.
    12.   handleError(error: Error | HttpErrorResponse) {
    13.     if (error instanceof HttpResponseBase) {
    14.       this.HandleServerSideError(error); // Indicates its a server side error
    15.     } else {
    16.       this.HandleClientSideError(error); // Indicates its a client side error
    17.     }
    18.   }
    19.
    20.   private HandleServerSideError(error: HttpErrorResponse) {
    21.     if (error.status === 0) {
    22.       alert('Server is not running');
    23.     } else if (error.status === 401) {
    24.       this.zone.run(() => this.router.navigate(['/login']));
    25.     } else {
    26.       localStorage.error = error.message;
    27.       this.zone.run(() => this.router.navigate(['/error']));
    28.     }
    29.   }
    30.   private HandleClientSideError(error: Error) {
    31.     localStorage.error = error.message;
    32.     this.zone.run(() => this.router.navigate(['/error']));
    33.   }
    34. }
Discussion – Continued
Let’s understand the above code.
The first thing you must have noticed is the ErrorHandler interface. To create a custom error handler, we must implement our class with the ErrorHandler interface and define the handleError method.
handleError method is self-explanatory. You can see the if…else condition. Out of the four errors discussed, three are handled in if block, whereas the remaining one was handled in else block.
Note: In our current case, we are only storing the latest error in our localstorage. In the real-time scenario, you may follow a more persistent medium such as a Database and keep all the errors.
zone
I am sure zone.run in above code must have got your eyes.
We have an encapsulated router.navigate inside zone.run call.
To understand the same, look into the following code.
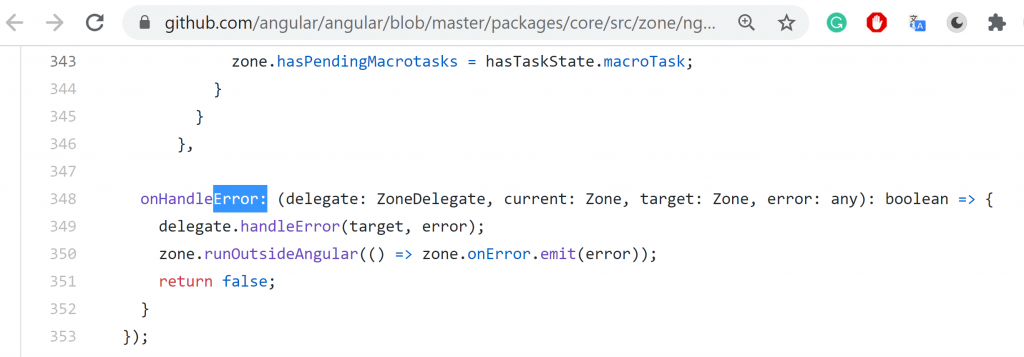
The above code is a part of the original Angular source code. onHandleError gets executed when the Angular application throws an unhandled exception.
Angular, in response to the error, make a call to the zone.runOutsideAngular method.
zone.runOutsideAngular
In Angular, the zone provides the execution context for the application.
zone.runOutsideAngular makes the code execute outside the Angular’s execution context so that change detection won’t kick-off. If you remember, we spoke about change detection once before. We said it is responsible for updating UI, and no change detection means no UI update.
Sometimes, to control the Angular application’s performance, we purposely execute some code outside Angular’s execution context. That can be done using the runOutsideAngular method.
By default, Angular is only interested in displaying the exception detail in the console and not in the UI update. Hence in the centralized error handler, it executes code using the runOutsideAngular method.
zone.run
When you are outside of Angular’s execution context, you can re-enter the execution zone using zone.run method.
The above code depicts that the error handler executes outside the Angular context. Hence we have used zone.run method so that our router.navigate method performs in the original execution context of our application, and so we see the updated UI.
Don’t stress much to understand the above theory as we hardly use runOutsideAngular in real-time.
My advice is, don’t forcefully use the runOutsideAngular method in your project. 😊
When needed, you will realize it, and secondly, once you use it, you may need to use the run method to come back to the original world.
Lab – Continued
Step 16 – configure Injector
The last step will be configuring the root injector with our custom error handler. Open app.module.ts file and modify code to following.
    1. import { HttpClientModule, HTTP_INTERCEPTORS } from '@angular/common/http';
    2. import { APP_INITIALIZER, ErrorHandler, NgModule } from '@angular/core';
    3. import { FormsModule, ReactiveFormsModule } from '@angular/forms';
    4. import { BrowserModule } from '@angular/platform-browser';
    5. import { RouterModule } from '@angular/router';
    6. ......
    7. import { AppErrorsHandler } from './Services/app-error-handler.service';
    8. ......
    9. @NgModule({
    10. ......
    11.   providers: [
    12.     {provide: APP_INITIALIZER, useFactory: initializeConfig, multi: true, deps:[AppConfigService]},
    13.     {provide: HTTP_INTERCEPTORS, useClass: TokenInterceptorService, multi: true},
    14.     {provide:ErrorHandler, useClass:AppErrorsHandler},
    15. ......
    16. })
    17. export class AppModule {}
Discussion – Continued
In the above code, you can see we have configured the root injector using the NgModule decorator instead of the Injectable decorator. An Injectable decorator cannot be used in this case as it won’t allow us to explicitly specify the DI token. For replacing the error handler with a custom error handler, we need to provide a DI token (ErrorHandler) explicitly.
Step 17 – Check the output
Execute the application and make sure the desired output is generated for all four kinds of errors.
Client-side run time error
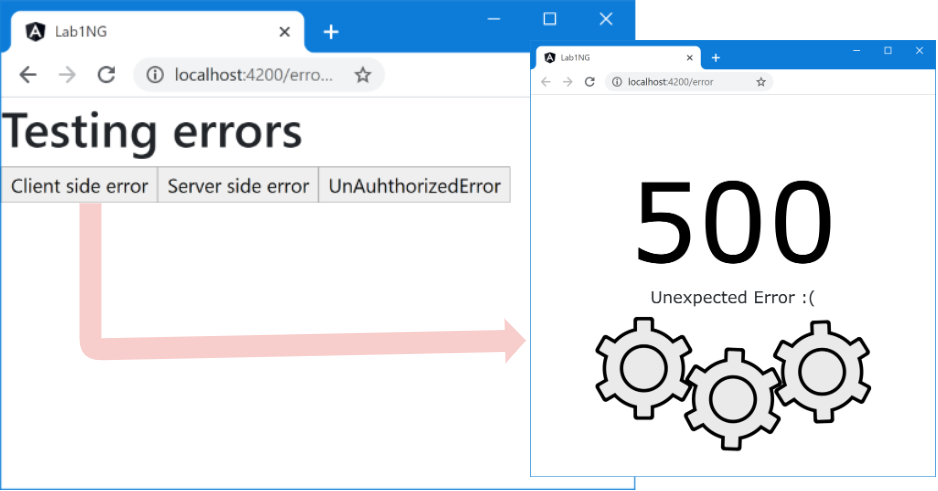
Server-side run-time error
Server-side error when a user is unauthorized
Server-side error when a server is not running
Summary
So, we reached station 10. In our journey to Station 10, we spoke learned the following things.
- In this chapter, we learned that we could attach a component-specific style to a component. For that, we will use the styleUrls parameter of the Component decorator.
- We learned that Angular has centralized exception handling already set in place. The default implementation prints the error messages to the console.
- We learned that the default behavior could be overridden using a custom Angular service and injecting it into the Angular pipeline as a new error handler. For that, we have to configure the root injector for the DI token – ErrorHandler.
- We learned that we have to implement the service with the ErrorHandler interface for creating a custom error handler service.
- We learned about zone.runOutsideAngular method that lets us execute code outside Angular’s execution context.
- We learned about zone.run method that lets us get back to Angular’s execution context.

