Complete series source code can be downloaded from GitHub.
Introduction
So, all of you are ready for the chapter on Angular Routing and your ride for Station 12.
We have already seen routing in action in one of the previous chapters.
In this chapter, we will dive deeper and learn more about it.
Complete series (Index)
— — — — — — — — — — — — — — — — — — — — — — — — — —— — —

— — — — — — — — — — — — — — — — — — — — — — — — —
Lab 7 – Angular Routing
Step 1 – Rename application.
Rename application to lab7-ng from lab6-ng.
Step 2 – Create more components for the demo
We require some more components for this demo. Create a folder Supplier and Product inside the app folder and then create respective components inside.
import { Component } from '@angular/core';

@Component({
    selector: 'supplier',
    template: '<h1>Welcome to supplier</h1>'
  })

  export class SupplierComponent {
    constructor() { }
  }
import { Component } from '@angular/core';

@Component({
  selector: 'product',
  template: '<h1>Welcome to product</h1>'
})

export class ProductComponent {
  constructor() { }
}
As you can see, this time, we have a template instead of templateURL.
Using a template, we can specify the component HTML inline instead of having it in a separate HTML file.
......
import { ProductComponent } from './Product/product.component';
......
import { SupplierComponent } from './Supplier/supplier.component'; @NgModule({
declarations: [AppComponent, LoginComponent,     CustomerComponent, ErrorTestComponent, ErrorComponent,     CustomerAddComponent, CustomerListComponent,     ProductComponent, SupplierComponent
],
......
bootstrap: [AppComponent],
})
export class AppModule {}
Don’t forget to add them to
AppModule
.
Step 3 – Prepare to route
Next, open app.routes.ts and configure the route for both of the above components as follows.
......
import { ProductComponent } from '../Product/product.component';
import { SupplierComponent } from '../Supplier/supplier.component';
export const AppRoutes: Routes = [
  {path: 'login', component: LoginComponent },
  {path: 'customer', component: CustomerComponent, canActivate: [AuthGuard] },
  {path: 'supplier', component: SupplierComponent, canActivate: [AuthGuard] },
  {path: 'product', component: ProductComponent, canActivate: [AuthGuard] },
  {path: 'error-test', component: ErrorTestComponent },
  {path: 'error', component: ErrorComponent },
  {path: '', redirectTo: 'login', pathMatch: 'full' },
  {path: '**', redirectTo: 'customer', pathMatch: 'full' },
];
Discussion – Continued
Now, we have something interesting. We have three problems to address.
1) We want to create a menu for navigating between the above components.
The question is in which component we will add the menu.
If we add it to the AppComponent, then it will be visible even on the login screen.
Explicitly doing it in each component will not be feasible as it will violate the DRY principle. (Don’t repeat yourself – Once the code is written, don’t repeat it).
2) Secondly, check the above route configuration code. Have you noticed AuthGuard attached to each route? Again that is a violation of the DRY principle. It is our second problem.
3)Finally, In one of our previous chapters, we added logged in the user’s name and logout link in the customer component. As an application, it has to be present on every page. That is the third problem.
The solution for all three problems is nested routes.
We will introduce another component – AuthComponent, the parent component for the menus, the user’s name, the logout link, and all other authorize-required-components.
Lab – Continued
Step 4 – Create AuthComponent
Create a new folder in the app folder called Auth and then create a new component called AuthComponent as follows.
import { Component } from '@angular/core';
import { AuthenticationService } from '../Services/authentication.service';
import * as jwt_decode from 'jwt-decode';
@Component({
  selector: 'auth-root',
  templateUrl: './auth.component.html'
})
export class AuthComponent {
  LoginUserFirstName = 'DummyFName';
  constructor(private authenticationService: AuthenticationService) {
      const decodedToken = jwt_decode(localStorage.token);
      this.LoginUserFirstName = decodedToken.firstName;
  }
  logout() {
    this.authenticationService.logout();
  }
}
As you can see, the username and logout code from CustomerComponent is shifted to AuthComponent.
(Please ensure that the corresponding code is removed from CustomerComponent as it is not relevant anymore.)
Template file should look like below.
<nav class="navbar navbar-expand navbar-dark bg-dark">
  <div class="collapse navbar-collapse" id="navbarSupportedContent">
    <ul class="navbar-nav mr-auto">
      <li class="nav-item ">
        <a class="nav-link" href="/customer">Customer</a>
      </li>
      <li class="nav-item ">
        <a class="nav-link" href="/supplier">Supplier</a>
      </li>
      <li class="nav-item ">
        <a class="nav-link" href="/product">Product</a>
      </li>
    </ul>
    <span class="navbar-brand mb-0 h1"> Welcome {{LoginUserFirstName}},</span>
    <a class="navbar-brand mb-0 h1 underline" routerLink='/login' (click)="logout()"><u>Logout</u></a>
  </div>
</nav>
<router-outlet></router-outlet>
Did you notice the router-outlet again in AuthComponent? It is going to be a place holder for all our authorize-required-components.
Make sure you also add it to the AppModule as follows.
......
@NgModule({
  declarations: [......,
    ProductComponent, SupplierComponent,AuthComponent
  ],
......
export class AppModule {}
Step 5 – Modify the routes
Modify the routing code as follows.
export const AppRoutes: Routes = [

  { path: 'login', component: LoginComponent },

  {

    path: '',

    component: AuthComponent,canActivate:[AuthGuard],

    children: [

      {

        path: 'customer',

        component: CustomerComponent

      },

      {

        path: 'supplier',

        component: SupplierComponent

      },

      {

        path: 'product',

        component: ProductComponent

      },

    ],

  },

  { path: 'error-test', component: ErrorTestComponent },

  { path: 'error', component: ErrorComponent },

  { path: '**', redirectTo: 'customer', pathMatch: 'full' },

];
Discussion – Continued
Let’s try to understand the code.
- There are two top-level routes – login responsible for LoginComponent and auth route responsible for AuthComponent.
- The router-outlet in the AppComponent becomes the place-holder for LoginComponent and AuthComponent, depending on the route.
- router-outlet in the AuthComponent becomes a place-holder for other components based on the child routes of the auth route.
Lab – Continued
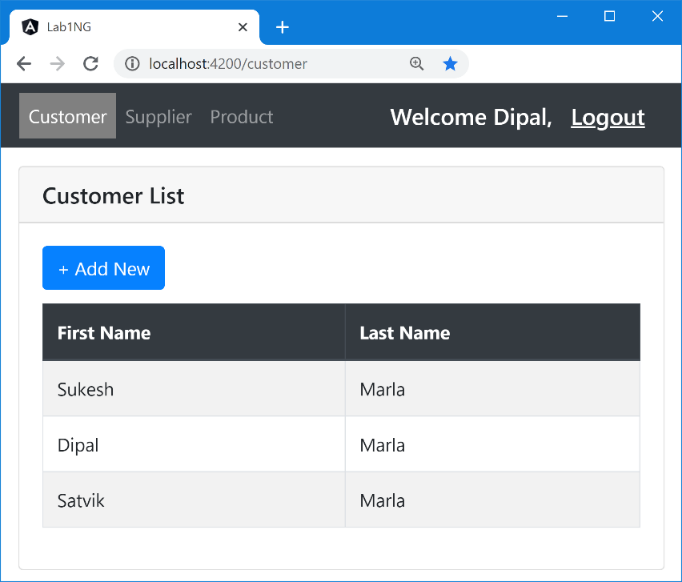
Step 6 – Check the output
Execute the application and complete login, and make sure all three links are working as per expectation.
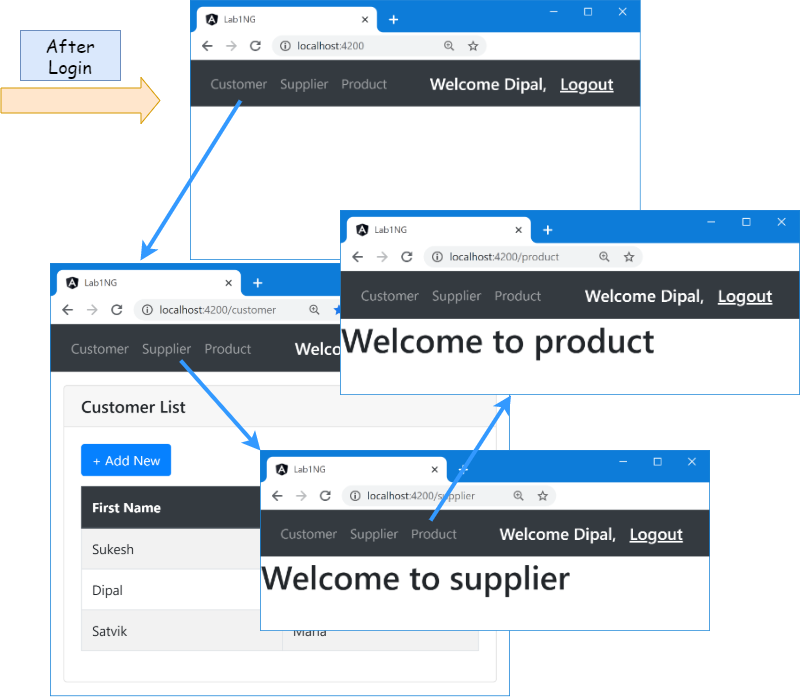
Figure 23.1
Discussion – Continued
There are three problems which we need to address.
- Page-Refresh
Did you notice something strange in the above output?
Did you notice a page refresh every time the link is clicked?
If the page is refreshing, then it is not a SPA. We have to achieve the same output without a page refresh, and that can be accomplished using a routerLink directive.
- Highlighting the current menu
As of now, the current menu is not highlighted. It can be solved using the routerLinkActive directive.
- Empty URL
The last problem is, when the URL is empty, we get a blank screen. (Execute the application. Complete login and check what you will get – a blank white screen.)
Let’s solve all of them.
Step 7 – replace anchor with routerLink
Open auth.component.html and replace href with routerLink directive as follows.
.........
<li class="nav-item ">
        <a class="nav-link" routerLink="/customer">Customer</a>
      </li>
      <li class="nav-item ">
        <a class="nav-link" routerLink="/supplier">Supplier</a>
      </li>
      <li class="nav-item ">
        <a class="nav-link" routerLink="/product">Product</a>
      </li>
.........
Step 8 – Check the output
It will solve our first problem. This time you will get the same output but without age refresh.
Step 9 – Define CSS for active menu
Create a new CSS class active in the style.css file as follows.
.active{
  color: black;
  background-color: gray;
}
Step 10 – Attach routerLinkActive directive
Attach routerLinkActive directive to each menu item as follows.
......
    <li class="nav-item ">
          <a class="nav-link" routerLinkActive="active" routerLink="/customer">Customer</a>
        </li>
        <li class="nav-item ">
          <a class="nav-link"  routerLinkActive="active" routerLink="/supplier">Supplier</a>
        </li>
        <li class="nav-item ">
          <a class="nav-link"  routerLinkActive="active" routerLink="/product">Product</a>
        </li>
......
 Step 11 – Check the output
As you can see, the active class got attached to only the current menu item. Other menus are displaying with no formatting.
Figure 23.2
Step 12 – Attach default route
As per our current route configuration, when the URL is empty, AuthComponent will be displayed.
But that configuration is applied to only main routes. We need to do the same for child routes. For that, add the default route to the children collection as follows.
......

export const AppRoutes: Routes = [

  { path: 'login', component: LoginComponent },

  {

    path: '',

    component: AuthComponent,canActivate:[AuthGuard],

    children: [

      {

        path: 'customer',

        component: CustomerComponent

      },

      {

        path: 'supplier',

        component: SupplierComponent

      },

      {

        path: 'product',

        component: ProductComponent

      },

      {

        path: '',

        redirectTo: 'customer', pathMatch: 'full'

      },

    ],

  },

  { path: 'error-test', component: ErrorTestComponent },

  { path: 'error', component: ErrorComponent },

  { path: '**', redirectTo: 'customer', pathMatch: 'full' },

];

......
Step 13 – Check the output
Now check the output with an empty URL. You will be redirected to the customer route.
Discussion – Continued
Although everything is working as per expectation, there is one big problem in the above lab.
That is eager loading. All the components are loaded into the project from the very beginning.
Open developer tools and check the source tab. You will find main.js. Please open it and scroll up and down to see the customer template content, supplier template content, and product template content. Everything is bundled into one.
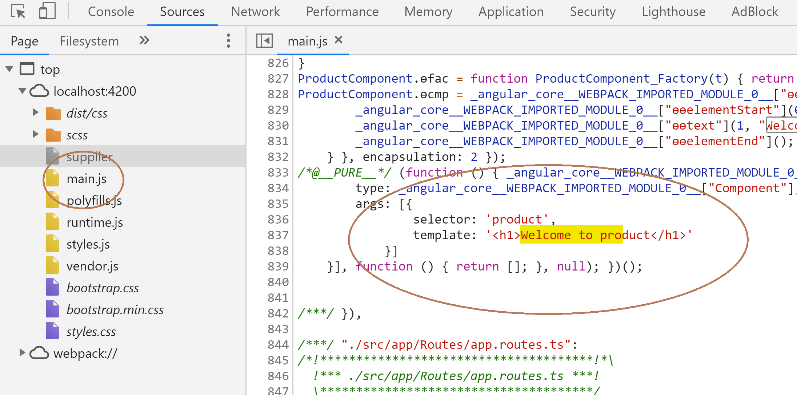
Figure 23.3
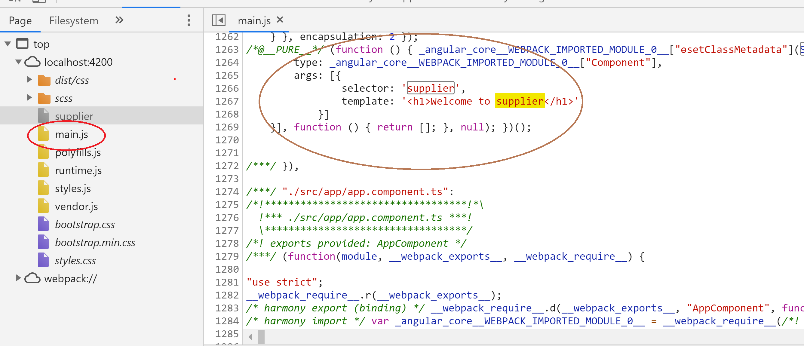
Figure 23.4
Let’s build the project and confirm if the generated bundle file has the same problem.
Stop the current execution by pressing Cntrl + C in the command prompt.
Then create the project build using the ng build command.
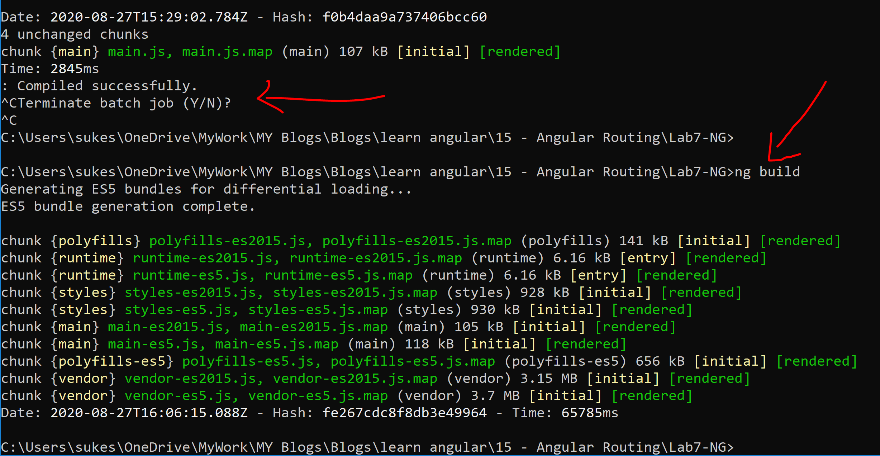
Figure 23.5
As you can see, only one application related bundle got generated – main.js.
Now search for customer keywords in it. Then search for the supplier followed by product.
You will find everything in that one single JavaScript file.
Imagine the situation of a project with hundreds of such components. Imagine the bundle’s size and imagine the load on the browser to download that huge bundle file.
The solution is lazy loading. We will configure our route to load components lazily.
For that, first, we have to encapsulate each component inside an independent Angular Module.
Lab – Continued
Step 14 – Create an Angular Module
Create a new Angular module CustomerModule inside the Customer folder. Then include all customer related components inside this CustomerModule.
import { NgModule } from '@angular/core';

import { CustomerAddComponent } from './customer-add.component';

import { CustomerListComponent } from './customer-list.component';

import { CustomerComponent } from './customer.component';

@NgModule({

  declarations: [CustomerComponent,CustomerListComponent,CustomerAddComponent]

})

export class CustomerModule { }
Once it is done, make sure that you remove all of the above components from the AppModule.
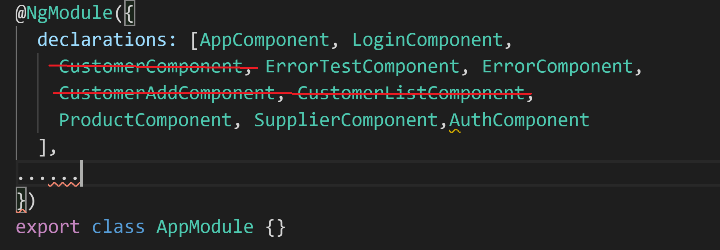
Figure 23.6
Discussion – Continued
As you can see, CustomerComponent, CustomerListComponent, and CustomerAddComponent are added to the declaration section of CustomerModule.
- But you can notice that there is no bootstrap section in the NgModule decorator.
The bootstrap section will be needed only in the root module to declare the root component. - You must have noticed the missing BrowserModule in the imports section.
That’s because services registered in the BrowserModule needed to be a singleton, and hence it is imported only in the root module.
Don’t worry much about it. In the next chapter, we will revise everything we learned about the Angular module regarding Services, Components, Routing, etc.
Lab – Continued
Step 15 – Create other Angular Modules
Next, create SupplierModule and ProductModule as follows.
import { NgModule } from '@angular/core';

import { SupplierComponent } from '../Supplier/supplier.component';

@NgModule({

  declarations: [SupplierComponent],

})

export class SupplierModule { }

import { NgModule } from '@angular/core';

import { ProductComponent } from './product.component';

@NgModule({

  declarations: [ProductComponent],

})

export class ProductModule { }
Again, don’t forget to remove the respective components from AppModule.
Step 16 – Reconfigure the route for lazy loading
Open app.route.ts file and modify your routes to the following.
export const AppRoutes: Routes = [

  { path: 'login', component: LoginComponent },

  {

    path: '',

    component: AuthComponent,

    canActivate: [AuthGuard],

    children: [

      {

        path: 'customer',

        loadChildren: () =>

          import('src/app/Customer/customer.module').then(

            (x) => x.CustomerModule

          ),

      },

      {

        path: 'supplier',

        loadChildren: () =>

          import('src/app/Supplier/supplier.module').then(

            (x) => x.SupplierModule

          ),

      },

      {

        path: 'product',

        loadChildren: () =>

          import('src/app/Product/product.module').then(

            (x) => x.ProductModule

          ),

      },

      {

        path: '',

        redirectTo: 'customer',

        pathMatch: 'full',

      },

    ],

  },

  { path: 'error-test', component: ErrorTestComponent },

  { path: 'error', component: ErrorComponent },

  { path: '**', redirectTo: 'customer', pathMatch: 'full' },

];
As you can see, we have removed references for all the components, and instead, now we are referring to modules.
Also, while defining routes, Instead of the component, we are using loadChildren.
Step 17 – Define child routes
There is one last step we need to perform to make lazy loading working. Define child routes and configure them in respective Angular modules as follows.
const childRoute: Routes = [{ path: '', component: CustomerComponent }];

@NgModule({

  imports: [RouterModule.forChild(childRoute)],

  declarations: [

    CustomerComponent,

    CustomerListComponent,

    CustomerAddComponent,

  ],

})

export class CustomerModule {}

const childRoute: Routes = [{ path: '', component: SupplierComponent }];

@NgModule({

  imports: [RouterModule.forChild(childRoute)],

  declarations: [

    SupplierComponent

  ],

})

export class SupplierModule { }

const childRoute: Routes = [{ path: '', component: ProductComponent }];

@NgModule({

  imports: [RouterModule.forChild(childRoute)],

  declarations: [

    ProductComponent

  ],

})

export class ProductModule { }
Step 18 – Check the console
I am not sure if you had a chance to look into your command prompt where the Angular application was executed. You will find a bunch of errors been thrown by CustomerAddComponent and CustomerListComponent.
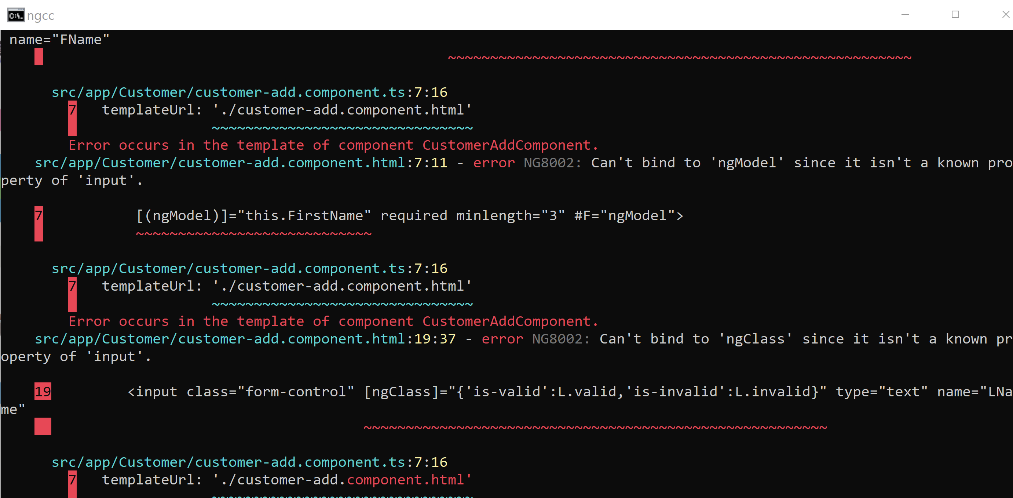
Figure 23.7
Scroll down, and you will be able to find an error for *ngFor thrown by CustomerListComponent, *ngIf by CustomerComponent, and ngModel CustomerAddComponent.
Discussion – Continued
As you know, a component in Angular belongs to an Angular.
The same rule applies to directives and pipes. (Soon, we will create custom directives and pipes, and then you will see it in action.)
We have already spoken about the Modules once before in this book – In ES6 learning and TypeScript learning. The idea of the module is the same everywhere.
Whatever is defined inside one module will be by default private to that module and won’t be accessible outside. If one module wants to access the stuff defined in another module, then the second module needs to import the first one.
ngModule
If you remember, in our earlier code CustomerAddComponent was part of AppModule, and we did import FormsModule in the AppModule. That is how we were able to use directives such as ngModel in CustomerAddComponent.
In the new code, CustomerAddComponent is defined as part of CustomerModule. We never imported FormsModule in the CustomerModule. That is why we are getting such an error.
Importing FormsModule in CustomerModule will solve a whole bunch of errors thrown in CustomerAddComponent.
*ngFor,*ngIf, and ngClass
But this will not resolve the error thrown by CustomerListComponent about *ngFor.
*ngFor, *ngIf, ngClass are directives defined inside CommonModule.
To solve the error about those directives, we need to import CommonModule in the respective module.
Now I am sure that there is one big question that is troubling you. How was it working earlier?
Earlier, CustomerListComponent was part of AppModule. I know you will immediately say, “but we haven’t imported CommonModule in AppModule.” It is true, but you have imported BrowserModule, which internally imported CommonModule. (You will learn more about Angular modules in the next chapter.)
Then why not we are not importing BrowserModule in CustomerModule?
BrowserModule also configures injectors for some services that are responsible for DOM manipulations and many other browser-related services. Those services are expected to be singleton at the application level. Re-importing it again will throw the following error.
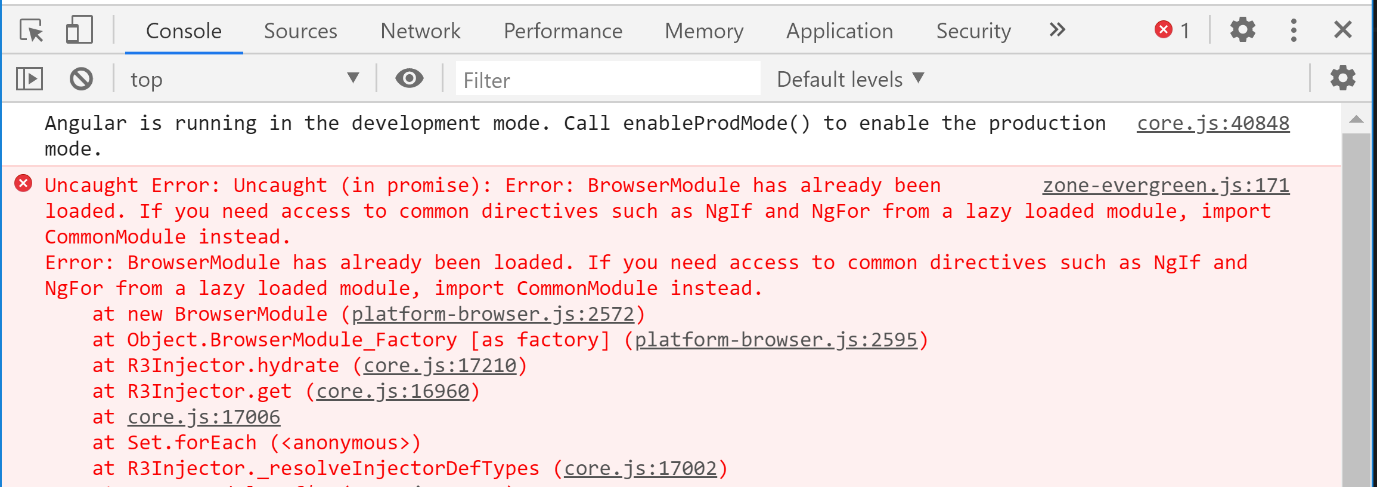
Figure 23.8
Lab – Continued
Step 19 – Import Forms and CommonModule
Import both FormsModule and CommonModule in CustomerModule.
@NgModule({
  imports: [RouterModule.forChild(childRoute),CommonModule,FormsModule],
  declarations: [
    CustomerComponent,
    CustomerListComponent,
    CustomerAddComponent,
  ],
})
export class CustomerModule {}
Step 20 – Check the output
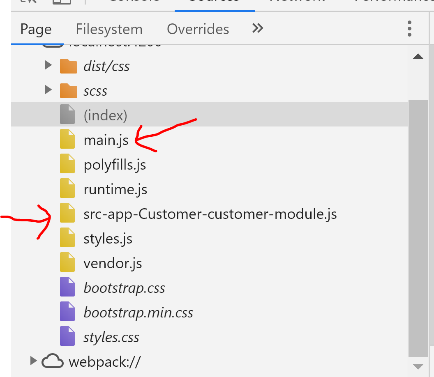
Make sure that all routes are working as before. After that, open developer tools and check the source tab.
You will find main.js, but along with that, you will also find another JavaScript file related to the customer.
Figure 23.9
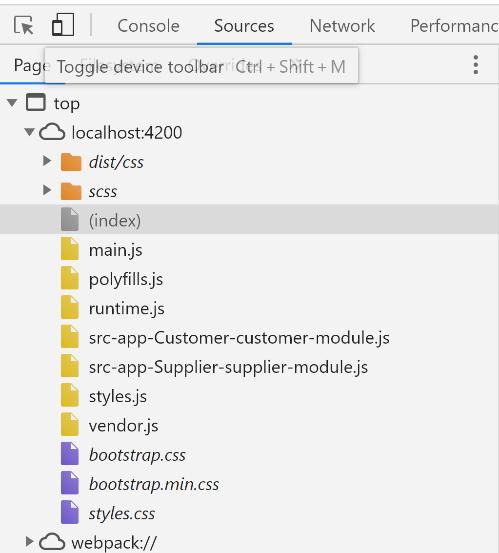 Next, click the supplier link, and you will find that the JavaScript file related to the supplier gets loaded. The same goes for the product.
This is called lazy loading. Based on the need, components/modules are loaded.
Step 21 – Build the project
Build the project using the ng build command and check the generated files. You will find one bundle for each lazily loaded module.
Figure 23.10
What are lazily loaded? – Modules, or Components.
When you go through this concept, sometimes you will hear modules are lazily loaded and sometimes components. So what exactly loaded lazily.
The answer is both. Modules are lazily loaded, and so their corresponding components.
Is bundling good or bad?
I am sure you must be wondering about one thing now.
Earlier, while learning JavaScript, we spoke about bundling’s advantages. We said we need bundling, and now we are finding a way to create multiple bundles.
Let me clarify it.
Bundling is indeed good, but the bundle should not be huge. If it is too big, then break it down into multiple.
Most of my clients always have this issue. I have seen projects with a bundle size of more than 30MB.
Does that mean we should lazy load every module?
In our case, I configured my route in a way that each module will load lazily. Hence for each module, one bundle gets generated, but that won’t be the case in a real-time project.
If you do that, then there is no point in bundling at all. It would be like to load everything on demand.
Hybrid approach
In real-time, make that decision wisely. Load a couple of modules eagerly and load some of them lazily.
For instance, look at the following sample routing.
export const AppRoutes: Routes = [
  { path: 'login', component: LoginComponent },
  {path:'',component:AuthComponent,children:[
    {
      path:'config',
loadChildren:import("src/app/master/maser.module").then(x=>x.MasterModule)
    },
    {
      path:'exec',
loadChildren:import("src/app/transaction/transaction.module").then(x=>x.TransactionModule)
    }
  ]},
];
@NgModule({
  declarations: [LoginComponent,HeaderComponent,AuthComponent],
})
export class InitialModule { }
@NgModule({
  imports:[InitialModule,RouterModule.forRoot(AppRoutes)],
  declarations: [AppComponent],
})
export class AppModule   { }
You can see four Angular modules in action in the above code – AppModule, InitialModule, MasterModule, and TransactionModule.
-
- Assume that LoginComponent, HeaderComponent, and AuthComponent are declared as part of InitialModule.
- Assume that MasterModule has CustomerComponent and ProductComponent.
- Assume that TransactionModule has CheckoutComponent and CheckInComponent.
- AppComponent is the root component, and AppModule is the root module. So it will be loaded during the application initiation time, and it will be included in the main bundle.
- InitialModule is directly imported into the AppModule. So it will be eagerly loaded, and so it will be included in the main bundle.
- MasterModule will be lazily loaded, so a separate bundle will be created for this module, containing both CustomerComponent and ProductComponent.
- TransactionModule will be lazily loaded, so a separate bundle will be created for this module, containing both CheckoutComponent and CheckInComponent.
Let’s explore each of these two modules.
export const configRoutes: Routes = [
  { path: 'customer', component: CustomerComponent },
  { path: 'product', component: ProductComponent },
];
@NgModule({
  imports:[RouterModule.forChild(configRoutes)],
  declarations: [CustomerComponent ,ProductComponent],
})
export class MasterModule  { }
MasterModule has configured routes for two of its components.
export const execRoutes: Routes = [
  { path: 'cout', component: CheckoutComponent },
  { path: 'cin', component: CheckInComponent },
  { path: 'bal', component: BalanceSheetComponent },
  { path: 'pnl', component: ProfitAndLossComponent },
];
@NgModule({
  declarations: [BalanceSheetComponent ,ProfitAndLossComponent],
})
export class ReportModule { }
@NgModule({
  imports:[ReportModule],
  declarations: [CheckoutComponent ,CheckInComponent],
})
export class TransactionModule  { }
Look at the TransactionModule. It has not only configured routes for each of its components but the components of ReportsModule too. TransactionModule has imported the ReportsModule. Hence ReportsModule gets loaded when TransactionModule is loaded. On top of that, all the components in the ReportsModule become part of the same bundle.
In short, ReportModule and TransactionModule will be included in the same module.
So overall, the above example has three lazy loaded modules -main, master, and transaction.
Pre-loading strategy
Lazy loading is a nice feature as it makes the bundles smaller and reduces the initial load—the Angular loads the module when the user requests it for the first time.
The Angular allows us to optimize our app further using a technique called PreLoading – loading the lazy-loaded Modules in the background asynchronously while the user is interacting with the app. This will help boost up the loading time of the app
When we configure our routes using the forRoot method, we have a second argument to specify a strategy.
RouterModule.forRoot(AppRoutes, { preloadingStrategy: NoPreloading }))
It can have two possible values.
NoPreloading – It is the default one. It means you don’t want to pre-load, and so modules configured to be lazy load will be downloaded on demand.
PreloadAllModules — It means you want to load all the lazy loaded modules asynchronously in the background.
By Pre-loading the lazy loaded module, the user does not have to wait for the module to be downloaded. All the modules will be already downloaded in the background.
Try executing our project using both strategies. It would be pretty straightforward. Just run and in the developer tools, find out what is loaded and what is not.
Are you confused between eager loading and lazy loading with PreloadAllModules?
Eager loading
Make modules part of one bundle, and that will be loaded in the beginning.
Lazy loading with NoPreloading
A separate bundle for each lazy-loaded module will be created, which will be loaded on demand.
Lazy loading with PreloadAllModules.
A separate bundle for each lazy-loaded module will be created, and all of them will be loaded asynchronously in the background.
Custom pre-loading strategy
We can even create a custom preloading strategy to match our requirements. For that, we have to create a custom class inheriting from PreLoadingStrategy class and then define the preload method.
export class CustomPreloadStrategy implements PreloadingStrategy {
  preload(route: Route, load: () => Observable<any>): Observable<any> {
    if (true){
      return load();
    }
    else{
      return of(null);
    }
  }
}
The pre-load method will be called once for every lazy loaded route configured in the application.
As you can see, the first parameter of the pre-load method is the active route. We can use this to extract the information about the route, which is being loaded.
The second parameter is the Observable function, which we need to return if we want to pre-load this module. We can return Observable of null if we do not wish to pre-load the module.
Summary
That concludes our Routing learning, and with that, we finished our Station 12 journey.
- We learned how we could use the template property instead of templateUrl when component HTML is simple.
- We revisited the router-outlet component that displays different components for different URLs.
- We spoke about the routerLink directive that let us navigate between routes without a full page refresh.
- We learned about the routerLinkActive that lets us add CSS class if a specific route is active.
- We spoke about default routes that will get loaded if the URL is empty.
- We learned that we could define default routes at both root level and child level.
- We did a detailed about lazy loading and learned how it reduces the initial load time.
- We spoke about pre-loading strategies that let us decide if a lazy-loaded module needs to be loaded asynchronously or no.

