
Introduction
In the process of development, the database performs most important role in any type of application. In this article we’ll learn how to Use Entity Framework Core with code first approach step by step.
Agenda
- What is ORM and what is Entity Framework (EF)?
- What is Entity Framework Core?
- Getting started with EF Core.
What is ORM? and What is EF?
-
-
- ORM stands for Object Relational Mapping.
- Basically ORM is a thought or technique by which ORM tool was developed. ORM tools let us automate the mapping between Object oriented world and Relational World.
- ORM enables developers work with data objects using classes without focusing on database tables and columns.
- Few years ago, we(developers) write ADO.NET code for
- Save or Retrieve data from database,
- Open a connection to the database,
- Create a DataSet to fetch or submit the data to the database,
- Convert data from the DataSet to .NET objects or vice-versa.
ORM automate all these databases related activities for your application
- With ORM, it is easier to determine the correctness of your queries faster through compile time errors and tests.
- ORM tools
- NHibernate
- Dapper
- LINQ
- EF
- Entity Framework is a Microsoft ORM tool.
-
What is Entity Framework Core?
Entity Framework Core is the new version of Entity Framework after EF 6.x.
EF Core introduces many improvements and new features when compared with EF6. At the same time, Because of EF Core is new it is not as mature as EF6.
Features of EF Core
-
- Lightweight – The Name Lightweight consist all the information about it, relatively simpler or faster.
- Extensible – The term extensibility can also be seen as a systemic measure of the ability to extend a system and the level of effort required to implement the extension.
- cross-platform -It enables development on several competing. Also called multi-platform. It can run on Windows, Linux and Mac.
Basically, this information is not enough for understand the concepts of Lightweight, Cross Platform and Extensible. Actually, this is vast topics. In this article we try to get some idea about it and not go in depth. I’ll try to write an Article on this topic in one of my next series, in that I’ll cover brief idea about this points.
EF Core supports two development approaches
-
- Code First –
In code first approach we will first create entity classes with list of properties defined in it. Entity framework will create the database and tables based on the entity classes.So database is generated from the code. - Database First–
In database first approach Database and tables are created first. Then you create entity Data Model using the created database.
- Code First –
In this article we’ll starts for creating console application with code first approach and will discuss Database First in some of later series of article.
Demo on EF core
Step 1
Create Application
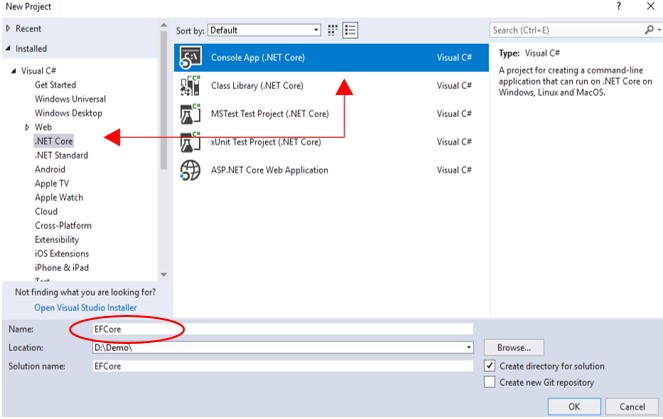
Create simple console application. You can follow below steps for creating an ASP.NET Core Console Application in Visual Studio 2017.
-
- Open Visual Studio 2017 and select File->New->Project.
- On the left side of popup screen select Web->.NET Core.
- In that, select Console App(.NET Core).
- Name the solution “EFCore”.
Step 2
Define EF Core Entities
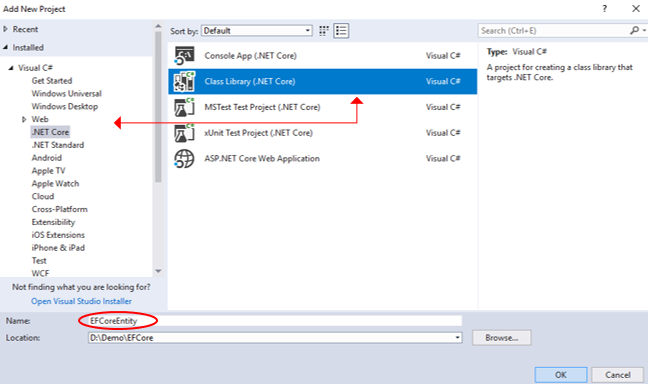
Create list of entities which objects are going to use for mapping to interact with Database. For this first we need to add a new class library.
To add a new class library just right click on solution Add->New Project->select Class Library(.NET Core).
Add Classes
Add new class Employee and Department into EFCoreEntity project, which has list of properties.
Steps to be follow: Right click on EFCoreEntity project click on Add->Class.
Please have look on below shared snapshot of Employee and Department classes. In that,I have added list of properties.


Step 3
Define EF Core Data Model
Now it’s time to add one more class library for Data Access Layer and name it as EFCoreDAL.
Data Access Layer(DAL) helps to interact with Database and .NET objects. DAL layer is act as an interpreter between Entity and Database.
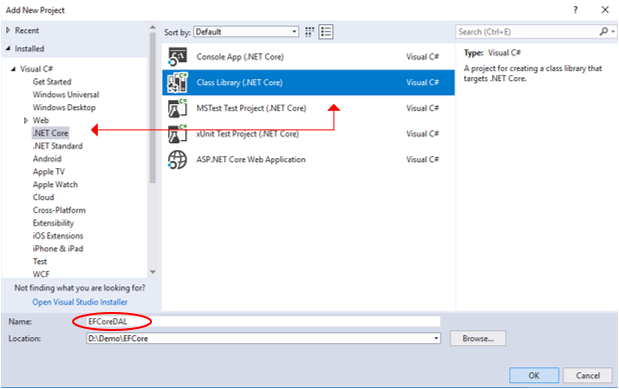
Now, It’s time to install EF Core into your DAL layer because it acts as an interpreter between our Entities and Database. So that we need to install EF Core into EFCoreDAL project.
Step 4
EF Core Installation
To use EF Core we have to install two things
-
- EF Core Database Provider.
- EF Core tools.
EF Core Database Provider
First we install Microsoft.EntityFrameworkCore.SqlServer to access MS SQL Server Database. Steps to be follows:
1) Right click on EFCoreDAL project in the solution explorerselect Manage NuGet Packages.
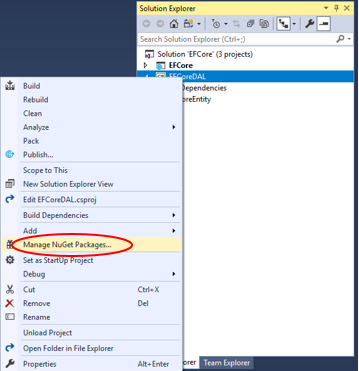
2) Search For Microsoft.EntityFrameworkCore.SqlServer, make sure that it has the .NET symbol and the Author is Microsoft. Click Install.
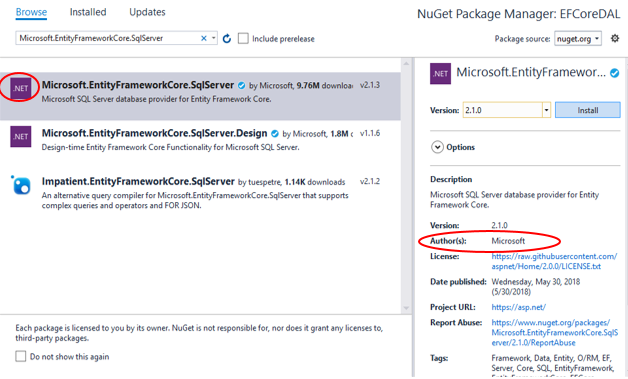
3) Following popup will appear which include list of packages. Click on Ok.

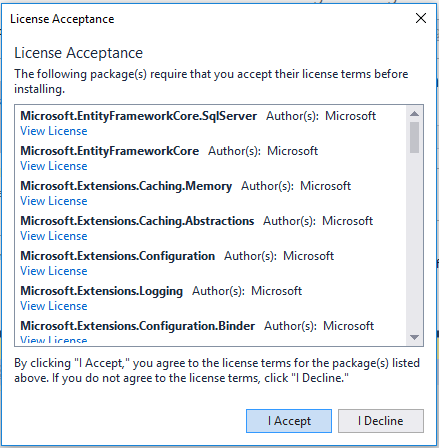
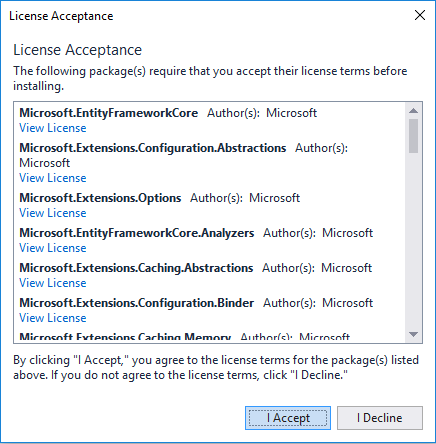
4) Accept the license terms associated with the packages that are going to be installed.
EF Core tools
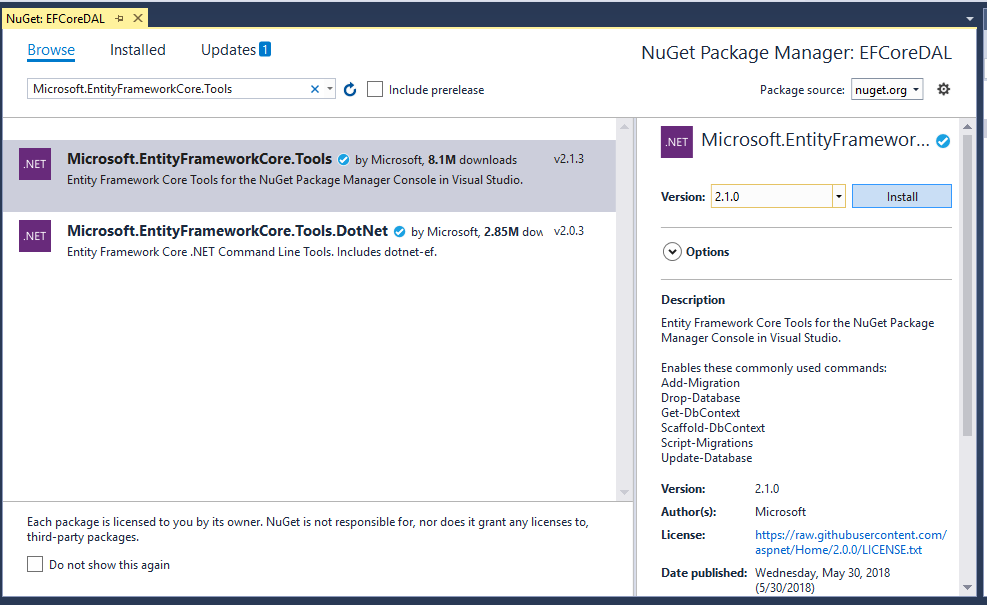
5) Install EF Core Tools. In NuGet Package Manager search for Microsoft.EntityFrameworkCore.Tools and install it. This will allow you to execute EF Core commands for scaffolding, migration etc.
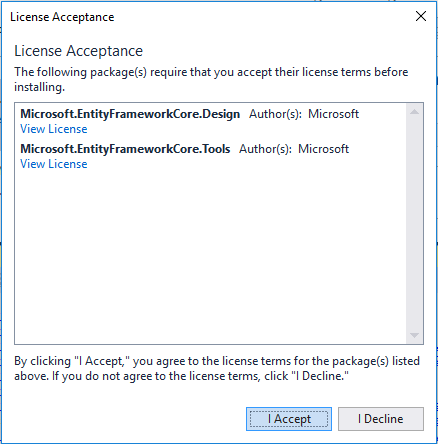
6) Following popup will appear with list of packages. Click on Ok then accept the license.

Step 5
Add DataContext
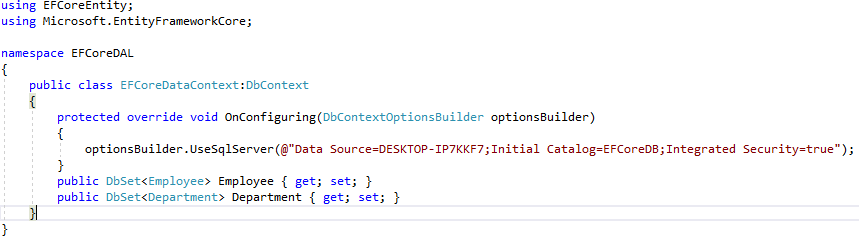
Add new class in DAL project, name it as EFCoreDataContext. This class needs to be derive from DBContext class. The DBContext class is use for:
-
- Manage database connection,
- Configure Models & Relationship,
- Querying Database,
- Saving data into database.
This context class also includes DBSet<Entity> properties for each entity in the model.Which is use to map the tables in the underlying database.
OnConfiguring() method,is an instance of DbContextOptionsBuilder used to specify which DB to use.
Step 6
Create Database
After creation of DataContext and Entities, now it’s time to add migration for creating the database.
Adding Migration
EF Core include many Migration commands to create or update the database based on the model. Right now we don’t have database “EFCoreDB”. So we need to create or add database by adding Migration.
Steps which are used to create Migration are as follows
-
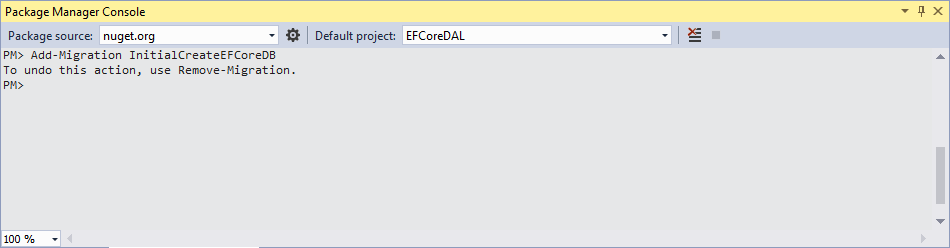
- Tools -> NuGet Package Manager -> Package Manager Console.
- Run command in Package Manager Console: Add-Migration InitialCreateEFCoreDB
Add-Migration command scaffolds a migration to create the initial set of tables for the model.While adding migration remember to select default project EFCoreDAL.
Now talking about, what is “InitialCreateEFCoreDB”? It’s just a name given to the migration.
While executing add migration command you are supposed to face below mentioned error.
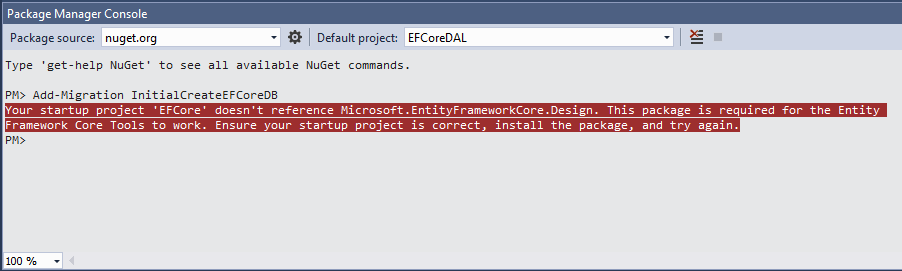
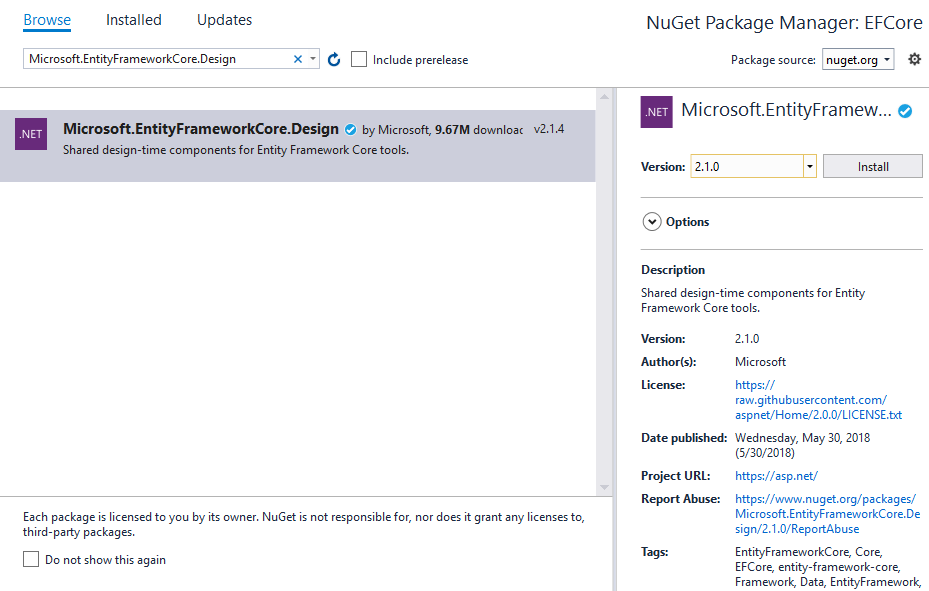
Above error shown only because we haven’t add “Micosoft.EntityFrameworkCore.Design” package from NuGet Package Manager into console application.
Let’s add “Micosoft.EntityFrameworkCore.Design” package into EFCore project.
Steps:
-
-
- Right click on EFCore project ->select Nuget Package Manager.
- Search for “Micosoft.EntityFrameworkCore.Design” package ->Install it.
-
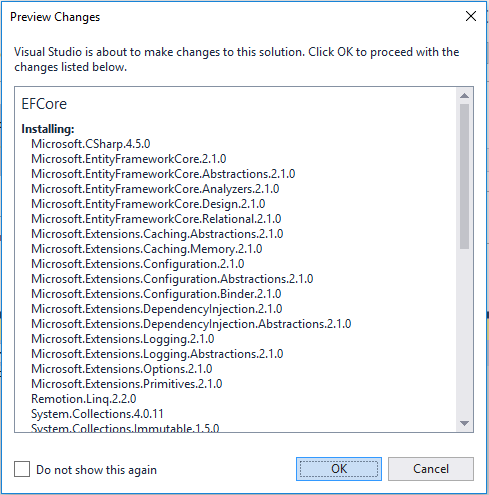
It will add list of packages then ask for accepts the agreement. So just click on ‘Ok’ then ‘I Accept’.
A snapshot shared below contain one more error.

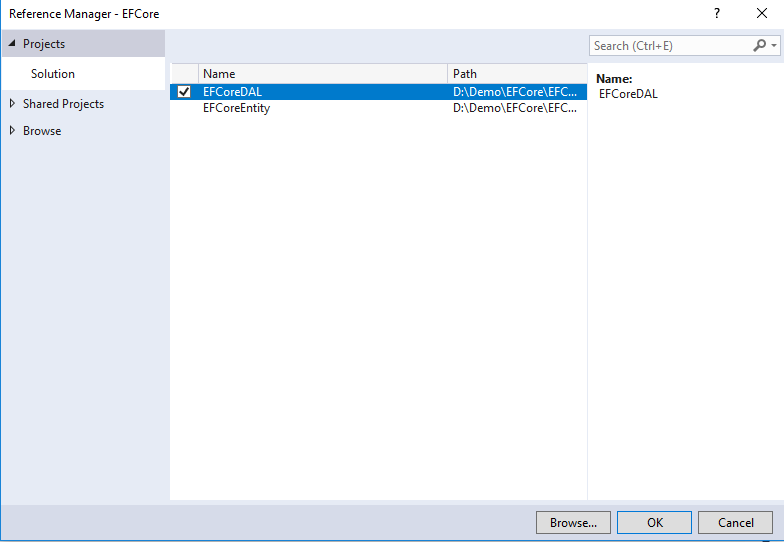
We have received above error because we haven’t added the reference of EFCoreDAL project into EFCore console project.
Let’s starts for adding reference:
-
- Right click on EFCore project->Add->Referrence.
- On left side of popup screen select Project.
- Just select EFCoreDAL project.
Now, we have solved all the errors. Now it’s time to start adding Migration. Just type Add-Migration command in console.
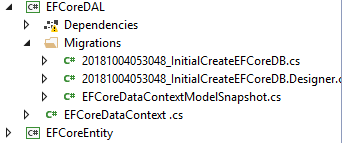
If you observe EFCoreDAL project, there is one additional folder was added by Migration command i.e. Migrations, which contains a script to initialize the database.
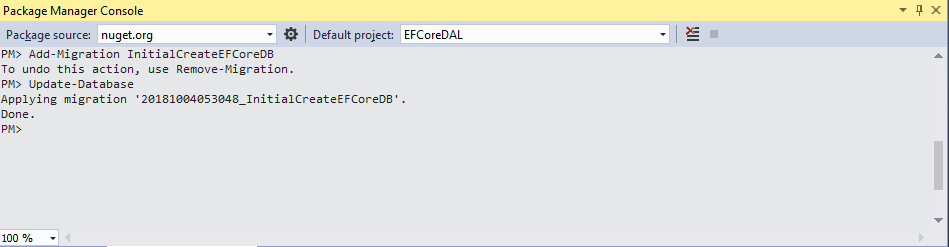
After creation of migration, we still need to create the database using the Update-Database command in the Package Manager Console, as below.
-
- Run Update-Database: Update-Database command creates the database and applies the new migration to it.
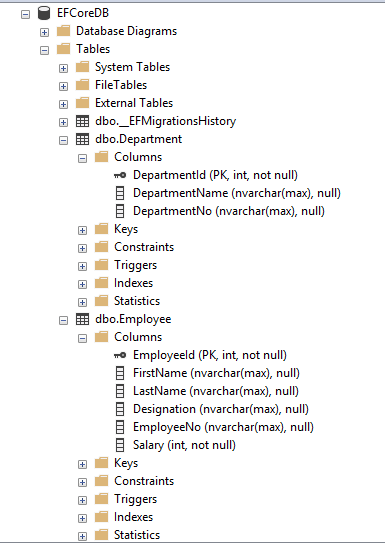
And here I share the snapshot of newly created database EFCoreDB with table Employee, Department and EFMigrationsHistory. In this all the tables which is our Classes is added into the DB.
So, today we have learned how to create Database and tables using code first approach using Entity Framework Core.
I hope this article will help you. Please put your feedback using comment which helps me to improve myself for next post. If you have any doubts, please ask your doubts in the below comment section. If you like this post, please don’t forget to share it with your friends. Thank You!


Good start..keep going